
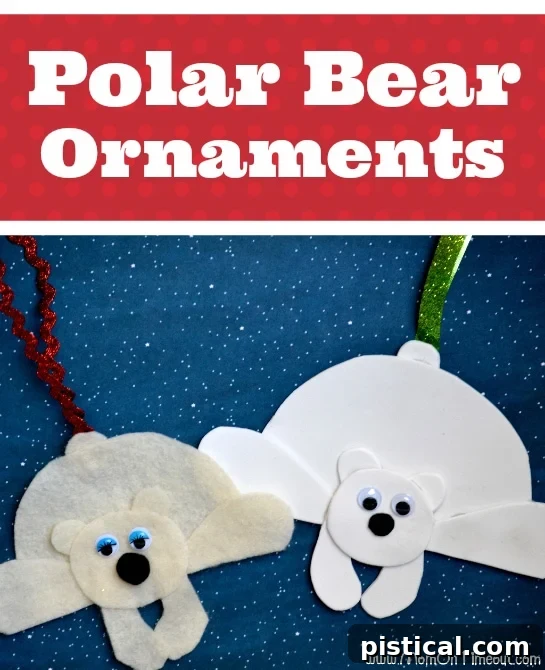
Easy DIY Polar Bear Ornaments: A Whimsical Christmas Craft for Kids!
As the holiday season draws near, there’s nothing quite like gathering the family for a cozy crafting session. And what could be more delightful than creating charming polar bear ornaments to adorn your Christmas tree? This simple yet incredibly rewarding DIY project is perfectly suited for children of all ages, offering a fantastic opportunity for imaginative play, fine motor skill development, and cherished family bonding. Get ready to transform basic craft supplies into adorable arctic friends that will bring a unique, handmade touch to your festive decor.
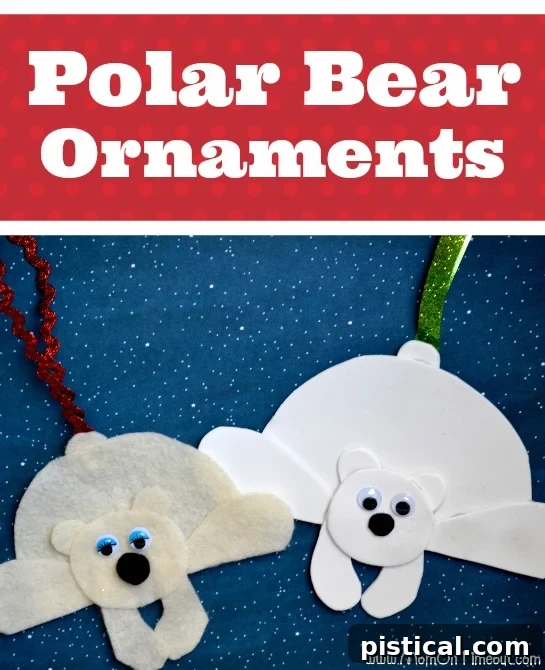
Why Choose Polar Bear Ornaments for Your Holiday Crafting?
Polar bears, with their majestic presence and gentle demeanor, are quintessential symbols of winter and the festive season. Crafting these beautiful creatures not only ties into the joyful spirit of Christmas but also introduces children to themes of arctic wildlife and winter wonderlands. These easy handmade ornaments stand out for their adorable simplicity, allowing for a high degree of personalization. Each polar bear can develop its own unique personality through different expressions and tiny details, making every creation a one-of-a-kind masterpiece. Unlike more complex crafts, these require minimal materials and steps, ensuring a fun, frustration-free experience for young crafters and busy parents alike.
The Magic of Crafting with Children: More Than Just an Ornament
Engaging in kids holiday crafts offers far more than just a finished product. It’s an invaluable experience that fosters creativity, problem-solving skills, and hand-eye coordination. Working on projects like these polar bear ornaments helps children develop their fine motor skills as they cut, glue, and arrange small pieces. It encourages them to follow instructions, yet also provides room for individual expression, boosting their self-confidence. Moreover, crafting together creates lasting memories, strengthens family bonds, and establishes wonderful holiday traditions. Imagine looking back years from now at these little homemade ornaments, each one carrying the story of a joyful afternoon spent together.
Gather Your Supplies: What You’ll Need for Your Polar Bear Craft
One of the best aspects of this DIY project is the simplicity of the materials. You likely have many of these items already at home, making it an incredibly accessible and affordable craft. Here’s a detailed list to get you started on your adorable polar bear adventure:
- White material (Foam, Felt, or Construction Paper): This will form the main body, head, and limbs of your polar bear. Each material offers a slightly different texture and workability.
- Googly Eyes: Available in various sizes, these add instant personality and charm to your polar bears. Consider different sizes for varied expressions!
- Black material for the nose: Options include small pieces of black felt, foam, or construction paper. Alternatively, a tiny black pom-pom can create a delightful three-dimensional nose.
- Craft Glue or Hot Glue: Standard liquid craft glue (like school glue) works well for paper and foam, offering a safer option for younger children. For felt or faster drying, a low-temperature hot glue gun (used with strict adult supervision) is ideal.
- Scissors: Child-safe scissors are recommended for kids to cut paper or foam. For cutting felt, a sharper pair of craft scissors will be more effective and should be handled by an adult or older, supervised child.
- Optional Embellishments: Ribbon or string for hanging, small white pom-poms for fluffy tails, glitter for a touch of sparkle, or markers for adding extra details like smiles or rosy cheeks.
Choosing Your Materials: Foam, Felt, or Paper?
The choice of material significantly impacts the final look and feel of your DIY polar bear craft, as well as the ease of creation for different age groups:
- Foam: Craft foam sheets are wonderful for younger children. They are thicker, easier to grip, and often simpler to cut with blunt-nosed child scissors. Foam also holds its shape well and gives the ornaments a slightly puffy, durable quality.
- Felt: Felt offers a soft, tactile experience. It’s great for adding a cozy, textured look to your polar bears. While slightly trickier to cut (requiring sharper scissors), felt pieces adhere well with various glues and won’t fray, making for a neat finish. Felt ornaments also tend to be quite durable.
- Construction Paper: This is the most readily available and budget-friendly option. Construction paper is easy to cut and glue, making it perfect for quick projects or if you’re making a large batch of ornaments. However, it is less durable than foam or felt and may require lamination or backing for longevity.
No matter your choice, each material will result in a uniquely charming Christmas tree decoration!
Step-by-Step Guide: Crafting Your Cute Polar Bear Ornaments
Now, let’s dive into the fun part: bringing your friendly polar bears to life! Follow these simple steps for a seamless crafting experience:
Step 1: Preparing Your Polar Bear Shapes
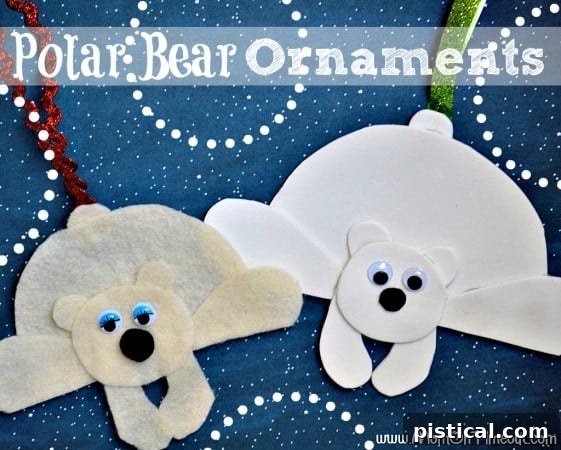
Begin by cutting out the individual components for each polar bear. You’ll need one main body shape, one head, two ears, two front legs, two back legs, and a small tail. To ensure consistency and ease, especially for multiple ornaments, consider creating a simple template from cardstock first. Trace these shapes onto your chosen white material (foam, felt, or paper) and carefully cut them out. As mentioned, foam is generally the easiest for little hands to cut, but felt offers a lovely soft texture if you’re using sharp craft scissors for precise cuts. An adult can pre-cut the pieces for very young children to simplify the assembly process.
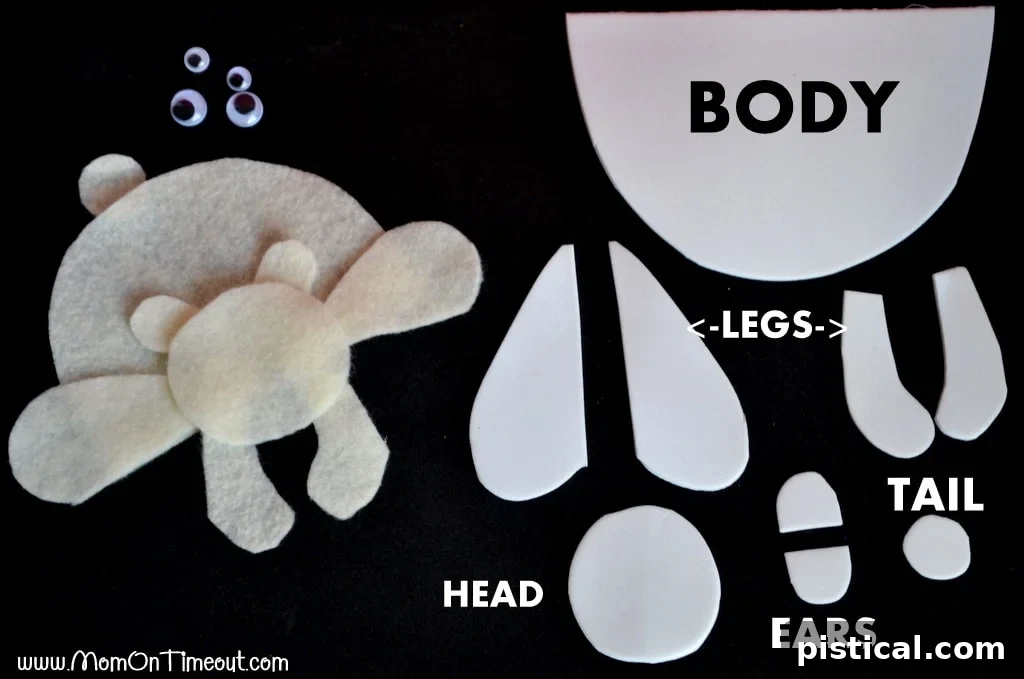
Step 2: Assembling the Legs
With all your pieces cut, it’s time for assembly! Start by taking the main body piece. Apply a small dab of glue to the top edge of each back leg piece and carefully attach them to the underside or lower back portion of the polar bear’s body. Then, do the same for the front legs, positioning them on the lower front side of the body. Ensure they are symmetrical and facing the correct direction to give your polar bear a balanced stance. If using liquid craft glue, hold each leg in place for a few seconds until it starts to set.
Step 3: Attaching the Head and Ears
Next, let’s give your polar bear its adorable face. First, take the two ear shapes. Apply a small amount of glue to the bottom edge of each ear and attach them to the top-back curve of the head piece. Make sure they are evenly spaced. Once the ears are in place, apply a line of glue along the bottom edge of the entire head piece (including the ears) and carefully secure it to the top of the polar bear’s body. Position the head so it looks like your polar bear is standing upright and alert.
Step 4: Adding a Playful Tail
Every polar bear needs a cute little tail! Take your small tail shape and apply glue to one side. Attach it to the back end of the polar bear’s body, usually slightly upward for a playful look. For an extra touch of fluffiness, you could also substitute the cutout tail with a small white pom-pom. Simply glue the pom-pom directly to the back of the body for a charming, three-dimensional effect.
Step 5: Bringing Your Polar Bear to Life with Face Details
This is where your polar bear truly gains its unique personality! Choose your googly eyes and apply a tiny dab of glue to the back of each one. Carefully position them on the upper half of the head, leaving enough space for the nose. Once the eyes are in place, select your black nose material (felt, foam, paper, or a pom-pom). Apply glue to it and center it just below and between the eyes. Experiment with different sizes of googly eyes and nose placements to create various expressions – some might look curious, others sleepy, and some wonderfully mischievous!
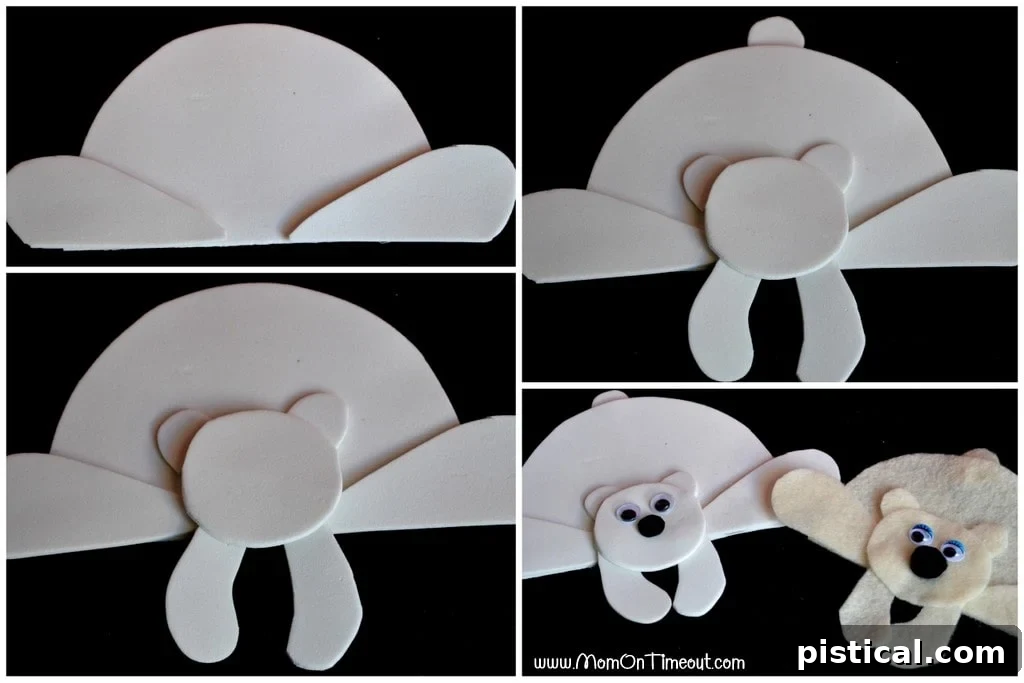
Step 6: Ready for the Tree! Adding the Hanger
The final step transforms your lovely creation into a hangable ornament! Cut a piece of ribbon or string, approximately 6-8 inches long. Form it into a loop and tie the ends together. Apply a generous dab of glue to the knotted end of the ribbon and firmly attach it to the top-back of your polar bear’s head or slightly behind its ears. Alternatively, you can glue the loop directly onto the top edge of the polar bear’s back for a different hanging style. Allow ample time for the glue to dry completely before hanging your beautiful festive season craft on the tree. This ensures it stays securely in place throughout the holidays!
Tips for Crafting Success and Personalization
To make your polar bear ornament crafting experience even more enjoyable and unique, consider these helpful tips:
- Supervision is Key: While this is an easy handmade ornament project, adult supervision is always recommended, especially when using scissors or hot glue.
- Create Templates: For a batch of uniform polar bears, create sturdy cardstock templates for each part (body, head, legs, ears, tail). This makes tracing and cutting much faster and more consistent.
- Experiment with Sizes: Don’t be limited to one size! Make a family of polar bears – large ones, medium ones, and tiny ones – for a diverse and adorable display on your tree.
- Add Personal Touches: Encourage creativity! Children can use markers to draw smiles, eyebrows, or rosy cheeks. Small scarves made from ribbon or tiny hats from felt scraps can add extra charm. A sprinkle of glitter before the glue dries can give your polar bears a “snowy” sparkle.
- Googly Eye Variety: Stock up on different sizes and colors of googly eyes. Using larger eyes can make the polar bears look more cartoonish and cute, while smaller ones give a more subtle expression.
- Let it Dry: Patience is a virtue in crafting! Ensure all glue has thoroughly dried before handling the ornaments too much or attempting to hang them. This prevents pieces from shifting or falling off.
Safety First: Important Reminders for Crafting with Kids
When crafting with children, safety should always be a top priority. Remind kids to be careful with scissors and always cut away from their body. If using a hot glue gun, it is essential for an adult to handle it exclusively or provide very close supervision for older children, emphasizing the importance of never touching the hot nozzle or freshly applied glue. Ensure good ventilation, especially if using strong-smelling glues, and always clean up any spills promptly.
Beyond the Tree: Creative Ways to Display Your Polar Bear Creations
While these polar bear ornaments are perfect for the Christmas tree, their charm isn’t limited to branches! Here are a few other ideas to display your adorable creations:
- Gift Tags: Glue a polar bear ornament to the front of a wrapped gift for a personalized touch that doubles as a present!
- Festive Garland: String multiple polar bears together with some cotton balls or glittery pom-poms to create a whimsical winter garland for a mantel or doorway.
- Window Decorations: Secure them to windows using suction cup hooks for a cheerful display.
- Fridge Magnets: Skip the ribbon and glue a small magnet to the back of each polar bear for a cute fridge decoration that can last all winter.
Explore More Festive Crafts for Kids!
If you loved making these charming DIY Christmas crafts, you’ll be thrilled to discover more delightful crafting ideas for the holiday season. Keep the festive spirit alive with these wonderful projects that are perfect for kids and adults to enjoy together. Each one offers a unique way to add handmade warmth to your home:
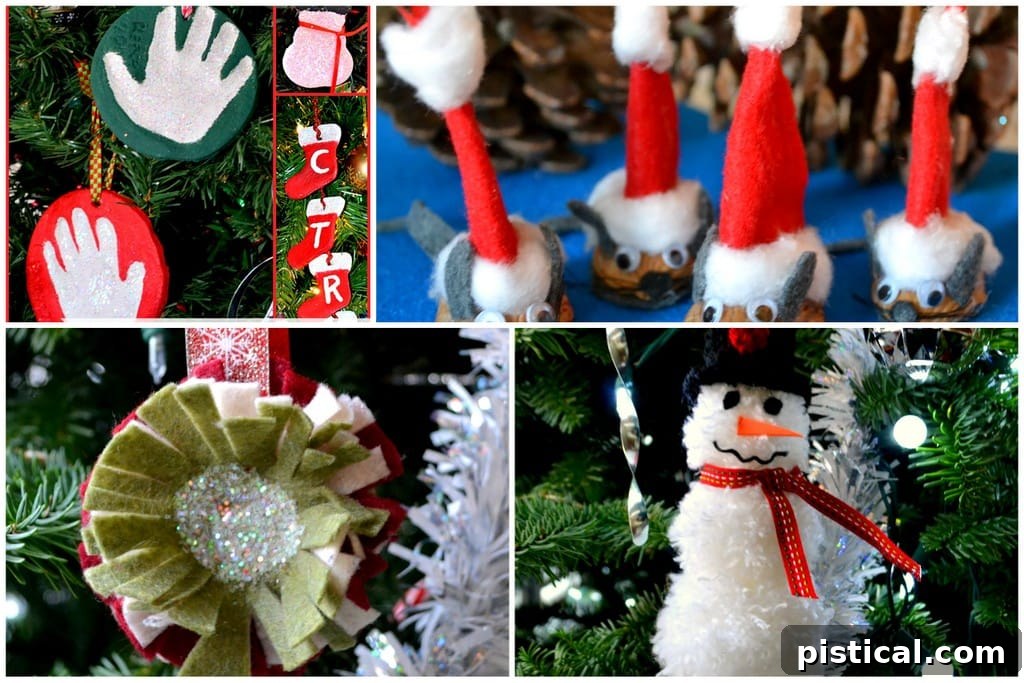
- Classic Salt Dough Christmas Ornaments: A timeless craft for creating custom shapes and memories, perfect for little hands to press and decorate.
- Adorable Santa Mouse Ornaments: Bring a cute, whiskered friend to your tree with this imaginative and engaging craft.
- Elegant Felt Flower Ornaments: Add a touch of handmade sophistication and color to your decor with these beautiful floral creations.
- Charming Pom Pom Snowman Ornaments: Craft these fluffy, frosty friends for a delightful winter wonderland feel on your tree or around the house.