

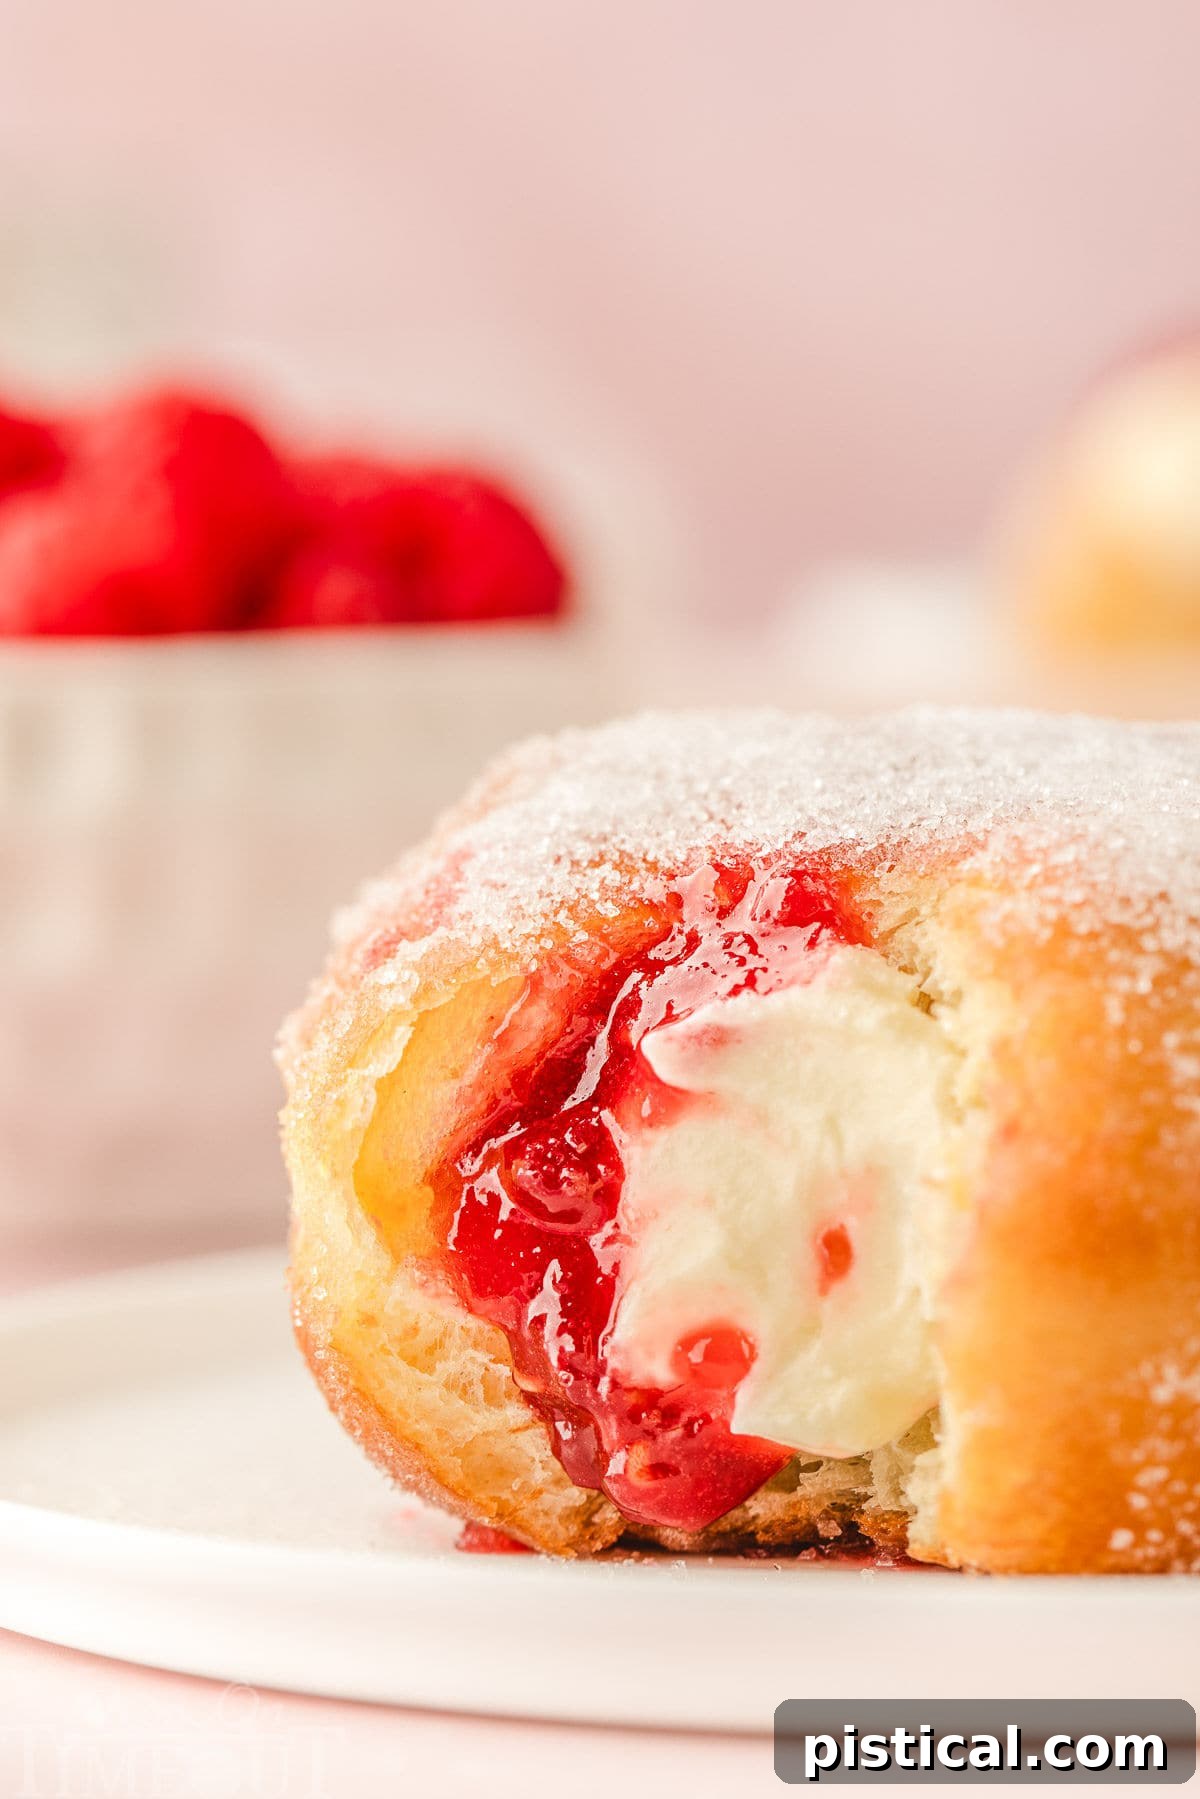
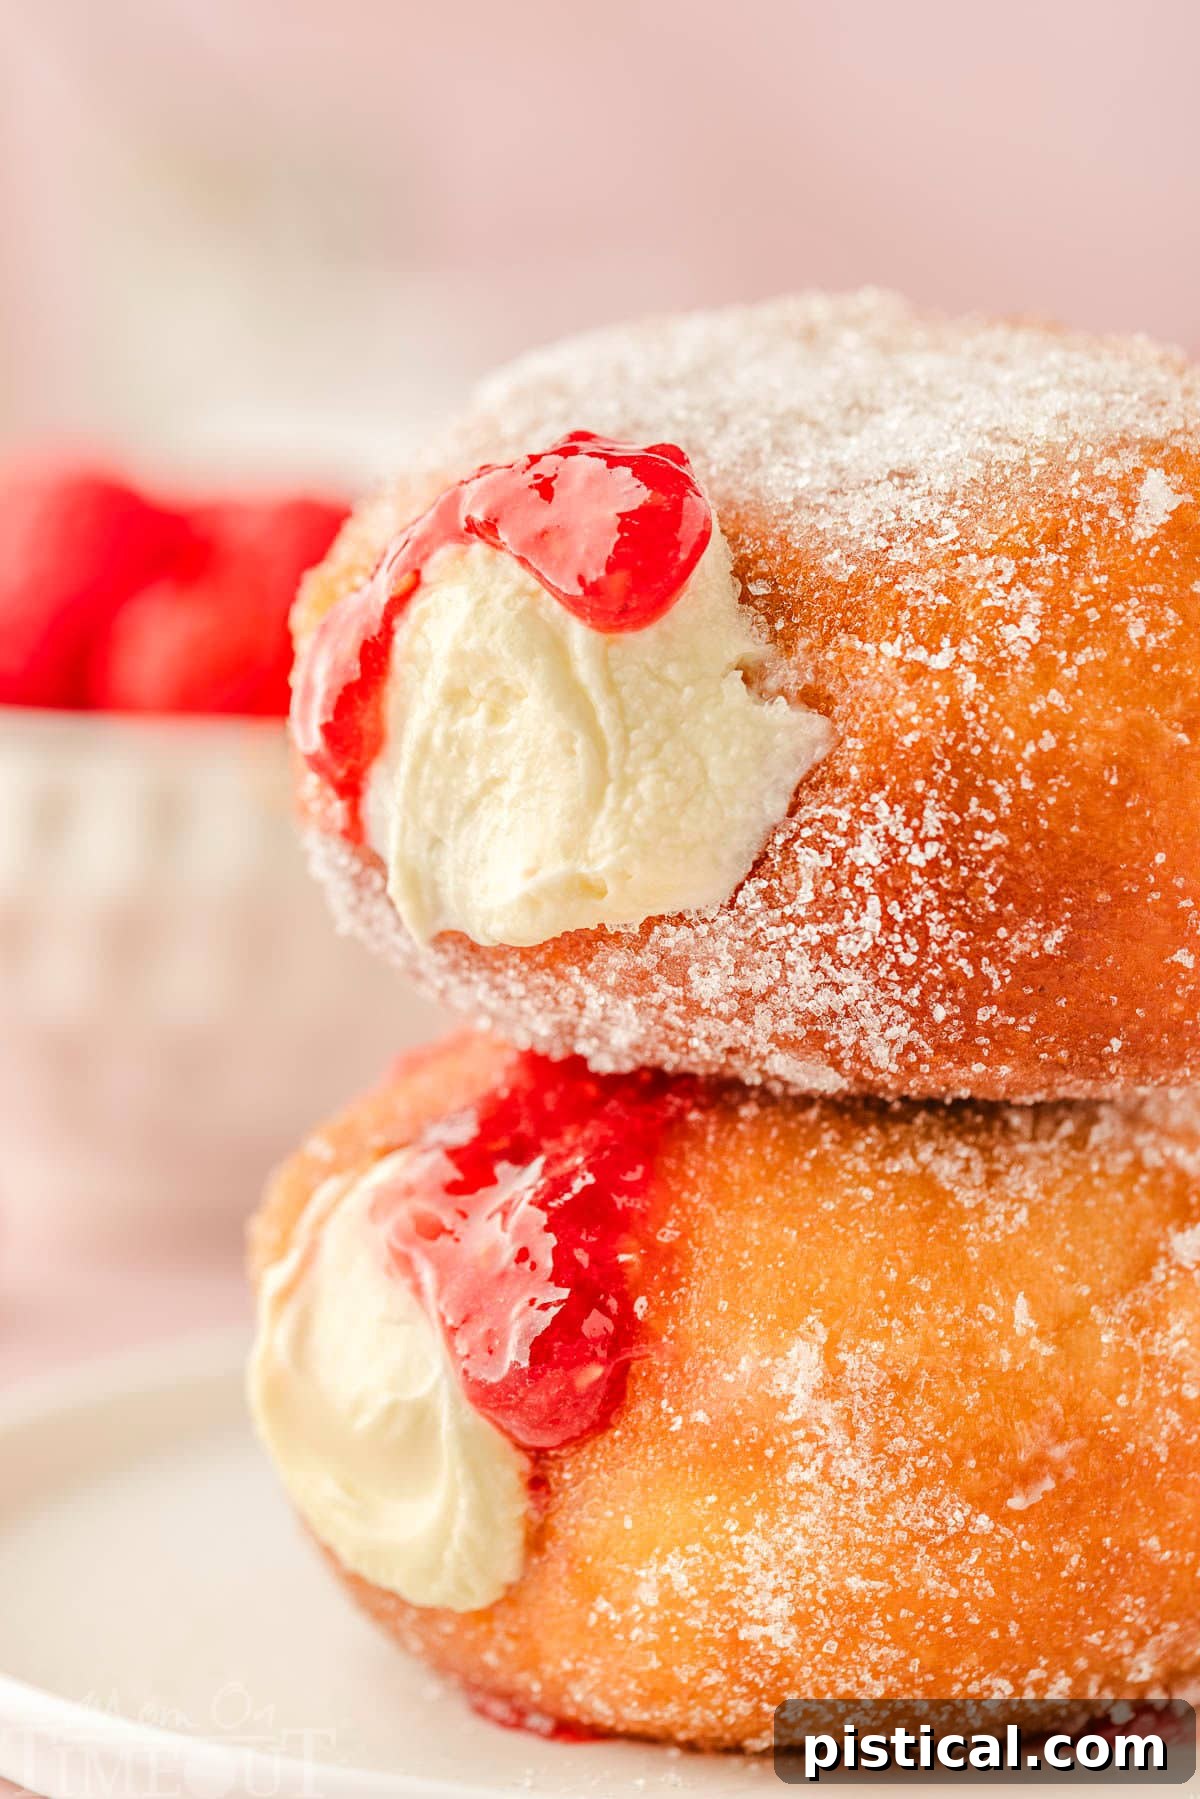
Prepare to be absolutely enchanted by these incredible Raspberry Cheesecake Stuffed Donuts! Imagine biting into a perfectly light and fluffy donut, delicately coated in sugar, only to discover a luxurious filling of creamy no-bake cheesecake perfectly complemented by a vibrant, tangy raspberry compote. These aren’t just donuts; they’re a sublime culinary experience, ideal for celebrating special moments or simply elevating your morning coffee or afternoon tea into a truly memorable occasion.
If you’re eager to explore more delightful homemade breakfast treats, be sure to check out my other cherished recipes: classic Glazed Donuts, beloved Jelly Donuts, and these wonderfully flaky Blackberry Turnovers!

Raspberry Cheesecake Stuffed Donuts: Your Guide to Homemade Perfection
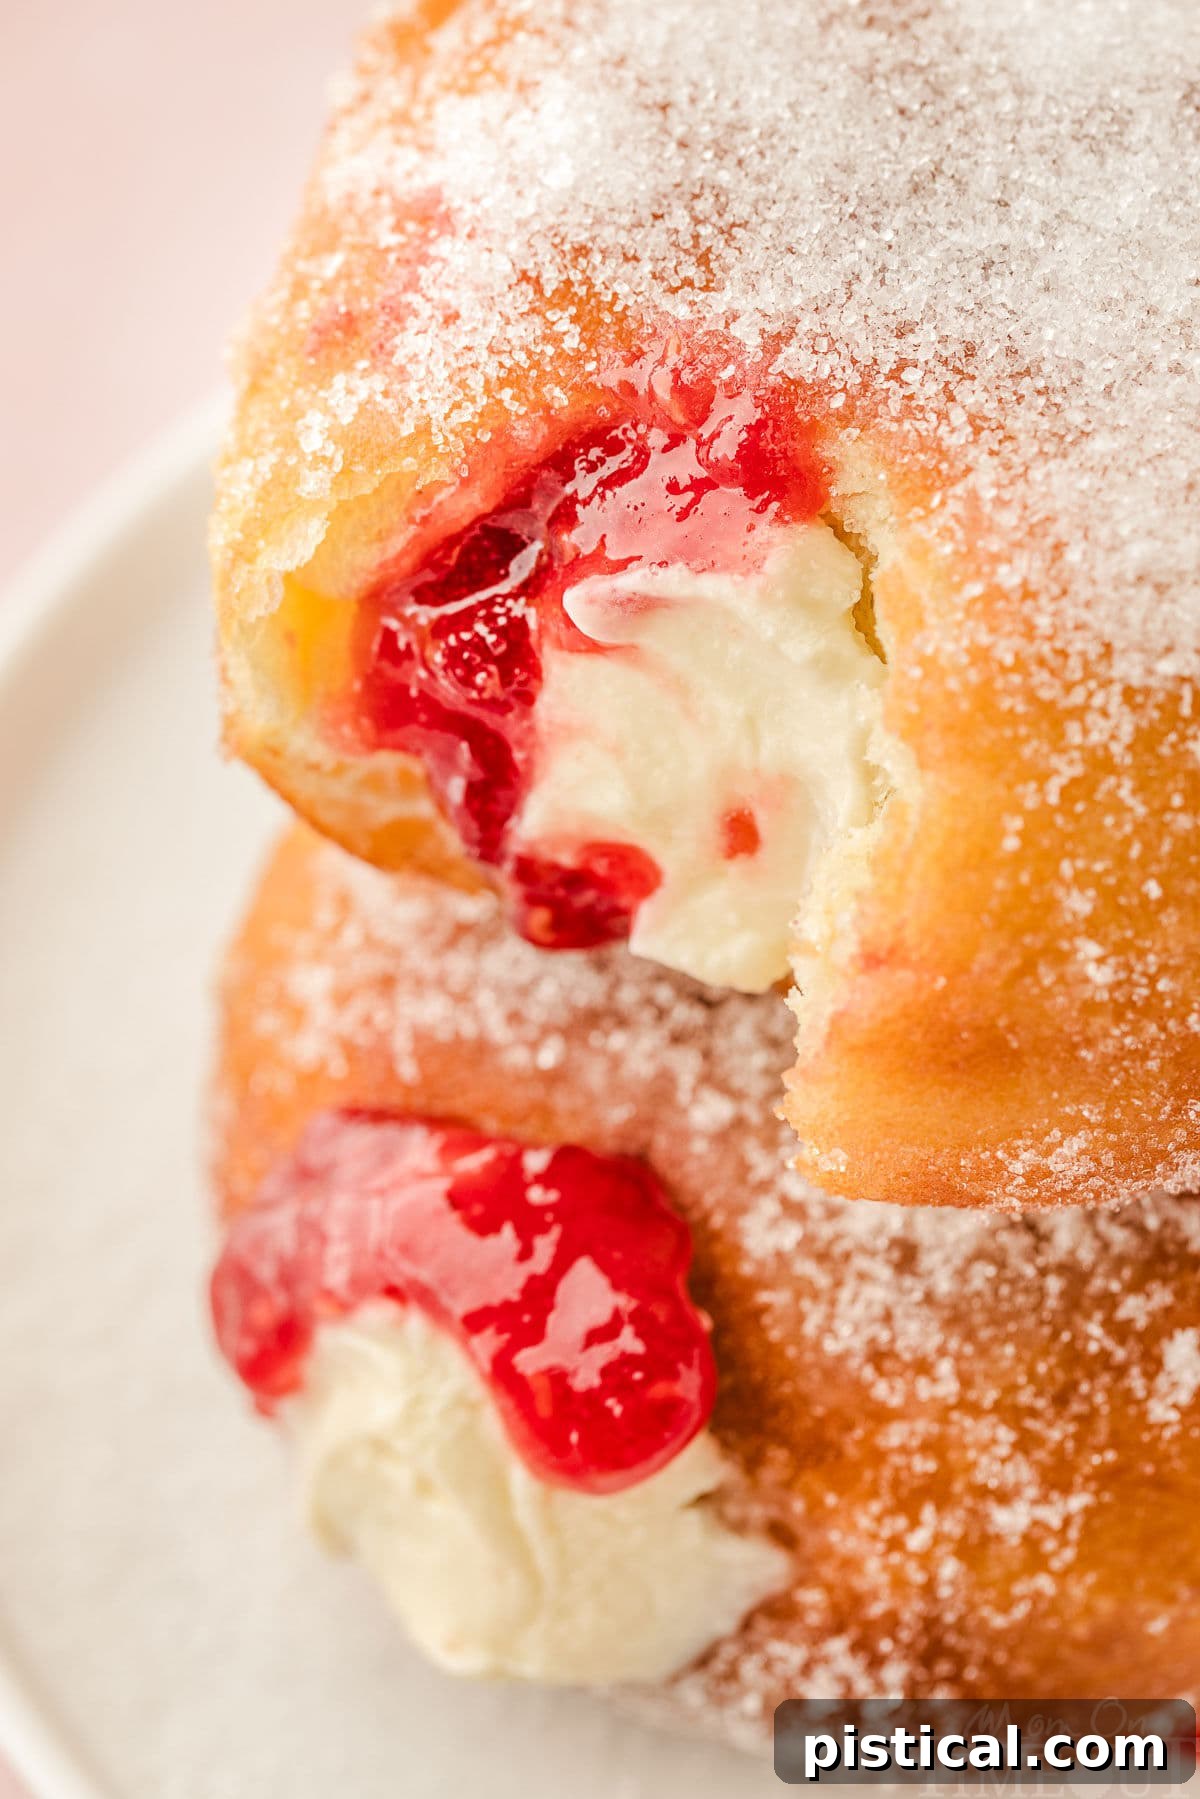
There’s an unparalleled joy that comes from savoring a homemade donut, and these raspberry cheesecake stuffed donuts transcend ordinary indulgence. Each bite delivers a perfect symphony of textures and flavors: a soft, pillowy interior encased in a golden, subtly crunchy sugar-rolled exterior, bursting with a decadent no-bake cheesecake filling and a bright, simple raspberry compote. This impressive yet easy-to-follow recipe is destined to become a staple for holidays, special celebrations, or simply as an extraordinary weekend treat.
Crafting these donut-shop-worthy delights from scratch in your own kitchen is surprisingly straightforward. Using everyday pantry staples like milk, butter, yeast, and eggs, you can whip up a batch whenever a craving strikes. This detailed guide will walk you through every step, ensuring your homemade donuts are nothing short of spectacular, bringing warmth and a heavenly aroma to your home.
Why You’ll Fall in Love with This Donut Recipe
These heavenly, homemade treats are not just for special occasions; they’re perfect for *any* occasion that calls for a truly unforgettable dessert. With their irresistible combination of a soft, cloud-like texture and a sweet, tangy, and creamy center, they are a treat that’s genuinely hard to resist. Here’s why these donuts will quickly become a favorite:
- Effortless Ingredients: You’ll be delighted by how simple the steps are and how easily you can find all the common ingredients in your pantry. Minimal equipment is needed, making this recipe a joy to follow!
- Unrivaled Texture: These donuts boast a ridiculously soft and fluffy interior, perfectly contrasting with a beautifully golden and slightly crisp exterior. The contrast with the smooth cheesecake and fruit compote creates a truly sensational mouthfeel. They are SO good!
- Customization at Your Fingertips: This base donut recipe is incredibly versatile. Feel free to customize your donuts with a variety of fillings beyond raspberry and cheesecake. Think rich custards, bright lemon curd, or your favorite fruit jams. For more inspiration, explore my Jelly Donuts recipe!
- Impressive Presentation: While easy to make, these stuffed donuts look incredibly professional and elegant, making them perfect for impressing guests or simply treating yourself to something truly special.

How to Create Raspberry Cheesecake Stuffed Donuts: A Step-by-Step Culinary Journey
There is nothing quite as satisfying as sharing a warm, sugary batch of homemade stuffed donuts with family and friends. These impressive and utterly delicious donuts are perfect for indulgent weekend treats, festive celebrations, or any moment you wish to infuse with a little extra sweetness. Let’s dive into the process of making these extraordinary donuts. For your convenience, a complete, printable recipe card with all measurements and detailed instructions can be found at the conclusion of this post.
Crafting the Dough and Delectable Fillings
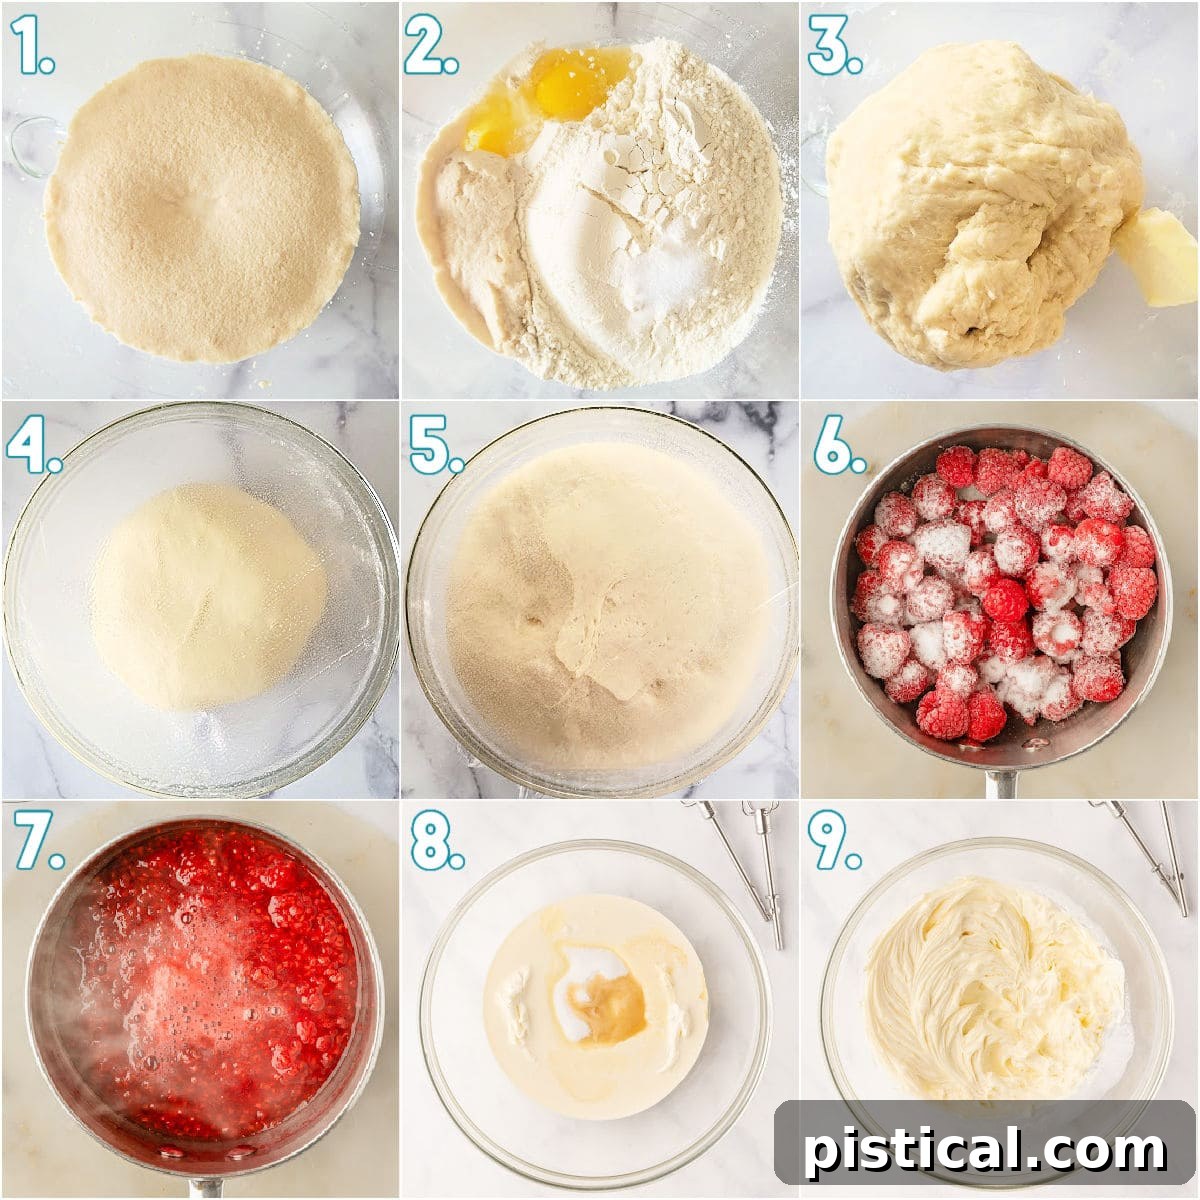
- Activate the Yeast: In a spacious mixing bowl or the bowl of your stand mixer, gently whisk together the warm milk, active dry yeast (or instant yeast), and granulated sugar. Allow this mixture to sit undisturbed for about 5 to 10 minutes. The mixture should become noticeably foamy, indicating that your yeast is active and ready to perform its magic. If no foam appears, your yeast may be expired or the milk too hot/cold, and you’ll need to start again with fresh yeast.
- Combine Dry and Wet Ingredients: Introduce the measured bread flour, room temperature eggs, and a pinch of salt to the foamy yeast mixture. Using a dough hook attachment on your stand mixer, mix on low speed for one minute until all ingredients are just incorporated and a shaggy dough forms.
- Develop the Dough: Stop the mixer and use a spatula to scrape down the sides and bottom of the bowl, ensuring all ingredients are fully integrated. Continue mixing on medium speed for an additional 2 minutes. At this point, the dough should begin to pull away from the sides of the bowl, showing signs of gluten development.
- Incorporate the Butter: With the mixer still running at medium speed, gradually add the softened unsalted butter, one tablespoon at a time. Initially, the dough will appear very sticky and wet – this is perfectly normal.
- Achieve Smooth Elasticity: Continue mixing with the dough hook for another 5 to 7 minutes. The dough will transform, becoming smooth, elastic, and almost dry to the touch (not sticky). This prolonged mixing is crucial for developing the gluten, which gives the donuts their signature light and airy texture. If it remains sticky, continue mixing until it reaches this soft, dry consistency. (If working manually with a hand mixer, you may need to finish kneading the dough by hand on a lightly floured surface).
- First Rise: Lightly grease a large bowl with a little oil or cooking spray. Transfer the prepared dough into this bowl. Cover the bowl loosely with greased plastic wrap to prevent a skin from forming, and place it in a warm, draft-free spot. Allow the dough to rise until it has visibly doubled in size, a process that typically takes about 60 to 90 minutes, depending on your room temperature.
- Prepare the Raspberry Compote: In a small saucepan, combine the frozen raspberries, granulated sugar, and fresh lemon juice. Stir the mixture gently over medium heat until the sugar has completely dissolved. Bring it to a gentle simmer and cook for approximately 8 minutes, or until the compote has thickened to a jam-like consistency. Remove from heat and set aside to cool completely.
- Whip the Cheesecake Filling: In a separate mixing bowl, combine the softened cream cheese, cold heavy whipping cream, granulated sugar, and vanilla extract. Whisk vigorously, or use an electric mixer, until the mixture is very thick, smooth, and holds soft peaks. This is your luscious no-bake cheesecake filling. Place it in the fridge to chill until you are ready to fill your donuts.
Frying and Artfully Filling Your Donuts
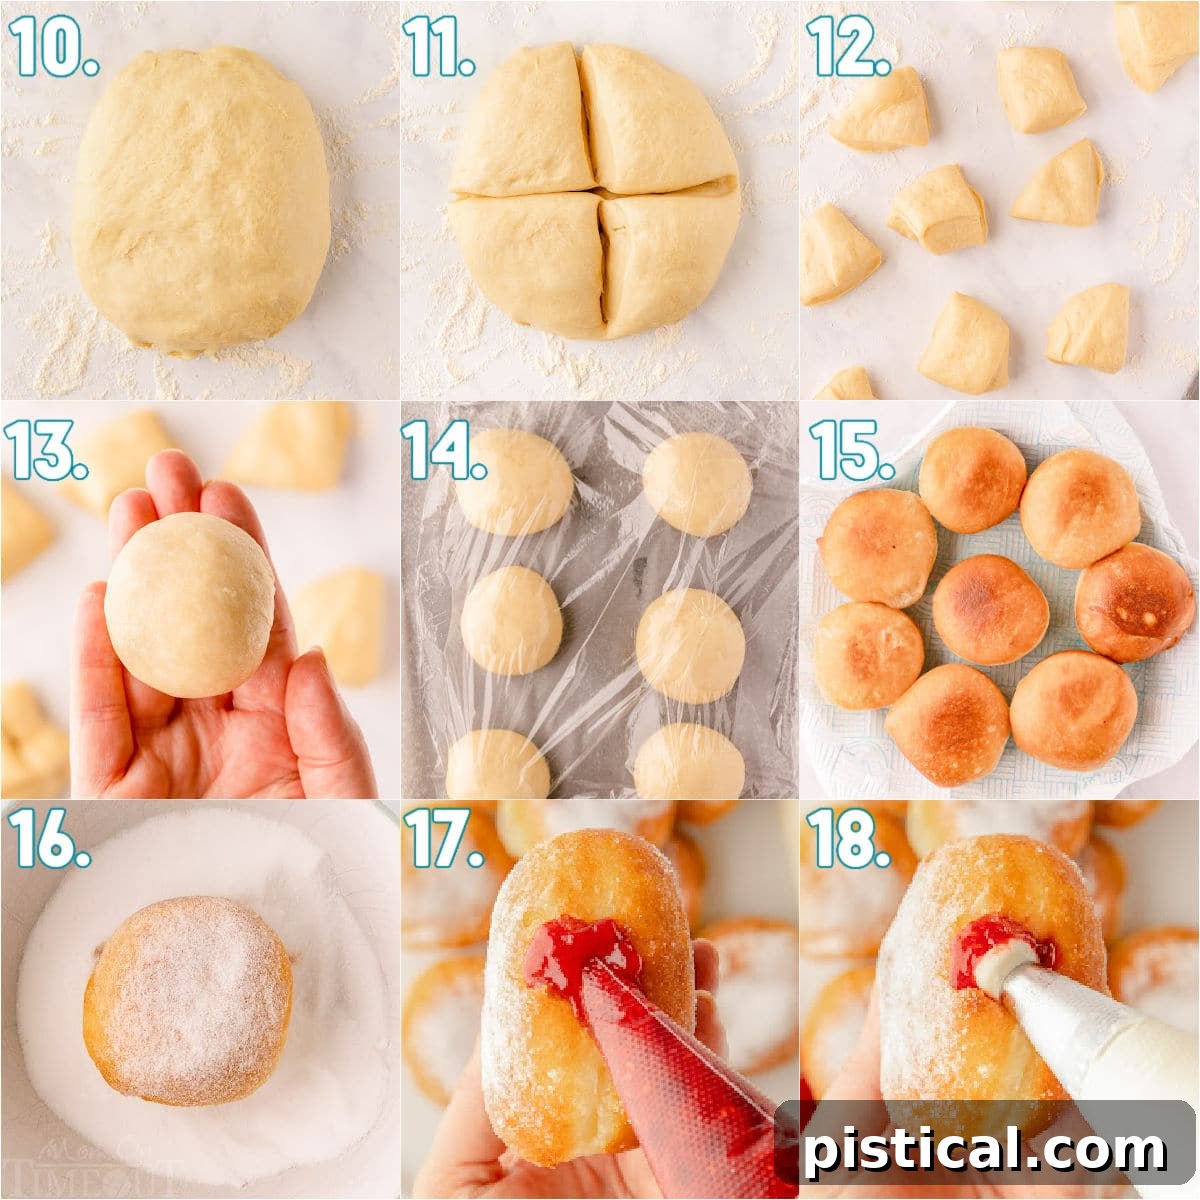
- Prepare for Shaping: Gently punch the risen dough down to release the trapped air. Transfer the dough onto a lightly floured work surface. Line three large baking sheets with parchment paper and lightly grease the parchment; set these aside.
- Portion the Dough: Shape the dough into a cohesive ball. Using a sharp knife or kitchen scissors, carefully cut the ball into quarters. Then, cut each of those quarters into quarters again. This method will yield 16 evenly sized pieces of dough, perfect for individual donuts.
- Shape the Donuts: Take each piece of dough and use your hands to roll and shape it into a tight, smooth ball. This careful shaping ensures uniform donuts that rise beautifully.
- Second Rise: Arrange the shaped donut balls onto the prepared baking sheets, leaving ample space between each one to allow for expansion. Loosely cover the baking sheets with greased plastic wrap. Let the donuts undergo their second rise in a warm spot until they have significantly puffed up and are nearly double in size, typically about 30 minutes. Be mindful not to over-proof them, as this can lead to deflation during frying.
- Heat the Frying Oil: In a large, heavy-duty Dutch oven or a deep, sturdy pot, pour enough vegetable oil to fry the donuts (about 2 quarts is usually sufficient). Heat the oil to a precise temperature range of 330°F to 350°F (165°C to 177°C). An accurate thermometer is indispensable here. If you don’t have one, drop a tiny piece of dough into the oil; if it floats and sizzles immediately, the oil is ready. Maintain this temperature throughout the frying process.
- Fry the Donuts: Carefully pick up 3 to 4 donuts at a time (depending on your pot size), being extra gentle not to deflate them. Gently lower them into the hot oil. Fry each side for approximately 2 minutes, or until they turn a beautiful golden brown. Use a spider strainer to safely lift the fried donuts out of the oil.
- Sugar Coating: Immediately transfer the hot, fried donuts to a large bowl filled with granulated sugar. Toss them gently to ensure an even, generous coating of sugar. Place the sugar-coated donuts on a wire rack to cool slightly while you continue frying the remaining dough. Monitor the oil temperature constantly, adjusting the heat as needed.
- Prepare for Filling: Transfer both the cooled raspberry compote and the chilled cheesecake filling into separate piping bags. Snip a small end off each piping bag with a pair of scissors.
- Fill the Donuts: Using a sharp knife or the tip of a pair of scissors, carefully make a small hole on the side of each sugar-coated donut. First, pipe the tangy raspberry filling into the donut, followed by a more generous amount of the creamy cheesecake filling. You’ll know they are sufficiently filled when they feel plump and heavier in your hand.
- Serve and Savor: These raspberry cheesecake stuffed donuts are truly best enjoyed while still warm and wonderfully fresh! Share them immediately and relish in the homemade goodness.
Troubleshooting Your Donuts: Common Issues and Quick Fixes
Even seasoned bakers encounter hiccups from time to time. Here’s a quick guide to troubleshooting common problems you might face when making your raspberry cheesecake donuts, ensuring you achieve perfect results every time:
- Dough Isn’t Rising: The most common culprits are inactive yeast or incorrect milk temperature. Always ensure your yeast is fresh (check the expiration date!) and properly activated with warm milk (between 90°F and 100°F or 32°C and 38°C) and a touch of sugar. Yeast is a living organism; too hot water will kill it, too cold will keep it dormant. Also, place your dough in a warm, draft-free area for rising. A slightly warm oven (turned off after heating) with the door ajar can create an ideal environment.
- Inconsistent Oil Temperature: This is perhaps the most critical factor for perfect fried donuts. An accurate thermometer is your best friend here. Maintaining the oil temperature precisely between 330°F to 350°F (165°C to 177°C) is key. If the oil is too hot, your donuts will brown rapidly on the outside, leaving them raw and doughy inside. Conversely, if the oil is too cold, the donuts will absorb excessive oil, becoming greasy and heavy. Keep a close eye on your thermometer and adjust your stovetop heat as needed throughout the frying process.
- Donuts are Dense or Heavy: This often indicates that the dough wasn’t kneaded enough to develop sufficient gluten, or it wasn’t allowed to rise properly. Ensure your dough passes the “windowpane test” after kneading (stretch a small piece until translucent without tearing) and always give it enough time for both rises.
- Donuts Deflate During Frying: This is typically a sign of over-proofing. If the dough rises too much, the gluten structure becomes weak and can’t hold its shape when introduced to hot oil. Watch your donuts closely during the second rise, and fry them when they are puffed but still hold some elasticity.

Storage and Make-Ahead Strategies for Your Donuts
While these homemade filled donuts are undeniably best enjoyed fresh and warm, there are excellent ways to prepare them in advance or store leftovers. Planning ahead means you can have these delightful treats ready to go with minimal fuss.
- Serving Fresh: These jelly-filled (or cheesecake-filled) donuts are truly at their peak when freshly made. If you happen to have any leftovers, a quick reheat for a few seconds in the microwave can revive their warmth and softness.
- Prepare Dough in Advance (Overnight): You can absolutely get a head start by preparing the dough the day before! After the first rise, gently punch the dough down, shape it into individual donut balls, and place them on parchment-lined baking sheets. Cover the sheets tightly with plastic wrap and refrigerate overnight (up to 12-18 hours). The next morning, simply remove the dough from the refrigerator, allow it to come to room temperature (which may take 30-60 minutes), and then proceed with the recipe as written for the second rise and frying.
- Freeze Unfried Donuts: Donut dough can also be frozen for longer storage. After the donuts have been cut, shaped, and completed their second rise, arrange them on a sheet tray and place it in the freezer until the donuts are solid. Once frozen, transfer the solid donut balls to a freezer-safe ziplock bag or airtight container. They can be frozen for up to 2 months. When you’re ready to enjoy them, thaw the donuts at room temperature for several hours or overnight in the fridge, then allow them to come to room temperature before frying as directed.
- Freeze Fried Donuts (Without Filling): If you prefer to have fried donuts ready, you can freeze them without the filling. After frying and sugar coating (or plain if you prefer), let the donuts cool completely. Place them in a single layer in a freezer-safe gallon ziplock bag or airtight container and freeze for up to 1 month. To serve, thaw them at room temperature. You can gently warm them for a few seconds in the microwave or a minute in an air fryer before adding the raspberry and cheesecake fillings.
Exciting Variations and Customizations to Try
While the classic raspberry cheesecake combination is heavenly, this recipe offers a fantastic base for creativity. Don’t hesitate to experiment with different flavors and textures to personalize your homemade donuts:
- Spiced Dough: For an added layer of warmth and flavor, incorporate a pinch of ground cinnamon or nutmeg into your donut dough along with the dry ingredients. This will give your donuts a subtle, cozy aroma.
- Explore New Jams and Curds: Experiment with a variety of different jams, like sweet blueberry, tangy apricot, or even a rich strawberry preserve, to replace the raspberry compote. A bright and zesty lemon curd is also an incredibly delicious filling option that pairs wonderfully with the creamy cheesecake.
- Chocolate Indulgence: For chocolate lovers, consider a rich chocolate ganache or a simple chocolate custard as a filling, either on its own or alongside the cheesecake.
- Enhanced Vanilla Flavor: Boost the vanilla notes in your dough by adding an extra teaspoon of pure vanilla extract to the wet ingredients. This simple addition elevates the overall aroma and taste.
- Alternative Coatings: Instead of rolling your donuts in granulated sugar, try a dusting of delicate powdered sugar for a different aesthetic and texture. You could also create a simple glaze using powdered sugar and milk for a more traditional donut finish.
- Nutty Topping: After sugar coating, you could lightly press finely chopped pistachios or almonds onto the donuts for added crunch and flavor.

Frequently Asked Questions About Homemade Donuts
Can I bake these donuts instead of frying them?
This recipe is specifically developed for fried donuts, which achieve that signature light, airy texture and golden crispness. While you can certainly attempt to bake them at 375°F (190°C) for 15 to 20 minutes, please be aware that the texture will be significantly different. Baked donuts will be denser and more cake-like, lacking the classic fried donut characteristics.
How do I know when the oil is ready for frying?
The ideal temperature for frying these donuts is between 330°F to 350°F (165°C to 177°C). Using a reliable deep-fry thermometer is the most accurate way to ensure consistent results. If you don’t have a thermometer, a simple trick is to drop a small piece of donut dough (about the size of a pea) into the hot oil. If it immediately floats to the surface and sizzles gently, the oil is ready. If it sinks to the bottom, the oil needs more time to heat up. If it browns too quickly, the oil is too hot.
What are some other delicious options for fillings?
The possibilities for donut fillings are endless and exciting! Beyond raspberry and cheesecake, consider classic options like chocolate pudding, vanilla custard, various fruit curds (such as a vibrant lemon curd or lime curd), or any other flavor of fruit jam or jelly. Nutella, peanut butter cream, or even a spiced apple compote can also make fantastic additions to these versatile homemade donuts.

Expert Tips and Tricks for Donut Success
Perfecting the Dough
- Yeast Vitality Check: Always verify the expiration date on your yeast. If the mixture of warm milk, yeast, and sugar doesn’t become foamy after 5-10 minutes, your yeast is likely inactive, and it won’t provide the necessary rise for light donuts. Start over with a fresh packet of yeast.
- Yeast Types: Both instant yeast and active dry yeast can be used interchangeably in this recipe with excellent results. The primary difference you might notice is a slight variation in rise time; instant yeast often acts a bit faster.
- Flour Choice Matters: I highly recommend using bread flour. Its higher protein content leads to increased gluten development, resulting in an exceptionally softer and fluffier donut. However, this recipe has been thoroughly tested with all-purpose flour, and it still yields deliciously satisfying donuts.
- Dough Consistency: Before moving on to the rising stage, ensure your dough is smooth, highly elastic, and feels almost dry to the touch (not sticky). This indicates proper kneading and gluten development.
- Creating a Warm Environment for Rising: If your kitchen is on the cooler side, you can easily create an ideal warm environment for your dough to rise. Set your oven to its lowest temperature for a few minutes, then turn it OFF. Place the covered bowl of dough inside the slightly warm oven with the door slightly ajar.
- Degassing the Dough: After the first rise, gently punch the dough down. Then, work the dough by tossing it back and forth in your hands a few times. This helps to release any large air bubbles, leading to a more uniform and tender donut texture.
- Monitoring the Second Rise: The second rise is crucial but doesn’t take as long as the first. Keep a close eye on your shaped donuts. You’re looking for them to puff up to roughly double their original size. Be careful not to let them over-rise; over-proofed donuts can completely deflate when frying or develop large, undesirable holes on the inside.
Mastering Donut Frying
- Oil Temperature Test (No Thermometer): If you don’t have a thermometer, the small piece of dough test is reliable. Drop a pea-sized piece of dough into the hot oil. If it floats and sizzles immediately, the oil is ready. If it sinks, it needs more heat. If it browns too quickly, it’s too hot.
- Preventing Deflation During Transfer: If your donuts are delicate and prone to deflating when you pick them up to transfer to the hot oil, try this trick: cut the parchment paper around each individual donut. Then, gently lower the donut *with the parchment* into the hot oil. The parchment will easily detach after a few seconds, and you can carefully remove it with tongs. This minimizes handling and protects the delicate risen structure.
- Crucial Oil Temperature Control: Consistently maintaining the correct oil temperature (330°F-350°F / 165°C-177°C) is paramount. It ensures your donuts cook perfectly – achieving a beautiful golden-brown exterior while remaining fully cooked, light, and fluffy on the inside. Fluctuating temperatures are the enemy of good fried donuts.
- Don’t Crowd the Pot: Fry donuts in small batches (3-4 at a time). Crowding the pot will lower the oil temperature significantly, leading to greasy, undercooked donuts.
Essential Tools for Your Donut-Making Journey
Having the right tools can make your donut-making experience much smoother and more enjoyable, leading to better results. Here are the key pieces of equipment you’ll need:
- Stand Mixer with Dough Hook: While not strictly essential, a stand mixer significantly simplifies the dough-making process, especially when kneading to achieve that smooth, elastic texture. If you don’t have one, a hand mixer or even manual kneading will work, though it requires a bit more effort.
- Deep-Fry Thermometer: This is arguably the most crucial tool for perfectly fried donuts. It ensures your oil is consistently at the ideal temperature, preventing greasy or undercooked results.
- Spider Strainer: A spider strainer is incredibly handy for safely and easily lowering donuts into hot oil and lifting them out without splashing or damaging their delicate structure. Its wide mesh allows excess oil to drain quickly.
- Large, Heavy-Bottomed Pot or Dutch Oven: Essential for deep-frying, as it retains heat well and provides enough depth for the oil.
- Piping Bags and Scissors: For neatly filling your donuts with the raspberry compote and cheesecake mixture.
More Sweet Breakfast Indulgences to Explore
If you’ve enjoyed making these raspberry cheesecake donuts, you’ll surely love these other fantastic sweet breakfast and dessert recipes:
- Classic Fluffy Waffle Recipe
- The Best Fluffy Buttermilk Pancakes
- Easy Cherry Cheese Danish Recipe
- Decadent Cinnamon Roll Layer Cake
- Irresistible Almond Bear Claws

Raspberry Cheesecake Donuts
These stunning Raspberry Cheesecake Stuffed Donuts are absolutely delightful! Light and fluffy donuts, rolled in sugar and filled with rich cheesecake and tangy raspberry compote. The perfect sweet treat for special occasions or to enjoy with your morning cup of coffee or afternoon tea.
Course: Breakfast
Cuisine: American
Prep Time: 30 minutes
Rise Time: 2 hours
Servings: 16 donuts
Author: Trish – Mom On Timeout
Ingredients
For the Donuts
- 1 cup warm milk (whole milk preferred, 90°F to 100°F)
- 1 tablespoon instant yeast (or active dry yeast)
- 3 tablespoons granulated sugar
- 4 cups bread flour (spooned and leveled, all-purpose flour can be used instead)
- 2 large eggs (room temperature)
- 1 teaspoon salt
- 8 tablespoons unsalted butter (room temperature)
- Vegetable oil (enough to fry the donuts, approximately 2 quarts)
For the Raspberry Filling
- 3 cups frozen raspberries
- 4 tablespoons granulated sugar
- 1 teaspoon lemon juice
For the Cheesecake Filling
- 8 ounces cream cheese (softened)
- ¾ cup heavy whipping cream (cold)
- 2 tablespoons granulated sugar
- 1 teaspoon vanilla extract
For the Sugar Coating
- 2 cups granulated sugar
Instructions
Donuts
- In a large mixing bowl or the bowl of a stand mixer, whisk together the warm milk, yeast, and 3 tablespoons granulated sugar. Let sit for 5 minutes or until the mixture is foamy. (If it doesn’t foam, start over with fresh yeast.)
- Add the 4 cups bread flour, eggs, and salt to the bowl and mix with the dough hook on low speed for one minute, until the ingredients are just incorporated.
- Scrape down the sides and bottom of the bowl. Continue mixing at medium speed for 2 minutes. The dough should start pulling away from the sides of the bowl.
- Scrape down the sides and bottom of the bowl again. With the mixer on medium speed, gradually add the 8 tablespoons butter, one tablespoon at a time. The dough will appear very sticky and wet after the butter is added.
- Continue mixing with the dough hook for another 5 minutes until the dough looks smooth and elastic and feels almost dry (not sticky) to the touch. If still sticky, continue mixing until this consistency is reached. (If using a hand mixer, you may need to finish kneading by hand on a lightly floured surface.)
- Lightly grease a large bowl and transfer the dough to it. Cover the bowl with lightly greased plastic wrap and let rise in a warm place until doubled in size, about 60 to 90 minutes.
Prepare Raspberry Filling
- Put the frozen raspberries, 4 tablespoons granulated sugar, and lemon juice into a small saucepan. Stir until the sugar has dissolved, then simmer for 8 minutes or until the mixture has thickened to the texture of jam. Set aside to cool completely.
Prepare Cheesecake Filling
- Add cream cheese, heavy cream, 2 tablespoons granulated sugar, and vanilla extract to a mixing bowl. Whisk until very thick and smooth. Set aside in the fridge until you’re ready to fill the donuts.
Back To The Donuts…
- Line three large baking sheets with parchment paper and lightly grease the parchment. Set aside. Lightly flour a work surface.
- When the dough has doubled, gently punch it down several times to release air bubbles, then transfer to the floured surface.
- Shape the dough into a ball, then use a sharp knife or kitchen scissors to cut the ball into quarters. Cut each quarter into quarters again, resulting in 16 pieces of dough.
- Use your hands to roll and shape each piece of dough into a tight ball.
- Transfer the donuts to the prepared baking sheets, leaving space in between for them to rise. Loosely cover with greased plastic wrap and let rest until they have puffed up and are nearly double in size, about 30 minutes.
Fry Donuts
- Pour 2 cups of granulated sugar into a large bowl for coating. Set aside.
- Transfer the cooled raspberry compote and chilled cheesecake filling into separate piping bags and snip the end off each with scissors.
- Pour enough vegetable oil into a large, heavy-duty Dutch oven or deep pot (approx. 2 quarts). Heat the oil to 330°F to 350°F (165°C to 177°C). Use a thermometer to check the temperature. (If no thermometer, add a small piece of dough; if it floats and sizzles, oil is ready.)
- Carefully pick up the donuts (being extra gentle not to deflate them) and gently place them into the hot oil, 3 to 4 at a time. Fry for 2 minutes on each side or until golden brown. Use a spider strainer to lift them out and place on a metal cooling rack.
- Immediately toss each hot donut in the sugar coating until evenly coated, then place back on the wire rack.
- Continue frying and sugar-coating all donuts, monitoring the oil temperature carefully throughout the process.
Fill Donuts
- Use a pair of scissors or a sharp knife to carefully make a small hole in the side of each donut.
- First, pipe the raspberry filling into each donut, followed by the cheesecake filling. You should use slightly more cheesecake than compote. You’ll know they’re full when they feel plump and heavy in your hand.
- Enjoy the donuts while they’re still warm and fresh!
Notes
Storage Information: These filled donuts are best enjoyed freshly made. If needed, you can reheat them for a few seconds in the microwave to restore warmth and softness.
Make Ahead: You can prepare the donut dough in advance. After the first rise, cut into donut shapes and place on parchment-lined baking sheets. Cover with plastic wrap and refrigerate overnight. To prepare, let the dough come to room temperature, then proceed with the recipe as written for the second rise and frying.
Freeze Unfried Donuts: Donut dough can be frozen after the second rise. Place shaped and risen donuts on a sheet tray in the freezer until solid. Transfer to a freezer-safe ziplock bag and freeze for up to 2 months. Let them defrost at room temperature, then fry as directed.
Freeze Fried Donuts: You can also freeze fried donuts (without filling) for up to two months. Place in a single layer in a freezer-safe bag. Thaw at room temperature. Warm in a microwave for a few seconds or an air fryer, then add filling.
Nutrition
Calories: 404 kcal | Carbohydrates: 59g | Protein: 7g | Fat: 16g | Saturated Fat: 10g | Polyunsaturated Fat: 1g | Monounsaturated Fat: 4g | Trans Fat: 0.2g | Cholesterol: 67mg | Sodium: 210mg | Potassium: 131mg | Fiber: 2g | Sugar: 34g | Vitamin A: 596IU | Vitamin C: 6mg | Calcium: 56mg | Iron: 1mg