

Unleash Winter’s Sparkle: Your Ultimate Guide to Crafting Dazzling Foil Snowflakes
As the days grow shorter and the air turns crisp, there’s a unique magic in winter crafts. Among the beloved traditions, making snowflakes stands out as a timeless activity that brings joy to all ages. But what if we could elevate this classic paper craft to something truly extraordinary, something that shimmers and shines with every flicker of light? This season, we invite you to discover the enchanting world of foil snowflakes – a brilliant twist that promises to add an unparalleled sparkle to your holiday décor and bring endless smiles to those who create them.
Forget the traditional, flat paper versions for a moment. Imagine intricate patterns catching and reflecting light, transforming your windows, walls, or Christmas tree into a dazzling winter wonderland. That’s the allure of aluminum foil snowflakes! While they may seem delicate, with the right technique, they are surprisingly durable and offer a stunning metallic sheen that paper simply cannot replicate. We recently embarked on this shimmering adventure, and as you can see from the image above, the results were absolutely gorgeous, adorning our walls with festive brilliance. And the best part? These pretty snowflakes are versatile, ready to be incorporated into many other exciting winter projects!
The Journey to Shimmering Success: Why Foil Snowflakes are a Must-Try Craft
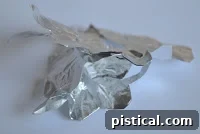
Like many creative endeavors, our initial attempts at crafting foil snowflakes were met with a few hurdles. My first few tries, using the exact same folding method as paper snowflakes, were, frankly, quite disastrous. The delicate layers of aluminum foil would stubbornly stick together, tearing apart as I tried to separate them after cutting. It was frustrating, but it led to a breakthrough!
I experimented with heavy-duty aluminum foil, which offered a marginal improvement in durability but didn’t entirely solve the sticking problem. The “aha!” moment arrived when I realized the foil simply needed a barrier. The trick, I discovered, was to sandwich the foil between sheets of thin paper *before* folding and cutting. This simple yet ingenious method prevents the foil layers from adhering to each other, allowing for clean, intricate cuts and a flawless unfolding experience. This small adjustment transformed a challenging craft into an incredibly rewarding one, opening up a world of sparkling possibilities for anyone eager to try it.
Gather Your Essentials: Materials for Crafting Beautiful Foil Snowflakes
Before you dive into the delightful process of creating your shimmering masterpieces, ensure you have these basic materials on hand. The beauty of this craft lies in its simplicity and accessibility, requiring only a few common household items.
Materials Needed:
Aluminum Foil: While standard foil works, we highly recommend using Heavy Duty aluminum foil if you have it available. Its thicker gauge makes it more resilient to tearing during the folding and cutting process, yielding sturdier and more intricate snowflakes. If you only have standard foil, don’t worry – you can simply double up the layers to achieve similar results.
Scissors: The quality of your cuts will significantly impact the beauty of your snowflake. Invest in a pair of sharp, precision-tip scissors. Craft scissors or even small embroidery scissors are ideal for navigating the intricate curves and angles that truly bring snowflakes to life. Dull or bulky scissors can lead to frustrating tears and imprecise designs.
Thin Paper or Newspaper: This is the secret ingredient! As discussed, a thin barrier is crucial to prevent the foil from sticking to itself during folding. Standard printer paper can work, especially for larger snowflakes, but very thin paper like cheap newspaper, tissue paper, or even tracing paper is superior. The thinner the paper, the easier it will be to make fine, delicate cuts through all layers.
Step-by-Step Guide: Crafting Your Dazzling Foil Snowflakes
Now that you have your materials ready, let’s walk through the simple yet magical process of transforming a sheet of foil into a unique, glittering snowflake. Follow these instructions carefully, and don’t be afraid to experiment with your cuts to create truly one-of-a-kind designs.
Instructions:
Step 1: Create Your Foil and Paper Sandwich
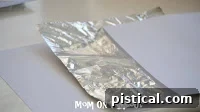
Begin by tearing off a piece of aluminum foil. The size isn’t critical at this stage, as you’ll be cutting a square from it. The crucial part is to carefully slip this piece of foil in between two sheets of your chosen thin paper. For demonstration purposes, we’re using standard printer paper, but remember, the thinner the paper (like newspaper), the easier it will be to make precise and intricate cuts on your final snowflake. Ensure the foil is fully covered by the paper on both sides.
Step 2: Cut a Perfect Square
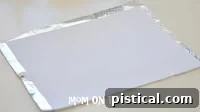
Next, take your foil and paper sandwich. Line up one corner, and then carefully cut out a square. The size of your square will determine the size of your finished snowflake. Any size will work, and it’s particularly fun to make a variety of sizes – from tiny delicate flakes to larger, statement pieces – to create a dynamic display. Just ensure your square is as neat as possible, as this forms the foundation for your symmetrical snowflake.
Step 3: First Fold – Forming the Initial Triangle
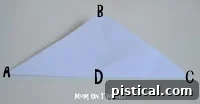
With your perfect square of foil and paper, fold it precisely in half diagonally to form a large triangle. For clarity in the following steps, we have labeled the points of the triangle: the two base corners are A and C, and the top point is B. This is a classic method for making snowflakes, but feel free to adapt if you have a preferred folding technique. The key is to create a solid, creased triangle.
Step 4: Second Fold – Halving the Triangle Again
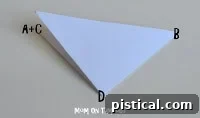
Now, take your large triangle and fold it in half once more. Bring points A and C together, aligning the edges perfectly. This will create a smaller triangle and a new point, which we’ll call D. Point D will eventually become the very center of your snowflake, so precise alignment here helps ensure a symmetrical outcome. Press down firmly to create a crisp crease.
Step 5: Third Fold – Shaping the Right Side
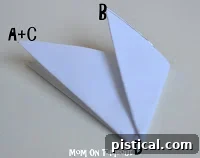
This step begins to define the six-pointed structure of your snowflake. Take point B (the top point of your current triangle) and fold the right third of the triangle over towards the center. Aim to create an angle that will allow for a six-fold symmetry when unfolded. The visual reference in the image should help guide your fold. Smooth down the crease.
Step 6: Fourth Fold – Shaping the Left Side
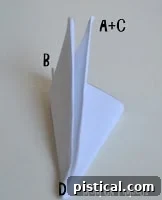
Mirroring the previous step, now take the combined point A+C (which is now part of the base of your folded shape) and fold the left third over as far as it will naturally go. The goal is to create a neat, conical shape where all the layers are tightly stacked. These specific folds are crucial for achieving the classic six-pointed snowflake design. Again, a firm crease is important.
Step 7: Trim the Excess
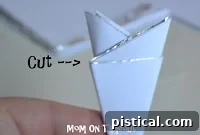
You will now notice two small triangular pieces of foil and paper protruding at the top of your folded shape, created by the previous two folds. Using your sharp scissors, carefully cut off these two little triangles to create a clean, straight or slightly curved edge. This trimming ensures that when your snowflake is unfolded, its outer edges will be smooth and uniform, forming a perfect circular or hexagonal shape, depending on your cut.
Step 8: Ready for Cutting – Understanding Your Snowflake’s Center
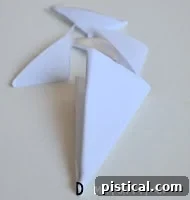
Your final folded triangle is now ready for the creative cutting phase. Remember that point D, which you created by folding points A and C together, represents the absolute center of your snowflake. Any cuts you make directly into or around point D will create a hole or a central design element in your finished snowflake. For instance, cutting a small triangle out of point D will result in a lovely star shape right in the middle of your design. Understanding this helps you visualize how your cuts will translate into the final pattern.
Step 9: Let Your Creativity Shine – Making Your Cuts
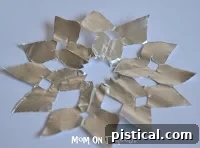
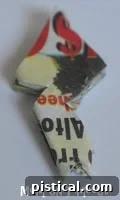
This is where the magic truly happens! Begin making various cuts along the folded edges of your foil-and-paper triangle. You can experiment with triangles, curves, squares, and abstract shapes. The more intricate your cuts are, the more delicate and detailed your resulting snowflake will be. The image above illustrates some basic cuts on the left and the resulting snowflake on the right, providing inspiration. Remember to cut through all layers of foil and paper. This is a wonderfully engaging craft for children, as it’s amazing to watch them make the connection between the simple cuts they make and the complex, beautiful patterns that emerge. Encourage them to explore and discover their own unique designs.
The Grand Reveal: Unfolding Your Shimmering Masterpiece
Once you’re satisfied with your cuts, gently unfold your creation. This is arguably the most exciting part of the entire process! As you slowly peel back each fold, your unique design will reveal itself, transforming from a simple folded triangle into a magnificent, symmetrical foil snowflake. The metallic shimmer will instantly catch the light, adding a captivating dimension that paper snowflakes can’t match. Be patient and careful during this step, as the intricate cuts can make the foil delicate.
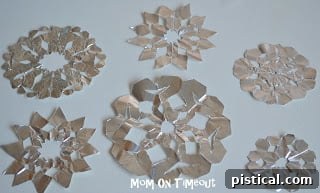
Each snowflake will be a testament to your creativity and precision, and no two will ever be exactly alike. These stunning creations are ready to adorn your home and bring a touch of winter elegance indoors. We’ve made many using this method, and each one brings a unique sparkle to our festive decorations.
Essential Tips & Tricks for Perfect Foil Snowflakes
To ensure your foil snowflake crafting experience is as enjoyable and successful as possible, keep these valuable tips in mind:
- Handle with Care: Foil snowflakes, despite their metallic nature, can be quite delicate, especially if you’ve made very intricate cuts. Always handle them gently to prevent tearing and preserve their beautiful shapes.
- Opt for Heavy-Duty Foil: As mentioned earlier, heavy-duty aluminum foil provides more resilience and body to your snowflakes, making them easier to cut cleanly and less prone to accidental rips. If you only have standard foil, consider doubling up the layers of foil within your paper sandwich for added strength.
- Invest in Sharp, Precision Scissors: This cannot be stressed enough! Sharp scissors with fine points are your best friend for creating crisp lines and intricate details. Dull scissors will frustrate you and lead to jagged edges or tears. Small craft or embroidery scissors work wonders for those tiny, delicate snips.
- Achieving Perfect Flatness: After unfolding, your snowflakes might not lie perfectly flat due to the folding creases. To achieve a pristine, flat look, simply place them between the pages of a heavy book and leave them for a few hours, or even overnight. The gentle pressure will flatten them beautifully without damaging the foil.
- Mindful Display Placement: If you plan on mounting your foil snowflakes directly onto a wall, window, or other surfaces using glue or tape, choose your spot carefully. Once adhered, they can tear very easily if you attempt to remove or reposition them. Consider using removable adhesive dots for a less permanent solution, especially on painted surfaces.
- Embrace Your Creativity: Don’t feel limited by traditional snowflake patterns. Experiment with different folding techniques, cut shapes, and sizes. Let your imagination guide you, and enjoy the process of creating unique, sparkling works of art. The joy is in the journey as much as the beautiful end product!
Beyond the Wall: Creative Display Ideas for Your Foil Snowflakes
Once you’ve crafted a collection of these stunning foil snowflakes, you’ll want to show them off! Their metallic shimmer makes them incredibly versatile for various decorative purposes:
- Window Decorations: Affix them to windows where they can catch natural light, scattering beautiful reflections around the room.
- Holiday Garland: String them together with fishing line or thin thread to create a breathtaking garland for your mantelpiece, doorway, or stair railing.
- Christmas Tree Ornaments: Punch a small hole at the top and loop a string through to hang them on your Christmas tree, adding extra sparkle.
- Gift Toppers: Use them as a unique and elegant embellishment for wrapped gifts, making your presents truly stand out.
- Table Centerpieces: Scatter a few different sized snowflakes across your holiday dining table for an instant festive touch.
- Mobile Art: Create a delicate mobile by hanging several snowflakes at varying lengths from a hanger or branch.
- Party Decor: They make excellent decorations for winter-themed parties, adding a touch of frosty elegance.
The Educational Fun: Benefits of This Craft for Kids
Crafting foil snowflakes isn’t just about making beautiful decorations; it’s also a fantastic educational activity, especially for children:
- Fine Motor Skills: The precise cutting and folding required enhance dexterity and hand-eye coordination.
- Spatial Reasoning: Kids learn to visualize how their cuts in a folded shape will translate into a larger pattern when unfolded.
- Problem-Solving: Overcoming challenges like foil sticking or achieving symmetry encourages critical thinking.
- Creativity & Imagination: There are no wrong answers when it comes to snowflake designs, fostering boundless artistic expression.
- Patience & Focus: The step-by-step process teaches patience and the rewards of focused effort.
- Understanding Symmetry: It’s a hands-on lesson in radial symmetry, a concept found throughout nature and art.
Conclusion: Shine Bright This Winter Season!
Crafting foil snowflakes is a truly rewarding experience, offering a delightful blend of traditional winter crafting with an irresistible modern sparkle. Whether you’re seeking a fun, engaging activity for the entire family, a unique way to decorate your home, or a thoughtful, handmade gift, these shimmering creations are sure to impress. So gather your materials, embrace your creativity, and prepare to be amazed as you unfold your own collection of dazzling foil snowflakes. Let their metallic brilliance illuminate your home and your spirits throughout the winter season. Happy crafting!