
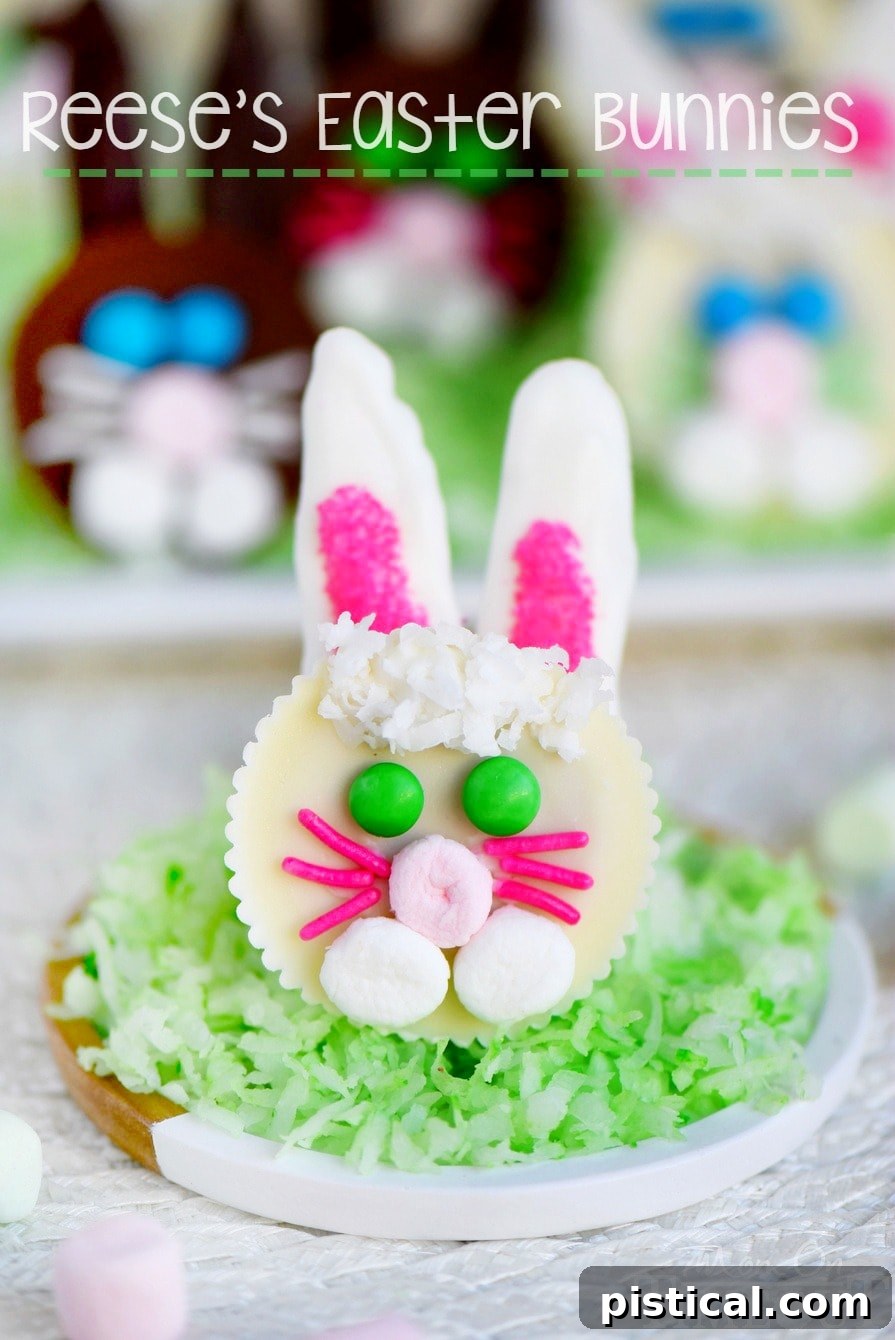
Nothing captures the joyous spirit of Easter quite like these utterly adorable Reese’s Easter Bunnies! Imagine the delight on everyone’s faces when they see these charming treats, almost too cute to nibble. These delightful peanut butter cup bunnies are incredibly fun to create, making them the perfect project for a memorable Spring day with your children. My boys absolutely loved helping me bring these little characters to life, and the best part? They are as delicious as they are enchanting!
Join our sweet community! Sign up for exclusive new recipes delivered straight to your inbox! Don’t forget to follow us on Facebook and Instagram for daily inspiration and behind-the-scenes fun!
PIN THIS RECIPE NOW AND SAVE IT FOR LATER!
Hopping into Fun: DIY Reese’s Easter Bunnies Recipe
For quite some time, the idea of these whimsical Reese’s Easter Bunnies had been playfully bouncing around in my mind. Finally, they’ve hopped right out and into our kitchen, just in time for the joyous Easter season! These charming little creatures, both boys and girls alike, promise to be an absolutely delightful activity for kids during Spring break or any festive gathering. The added bonus? They’re even more enjoyable to eat than they are to make! For this recipe, I’ve experimented with both classic milk chocolate and creamy white chocolate Reese’s peanut butter cups, giving you the freedom to choose your favorite.
While these adorable bunnies might appear intricate at first glance, I assure you that with a little guidance, they come together surprisingly quickly and effortlessly. I’m excited to walk you through each step, ensuring a smooth and fun experience from start to finish. Let’s dive into making these irresistible Easter treats!
Crafting the Perfect Bunny Ears: The First Step to Cuteness
We’ll begin our bunny-making adventure by focusing on the ears. Many find this to be the most “complicated” part, but it’s truly a simple two-step process that anyone can master. The key is taking your time and having fun with it!
Step 1: Forming the Basic Ear Shape
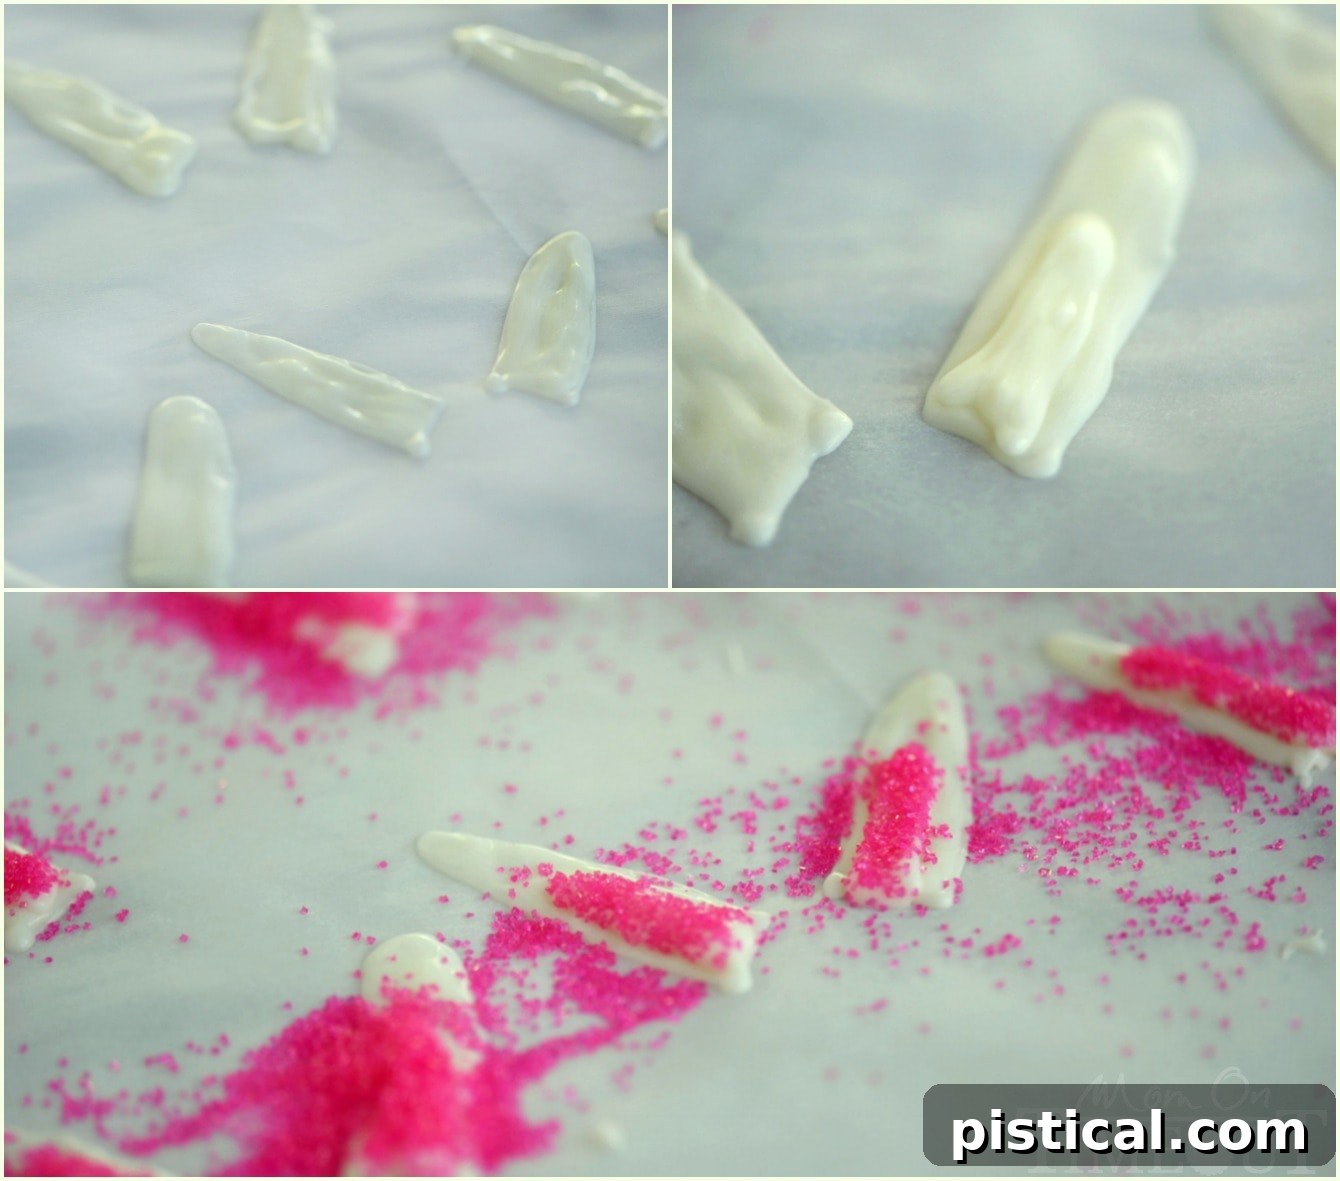
First, you’ll need to create the fundamental ear shape using white (vanilla) candy coating. Begin by melting your chosen candy coating according to the package instructions. Melting it in a heavy-duty ziploc bag is a fantastic shortcut – it’s less mess and easier to handle. Alternatively, you can melt it in a microwave-safe bowl and then transfer it to the bag.
Once the candy coating is perfectly smooth and melted, snip off a tiny corner from the ziploc bag. This small opening will act as your piping tool. On a sheet of parchment paper, carefully pipe out the desired ear shapes. Aim for elongated oval or teardrop shapes. Remember to make enough sets for all your Reese’s Easter Bunnies, plus an extra set or two, just in case of any mishaps or for practice. Precision isn’t paramount here; the charm comes from their handmade quality!
Step 2: Adding the Inner Pink Detail
After your white candy ears have completely hardened (this usually takes only a few minutes at room temperature, or even faster in the refrigerator), it’s time to add that iconic pink inner ear detail. Using a separate bag with a tiny snip, or a small spoon, pipe a small amount of melted candy coating onto the center of each white ear shape. Before it sets, generously sprinkle a bit of pink sugar over the wet candy coating. This creates a vibrant, charming contrast. Let these pink-accented ears dry completely. Voila! Your bunny ears are now ready for assembly. Now comes the truly exciting part – bringing the rest of the bunny to life!
Assembling Your Reese’s Easter Bunnies: A Delightful Creation Process
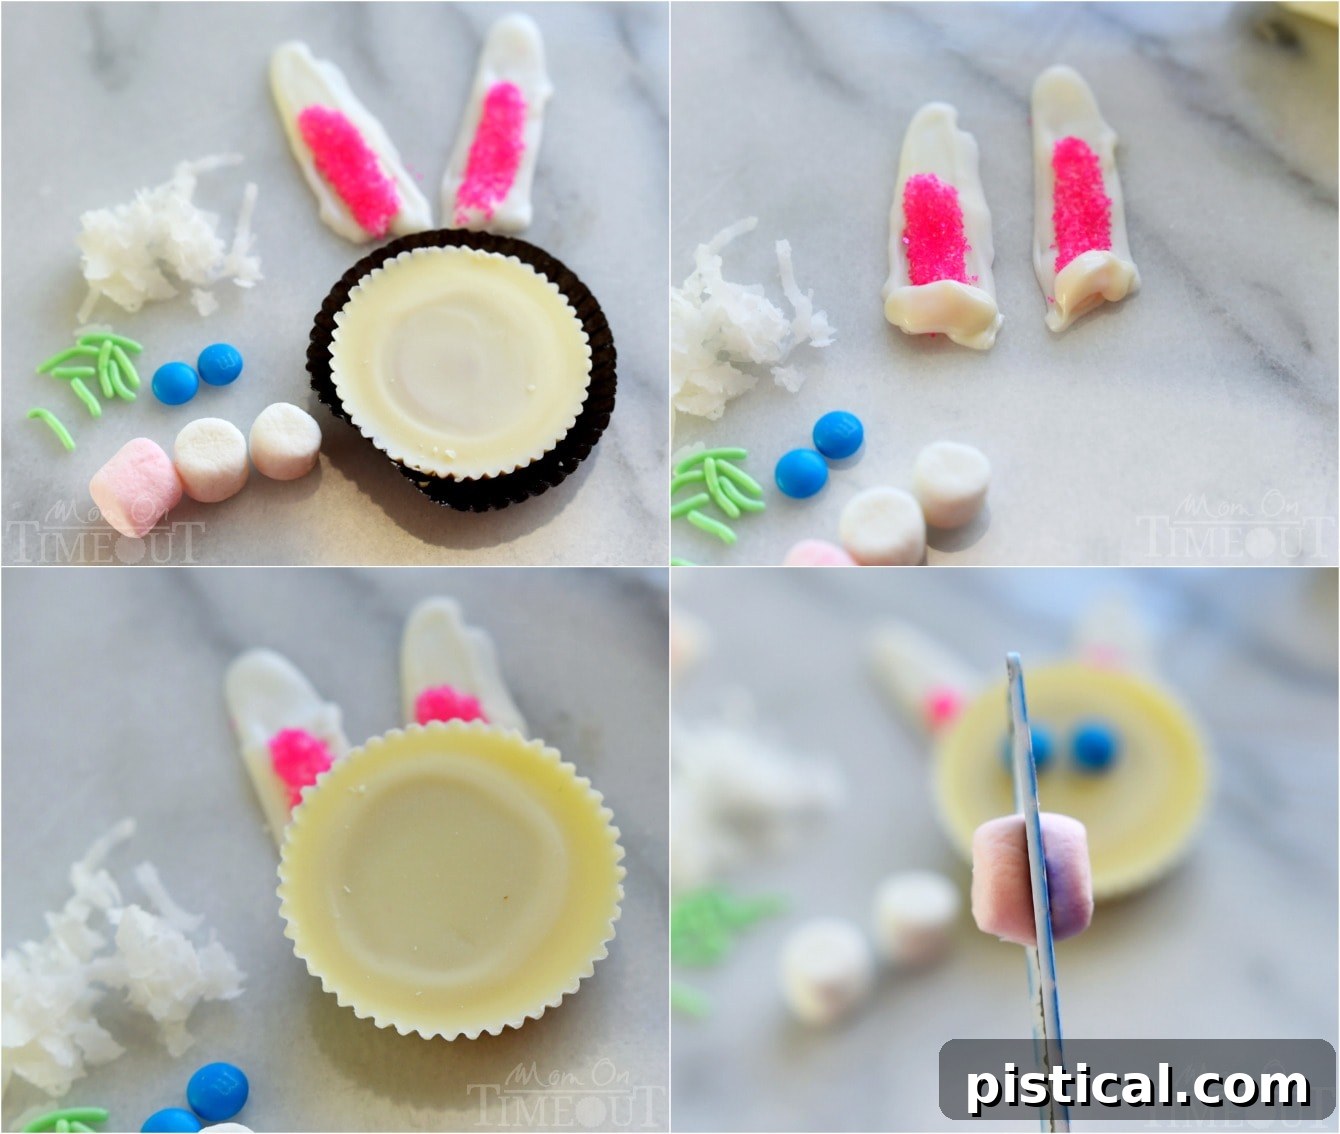
Gather your little components, and let’s bring these adorable bunnies to life! For each individual bunny, you will need two mini M&M’s for the eyes, one pink marshmallow for the nose, two white marshmallows for the cheeks, a small pinch of shredded coconut for the fluffy hair, and six colorful sprinkles or jimmies (choose any color you like!) to form the whiskers. Lay out all your components neatly; this makes the assembly process much smoother and more enjoyable.
Attaching the Ears to the Reese’s Base
To begin forming the face, pipe a small amount of your melted candy coating onto the bottom edge of each hardened ear. Gently press the Reese’s peanut butter cup onto these sticky spots, ensuring the ears are positioned at the top of the cup. Allow them a few moments to set firmly in place. This step forms the foundation of your bunny’s head, giving it that characteristic upright posture.
Creating the Bunny’s Charming Face Features
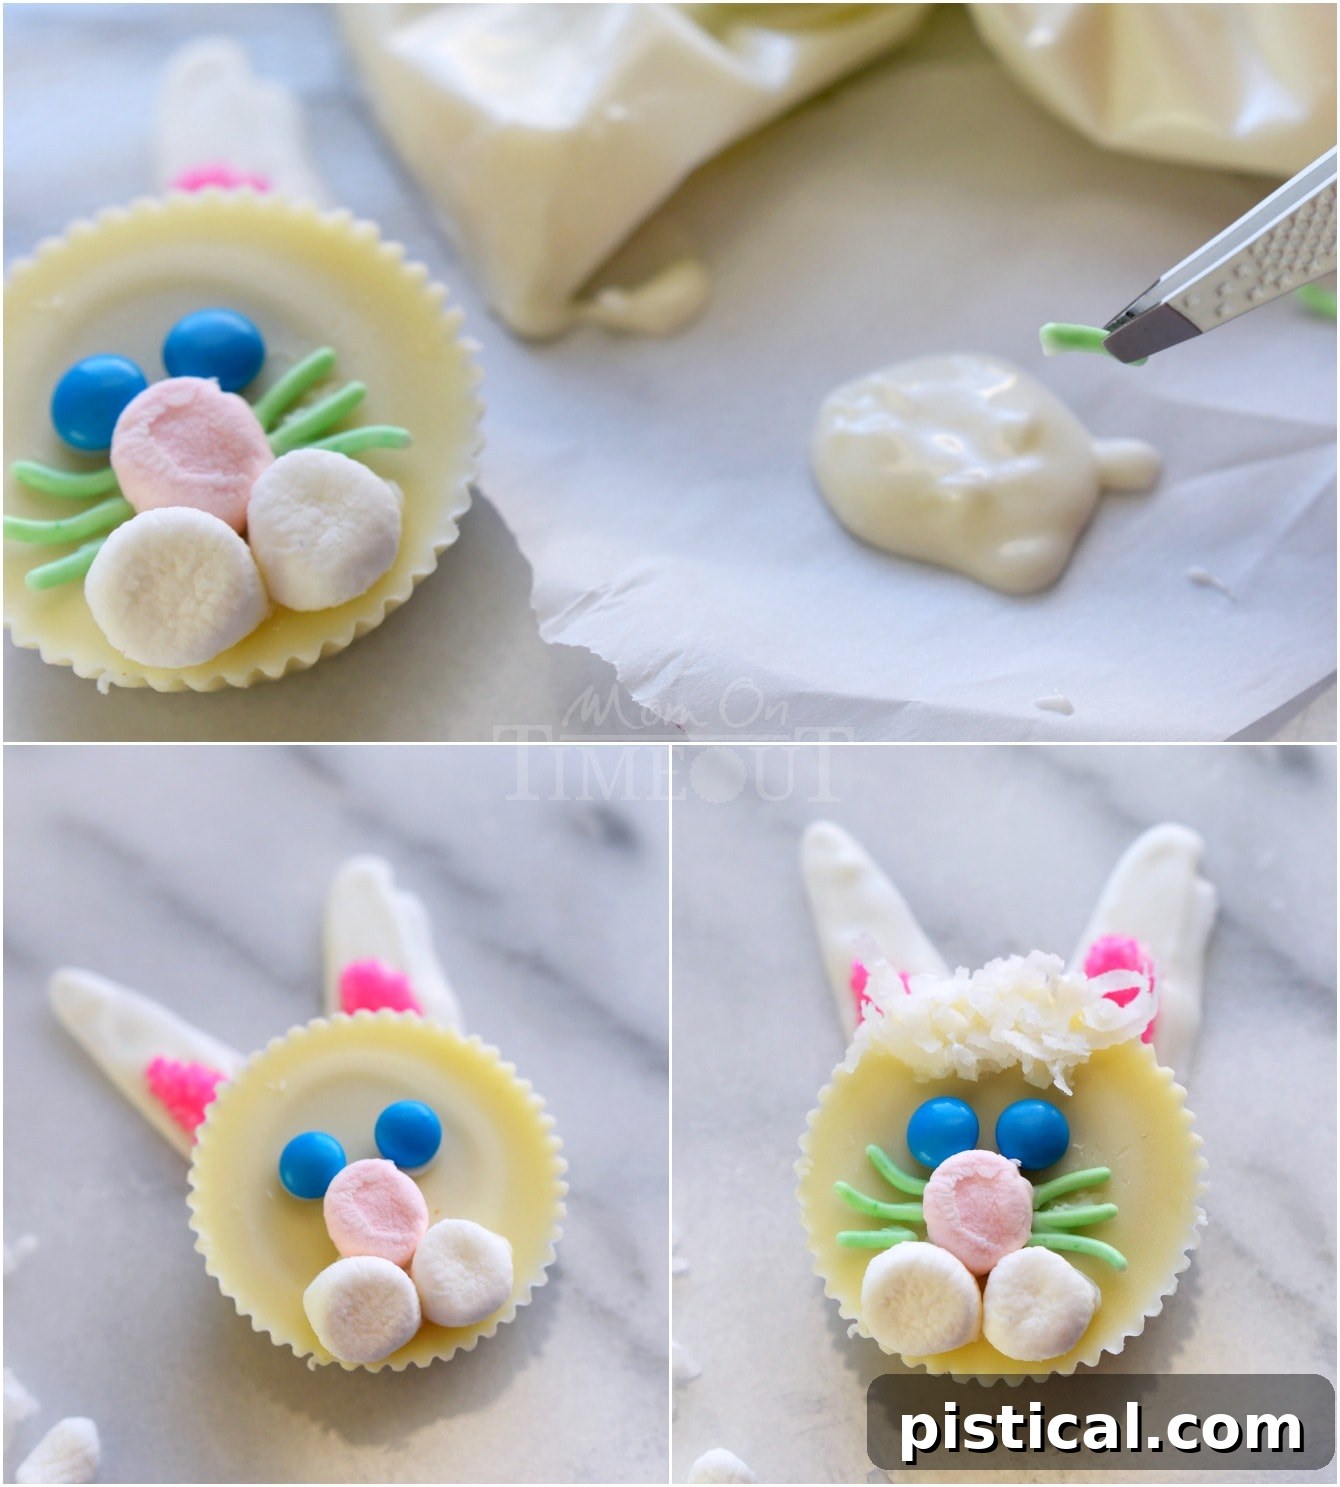
Now it’s time to “glue” on the rest of the facial features. Take your pink marshmallow and slice it in half horizontally to create two flat, round pieces—these will be the cute little noses. For the cheeks, take your two white marshmallows and carefully trim off the bottom third of each. While marshmallows naturally have a slight stickiness that can adhere to the Reese’s cup, for extra security and to prevent them from falling off, I recommend applying a tiny dab of melted candy coating before placing them. This ensures all parts stay put for picture-perfect bunnies.
Next, for the eyes and whiskers: squeeze out a small blob of candy coating from your ziploc bag onto a piece of parchment paper or a small plate. Dip the back of each mini M&M into the melted coating before positioning them as eyes on the Reese’s cup. Repeat this process for the jimmies (sprinkles) to create whimsical whiskers on either side of the nose. Finally, for a touch of fluffy hair, dip a tiny amount of shredded coconut into the candy coating and gently place it between the ears, just above the eyes. Remember, a little goes a long way to achieve that subtle, soft look!
Creative Ways to Display Your Reese’s Easter Bunnies
While laying your completed Reese’s Easter Bunnies flat on a platter is always an option, I truly love the visual appeal of seeing their little ears perk up! It took me a moment to devise the perfect display solution, and I’m thrilled to share my favorite method for showcasing these adorable treats upright, making them even more captivating for your Easter table.
The Edible Green Grass and Marshmallow Stand
Here’s how I created a charming and edible display for my bunnies. First, I dyed some sweetened shredded coconut a vibrant green to resemble grass. This is super easy to do: simply place the coconut in a ziploc bag, add a few drops of green food coloring (I highly recommend this brand for rich color), seal the bag, and shake until the color is evenly distributed. Once you have your “grass,” spread it across a serving plate or platter.
Next, I cleared out small circular areas within the coconut grass and placed large marshmallows in these spots. These substantial marshmallows serve as excellent, stable supports for the Reese’s Bunnies. Not only do they perfectly bear the weight of the treats, but they are also completely edible – an extra bonus that my boys absolutely adored! They had a blast picking off the bunnies and then devouring the marshmallows.
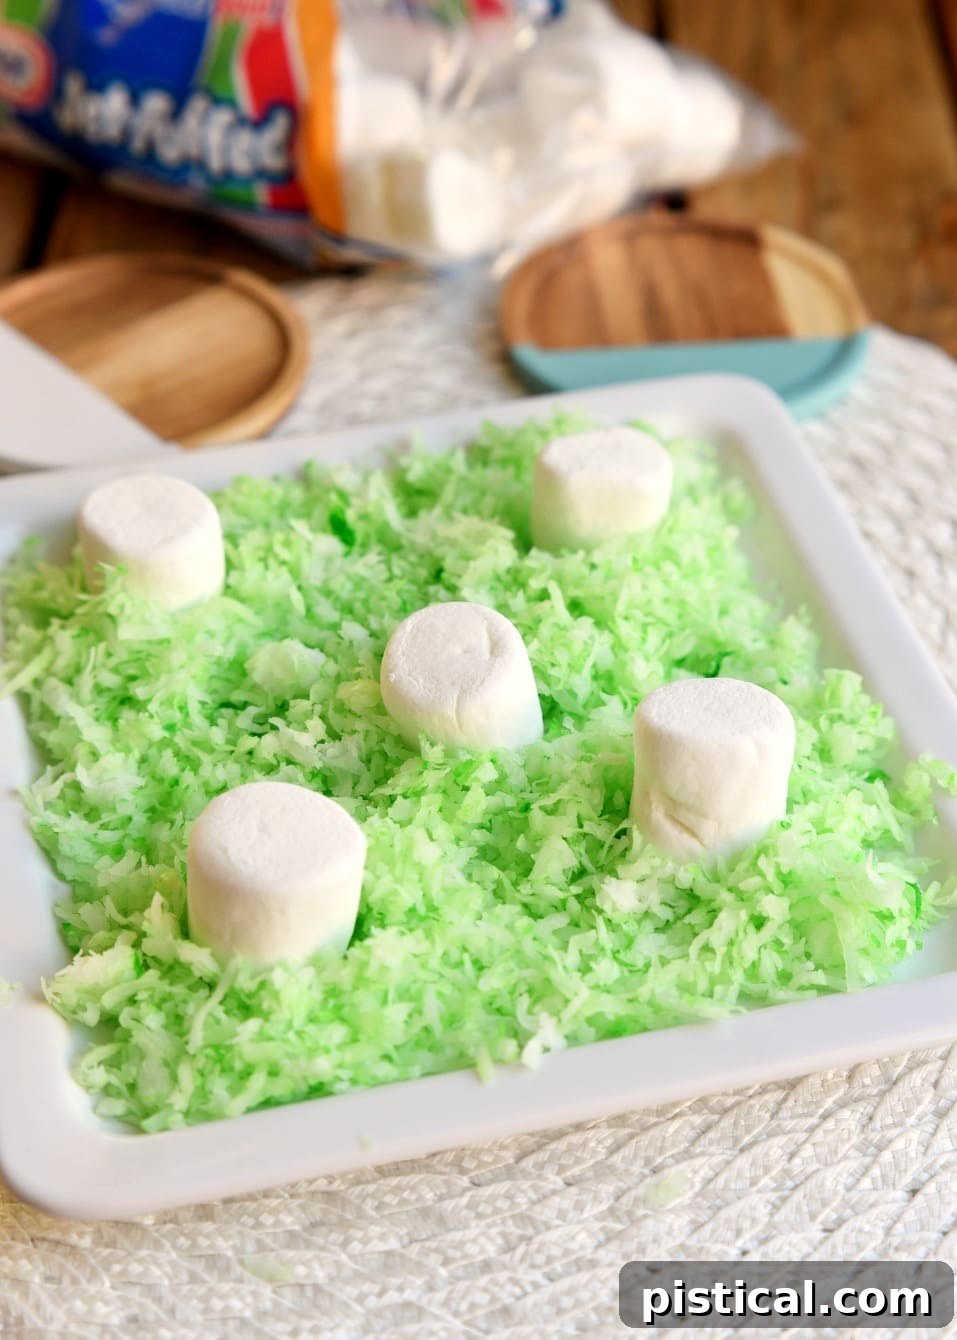
Now, simply lean your finished bunnies gently against the large marshmallows. This allows their charming faces and perky ears to be fully visible, creating an enchanting Easter tableau that will surely be a conversation starter.
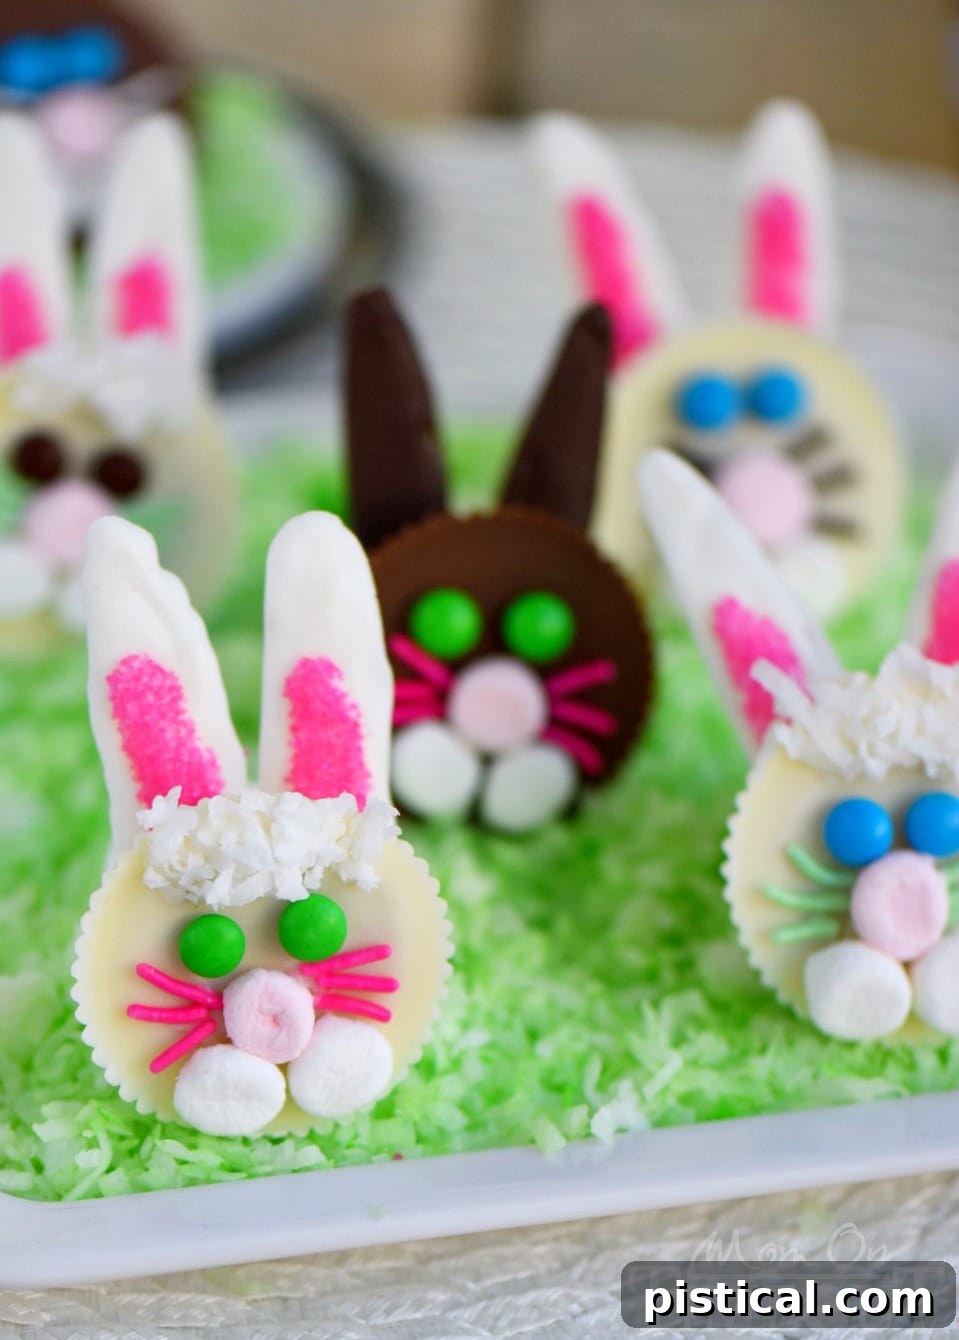
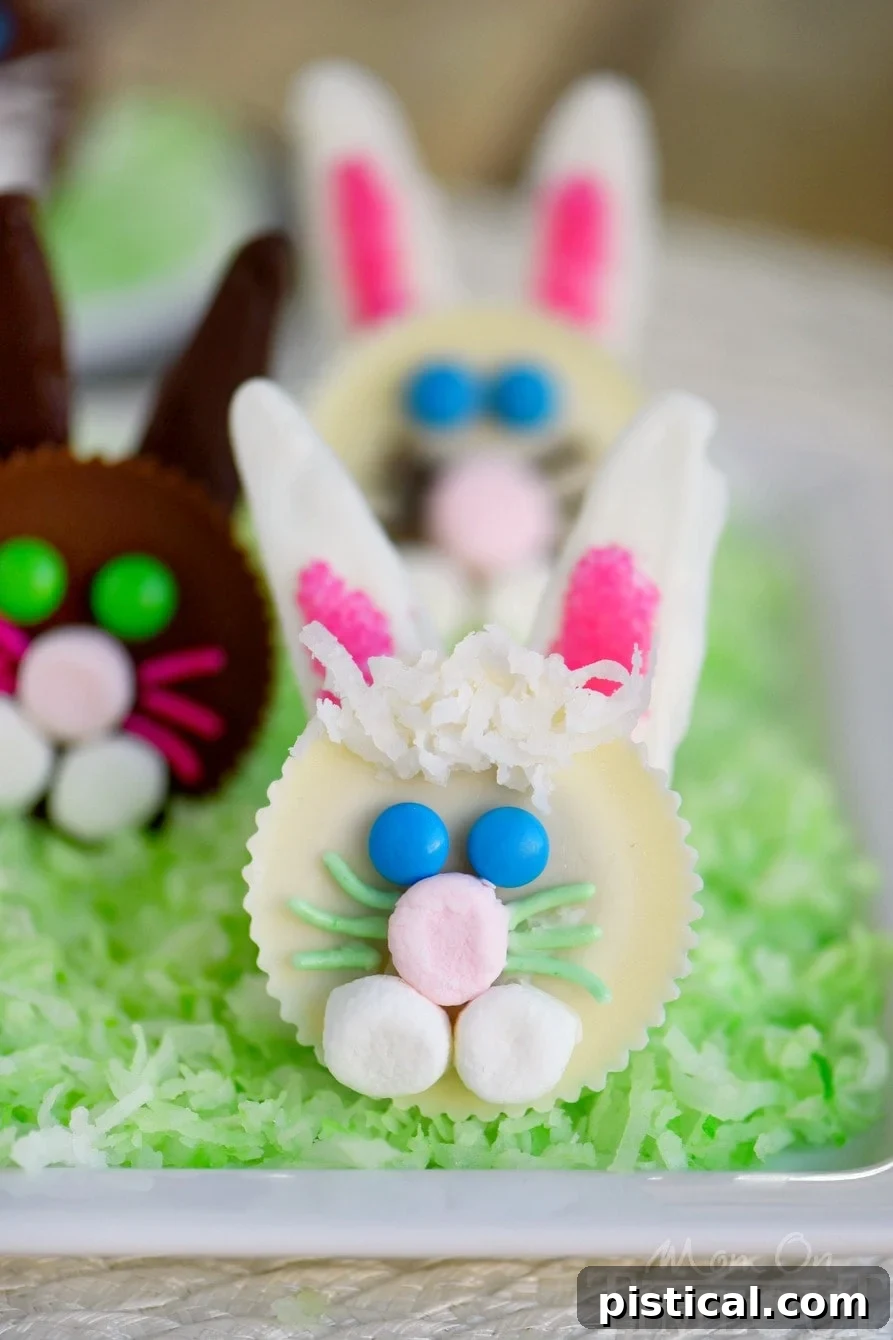
Aren’t they absolutely darling? The beauty of making these bunnies is that there’s truly no right or wrong way to do it. Embrace your creativity! I had so much fun experimenting with various color combinations for the M&M eyes, sprinkle whiskers, and even different shades of pink sugar for the ears. Honestly, I love every single variation we created, and I’m sure you will too!
Essential Ingredients and Where to Find Them
To help you gather everything you need for these delightful Reese’s Easter Bunnies, I’ve provided links to several items on Amazon. However, rest assured that all these ingredients are readily available at your local grocery store, Target, Walmart, or any major supermarket. The Amazon links are primarily to show you the exact products I used, which can be incredibly helpful when you’re shopping!
Wishing you and your family a very Happy Easter filled with joy, laughter, and plenty of sweet treats!
Reese’s Easter Bunnies Recipe
Print
Pin
Reese’s Bunnies
Ingredients
- 10 white chocolate Reese’s peanut butter cups or regular Reese’s peanut butter cups
- 10 pink marshmallows from a Fun Mallows bag
- 20 white mini marshmallows
- 60 jimmies (sprinkles) of assorted colors (brown, white, green, pink, etc.)
- 16 oz white candy coating (CandiQuik, Ghiradelli, Wilton) or chocolate candy coating (CandiQuik, Ghiradelli, Wilton)
- pink sugar
- 20 mini M&M’s (blue, green, brown)
- 1/2 cup sweetened shredded coconut
Instructions
Ears
-
Melt white (vanilla) candy coating according to package directions. For easiest handling and minimal mess, transfer the melted coating to a heavy-duty ziploc bag. It’s best to work with a couple of ounces at a time to keep it manageable.
-
Using scissors, snip off a small corner from the ziploc bag. Carefully pipe ear shapes onto a sheet of parchment paper. Ensure you pipe as many sets as you plan to make Reese’s Bunnies, plus an extra set or two for good measure. Let them harden completely.
-
Once the white ears are firm, pipe a small amount of melted candy coating onto the desired area for the inner ear. Immediately sprinkle pink sugar over this wet coating and allow it to dry fully.
Face Assembly
-
Pipe a small amount of melted candy coating onto the bottom of each hardened ear. Gently press each Reese’s peanut butter cup onto the coated ends of the ears. Allow to set up completely to secure the ears.
-
Cut each pink marshmallow in half to create two noses. For the cheeks, trim off the bottom third of each white mini marshmallow. While marshmallows may stick on their own, a tiny dab of melted candy coating ensures a secure attachment to the Reese’s cup.
-
Squeeze out a small amount of candy coating onto a clean surface. Dip the back of the M&M’s (for eyes) and the jimmies (for whiskers) into the coating before carefully placing them onto the Reese’s cup. Apply a small amount of coconut (for hair) in the same manner. Remember, less is often more for these delicate features!
-
Allow the assembled bunnies to set completely. Refrigerating them for a short period can expedite this process. Arrange your finished bunnies on a platter adorned with green coconut “grass” for a festive display.
Nutrition
More Sweet Treats Perfect for Easter Celebrations!
Looking for more delightful recipes to complete your Easter feast? We’ve got you covered with a selection of our favorite festive treats:
No-Fail Jell-O Divinity
Three-Minute Easter Fluff
To-Die-For Carrot Cake
Pastel Mint Patties
The Best Coconut Macaroons
Easter Cathedral Candy Recipe
Carrot Cake Bars with Cream Cheese Frosting

For a complete collection of all our delightful Easter ideas, explore HERE.
And for a treasure trove of all our dessert recipes, click HERE.
Don’t miss a single sweet moment! Sign up to receive email notifications when new recipes are posted!
For even more fabulous ideas and daily updates, follow us on Facebook – Pinterest – Instagram – Twitter – Bloglovin’.