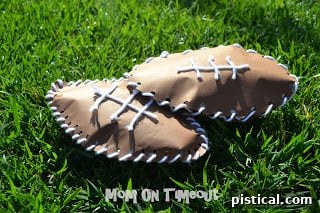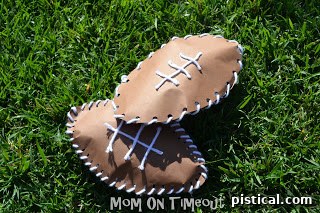
Score Big with This Easy DIY Paper Football Craft: Perfect for Kids’ Parties & Game Day Fun!
Are you ready for some football action? Not just any football, but an exciting football craft project that promises hours of fun and creativity! This simple yet engaging DIY paper football activity is perfect for almost any age group, making it an ideal choice for keeping little hands busy during a lively football party, a rainy afternoon, or just a casual game day gathering. Imagine the joy of crafting your very own footballs, especially when you can customize them in your favorite team colors for an added layer of personalized fun!
This craft isn’t just about making a toy; it’s about fostering creativity, developing fine motor skills, and creating lasting memories. With minimal materials and straightforward steps, you’ll be amazed at how quickly you can transform everyday items into fantastic footballs that are ready for play. Let’s dive into making these fun-tastic paper footballs!
Why Craft Paper Footballs? The Benefits of This Engaging DIY Project
Beyond being a delightful pastime, creating paper footballs offers a wealth of benefits for children and adults alike. It’s more than just a craft; it’s an opportunity for learning and development.
- Boosts Creativity & Imagination: From choosing paper colors to designing the laces, every step allows for personal expression. Kids can imagine themselves as star players or skilled artisans, bringing their unique vision to life.
- Develops Fine Motor Skills: Cutting, punching holes, lacing yarn, and carefully placing glue dots all require precision and coordination, helping to refine fine motor skills essential for writing and other daily tasks.
- Enhances Problem-Solving Abilities: Figuring out how much stuffing is enough, or how to evenly space the holes, encourages practical problem-solving in a fun context.
- Promotes Patience & Focus: Crafting requires concentration and the ability to follow instructions, teaching valuable lessons in patience and attention to detail.
- Budget-Friendly Entertainment: Using readily available and inexpensive materials like brown paper, newspaper, and yarn makes this an economical way to provide entertainment and creative outlets.
- Perfect for Group Activities: Whether it’s a birthday party, a classroom project, or a family gathering, this craft scales beautifully for groups, encouraging teamwork and shared experiences.
- Screen-Free Engagement: In an increasingly digital world, hands-on crafts offer a much-needed break from screens, promoting tactile learning and real-world interaction.
- Customization and Personalization: The ability to choose different paper colors allows for creating footballs in team colors, school colors, or any color scheme desired, making each craft uniquely yours.
This paper football craft truly offers a winning combination of entertainment, education, and creative expression, all wrapped up in a simple, accessible package.
Gather Your Game-Day Crafting Supplies
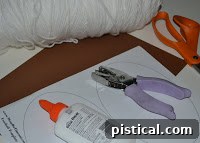
One of the best aspects of this DIY paper football project is the simplicity and accessibility of the materials required. You likely have most of these items lying around your home or can acquire them very affordably. Before you begin your crafting journey, make sure you have everything laid out and ready to go.
Here’s what you’ll need to create your fantastic paper footballs:
- Brown Construction Paper: This forms the body of your football. While brown is traditional, feel free to experiment with other colors to represent your favorite team or create unique designs.
- Newspaper, Shredded: This will be the stuffing that gives your football its plump, playable shape. Old newspapers are perfect for repurposing!
- White Yarn: Essential for lacing the football halves together and creating the iconic white laces on top. A sturdy cotton or acrylic yarn works best.
- Scissors: For cutting out the football shapes and yarn pieces. Ensure they are appropriate for the age group participating – child-safe scissors for younger crafters.
- Glue Stick or Liquid Glue: You’ll need glue to secure the decorative laces to your finished football. A glue stick is usually less messy, but liquid glue works well too.
- Hole Punch: To create the holes around the perimeter of your football halves for lacing. A standard single-hole punch is ideal.
- Football Template (Printable): A convenient downloadable template to help you create perfectly shaped footballs, ensuring consistency and ease, especially for those who prefer not to draw freehand.
Gathering these materials is the first exciting step towards crafting your very own personalized paper footballs. Once everything is assembled, you’ll be ready to move on to the fun part: the creation process!
Step-by-Step Guide: Crafting Your Own Paper Footballs
Now that you have all your materials, it’s time to transform them into a fun, playable paper football. Follow these detailed instructions to create a durable and exciting craft that’s perfect for tossing around or decorating.
Preparation is Key: Shredding Newspaper for Stuffing
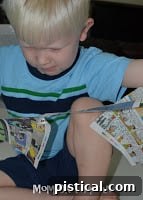
The first step in bringing your paper football to life is preparing its “insides.” You’ll need a good amount of stuffing to give your football a satisfying, plump feel. This is a fantastic opportunity to involve younger crafters, as shredding newspaper is a fun, sensory-rich activity.
-
Shred Newspaper: Take several pieces of old newspaper and begin shredding them into small strips or crinkled pieces. Don’t be afraid to let kids help with this; it’s excellent for developing hand strength and coordination. Ensure the pieces are small enough to easily stuff into the football, but not so tiny they become dust. You’ll need quite a bit of shredded newspaper for each football you plan to make, so gather a good pile. The more you shred, the softer and fuller your football will be. Just remember to have them wash their hands afterward, as newspaper ink can be a bit messy!
Shaping Your Football: Cutting the Brown Paper Ovals
The exterior of your paper football is just as important as its stuffing. This step focuses on creating the two identical halves that will form the outer shell of your craft.
-
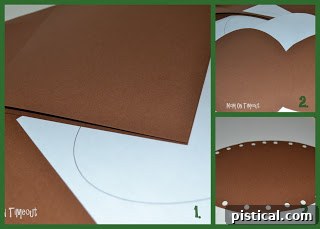
1. Fold Brown Paper: Take a piece of brown construction paper and fold it neatly in half. This technique allows you to cut two perfectly matching football shapes simultaneously.
-
2. Trace or Draw Your Oval: Use the provided football template to trace a large oval onto the folded paper. If you’re feeling artistic, you can freehand draw your own football shape. Ensure it’s a size that will be easy for small hands to hold and play with.
-
3. Cut Both Ovals: Carefully cut along the lines of your traced or drawn oval. Because the paper is folded, you will end up with two identical football-shaped pieces. It’s crucial that these two pieces match up perfectly, as you will be lacing them together shortly.
-
4. Punch Holes: Once your two football halves are cut, align them perfectly. Using your hole punch, make holes around the entire perimeter of the football. Aim for even spacing, typically about half an inch to an inch apart. It’s important not to punch the holes too close to the edge of the paper, as this could cause the paper to tear when you begin lacing. Ensure the holes on both layers of paper align for smooth lacing. Supervision is recommended for younger children using the hole punch.
The Lacing Journey: Assembling Your Football
Now for the exciting part where your football starts to take shape! Lacing the two halves together gives the football its structure and provides an opportunity to incorporate your white yarn details.
-
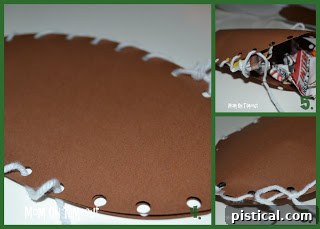
5. Start Lacing: Cut a generous length of white yarn – usually about 2-3 feet should be sufficient, depending on the size of your football. Tie one end of the yarn securely around one of the holes at the top or side of your football. Begin threading the yarn through the aligned holes, going back and forth between the two paper layers. You can use a simple whip stitch or an over-and-under stitch, whatever is easiest for the crafter. Continue lacing around the perimeter, making sure to stop and leave a significant opening (about one-third to one-half of the football) before you complete the circuit.
-
6. Stuff the Football: Now, take your pile of shredded newspaper and begin stuffing it into the open section of your partially laced football. Gently push the newspaper in, making sure to fill the entire cavity evenly. You want the football to be firm and plump, but not so overstuffed that it strains the paper or holes. Aim for a shape that feels good to hold and toss. This step is where your football truly begins to gain its three-dimensional form.
-
7. Finish Lacing and Tie Off: Once your football is sufficiently stuffed, continue threading the yarn through the remaining holes, closing the opening completely. When you reach the end, tie off the yarn securely with a double knot. You can trim any excess yarn, or if you prefer a neat finish, carefully tuck the knot and any loose ends inside the football.
Adding the Finishing Touches: The Iconic Laces
No football is complete without its characteristic white laces! This final step adds authenticity and detail to your handmade creation, truly bringing it to life.
-
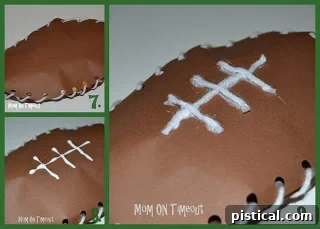
8. Apply the Main Lace Line: Locate the center of one side of your finished and stuffed paper football. Run a single, straight line of glue approximately three inches long down the middle of this section. This will be the main vertical “lace” line.
-
9. Add the Cross Laces: Next, create three more short lines of glue horizontally across the main glue line, spacing them evenly. These will form the smaller, horizontal cross-laces that give a football its distinctive look.
-
10. Cut Yarn for Laces: Cut four pieces of white yarn: one piece approximately 3 inches long for the main vertical lace, and three shorter pieces, each about 1.5 inches long, for the cross-laces. Adjust these lengths slightly as needed to fit your football’s size.
-
11. Place Yarn and Dry: Carefully place the 3-inch piece of yarn onto the long vertical glue line. Then, position the three shorter pieces horizontally onto the cross glue lines. Gently press them down to ensure good adhesion. Allow the glue to dry completely. This might take some time, so patience is key for a neat finish. Once dry, your paper football is officially complete!
Creative Variations & Customization Tips
While the traditional brown football with white laces is a classic, don’t hesitate to unleash your creativity and personalize your paper footballs! Here are some ideas to make each creation unique:
- Team Colors: Instead of brown construction paper, use paper in the colors of your favorite football team! Combine it with white yarn for the laces, or even use a contrasting yarn color that matches your team’s secondary colors.
- Different Sizes: Experiment with the template size. Make mini footballs perfect for tiny hands or desk games, or create larger ones for a more substantial craft project.
- Decorations: Before lacing, decorate the brown paper halves with markers, crayons, or even stickers. You could draw team logos, player numbers, or creative patterns.
- Personalization: Write names or messages on the footballs to make them special gifts or party favors.
- Adding Sound: For an extra element of fun, slip a small bell or a few beads inside the newspaper stuffing before you finish lacing. This will give your football a playful rattle when shaken or tossed.
- Texture Play: Use different types of paper for the outer shell – perhaps textured cardstock or even recycled paper with interesting prints for a unique look.
Game On! Ways to Play with Your New Paper Footballs
Once your paper footballs are complete and the glue is dry, the real fun begins! Here are a few ideas for how to enjoy your handmade creations:
- Classic Tabletop Football: Use your paper football for a traditional flick-football game. Set up goalposts with your fingers or other household items and flick the football across a table.
- Target Practice: Create targets (e.g., paper cups, small baskets) and see who can accurately toss their paper football into them. Assign points for different targets for competitive fun.
- Indoor Toss: Perfect for rainy days, these soft footballs are safe for indoor play, reducing the risk of damage to furniture or walls.
- Party Favors or Decorations: Your custom-made paper footballs make excellent party favors for a football-themed birthday, or they can be used as unique decorations around your game day spread.
- Creative Storytelling: Encourage kids to use their footballs as props in imaginative play, creating their own game scenarios and stories.
Safety First: Important Considerations for Kids’ Crafts
While this craft is generally very safe and suitable for children, it’s always important to keep a few safety considerations in mind, especially when crafting with younger participants:
- Scissors Supervision: Always supervise children when they are using scissors. Ensure they are using age-appropriate scissors with blunt tips if needed.
- Hole Punch Use: While simple, a hole punch can still pinch fingers. Show children how to use it safely and offer assistance if they struggle.
- Non-Toxic Materials: Confirm that your glue is non-toxic, especially if crafting with very young children who might be tempted to put things in their mouths.
- Small Pieces: The shredded newspaper and yarn pieces are small. Ensure children understand not to ingest them.
- Clean Workspace: Encourage good hygiene, especially after handling newspaper, as ink can transfer to hands.
By following these simple safety guidelines, you can ensure a fun and secure crafting experience for everyone involved.
There you have it – a wonderfully engaging, simple, and satisfying craft project that results in a fun-tastic paper football! Whether you’re gearing up for a big game, hosting a themed party, or simply looking for a creative outlet on a quiet afternoon, these DIY paper footballs are sure to be a hit. The process of making them is just as enjoyable as playing with them.
So gather your materials, call up your teammates (or little crafters), and get ready to create some memorable moments and cool custom footballs. Don’t forget to experiment with colors and decorations to truly make them your own. Share your creations and enjoy the satisfaction of scoring a crafting touchdown! Get ready to flick, toss, and play with your very own handmade masterpieces.