

Step into a world of vibrant citrus with these incredible Lemon Sweet Rolls. Forget your traditional cinnamon rolls for a moment; these delightful pastries offer a bright, zesty alternative that promises to awaken your taste buds. Each bite delivers a perfect harmony of sweet, tart, and buttery flavors, all encased in a soft, pillowy dough. Whether you’re planning a lavish breakfast, a comforting brunch, or simply craving an afternoon pick-me-up, these lemon rolls are surprisingly simple to master and guaranteed to become a new favorite.
If you’re as passionate about lemon as we are, you’ll love exploring these other delectable lemon desserts: Classic Lemon Bars, Light Lemon Tiramisu, or our show-stopping Elegant Lemon Meringue Cheesecake.

The Irresistible Allure of Lemon Sweet Rolls
While classic cinnamon rolls hold a special place in many hearts, there’s an undeniable joy in experimenting with new flavors and giving beloved recipes a fresh twist. If you’re searching for something innovative and utterly delicious to bake, these lemon rolls are your answer. They combine the familiar comfort of a soft, fluffy dough with an exhilarating burst of zesty lemon filling, all crowned with a luscious, creamy glaze. The result is an irresistible treat that’s perfect for any occasion, from casual family mornings to elegant holiday brunches.
Imagine the aroma of freshly baked bread mingling with bright citrus filling wafting through your kitchen. These rolls aren’t just food; they’re an experience. I can almost guarantee that once a batch of these lemon rolls emerges from your oven, they’ll disappear at an astonishing rate. It’s hard to stop at just one when they’re this good!

Why These Lemon Sweet Rolls Will Steal Your Heart
These aren’t just any sweet rolls; they offer a unique combination of factors that make them truly exceptional:
Sunshine in Every Bite:
There’s an unparalleled freshness that lemon brings to both breakfast and dessert, making it a beloved flavor across countless culinary traditions. The vibrant zest and tangy juice from fresh lemons infuse these rolls with a refreshing citrus flavor that instantly brightens your palate and invigorates your senses. Each bite is like experiencing a burst of sunshine, offering a delightful escape from the ordinary and a perfect antidote to dreary mornings or a long day.
A Sweet and Tangy Twist on a Beloved Classic:
For those who adore the comforting warmth of traditional cinnamon rolls, these lemon sweet rolls present a thrilling and welcome departure. They boast the same incredibly soft, fluffy dough that you know and love, but with a filling that trades spice for a dynamic balance of sweetness and tang. This innovative twist is ideal for adventurous eaters, those looking to impress with something unexpected, or anyone craving a familiar form with a refreshingly new flavor profile.
Remarkably Versatile for Any Occasion:
The beauty of these lemon rolls lies in their incredible versatility. Serve them warm, generously drenched in their creamy lemon glaze, as a show-stopping breakfast or brunch centerpiece that will earn you rave reviews. Alternatively, they make a fantastic and invigorating afternoon pick-me-up alongside a cup of tea or coffee, providing just the right amount of sweetness and zest. They can also transform into a light and elegant dessert, perfect for concluding any meal with a sophisticated, refreshing note.

Mastering the Art of Lemon Sweet Rolls: A Step-by-Step Guide
If you’re already familiar with baking cinnamon rolls, you’ll find this lemon roll recipe to be a breeze! The primary differences lie in the bright lemon-infused filling and the creamy lemon glaze. But fear not, even if you’re a novice baker, I’ll guide you through every step of the process with clear, simple instructions, ensuring a successful and delicious outcome.
For your convenience, the complete printable recipe card with precise measurements and timings can be found at the conclusion of this post.
Crafting the Perfect Lemon Rolls
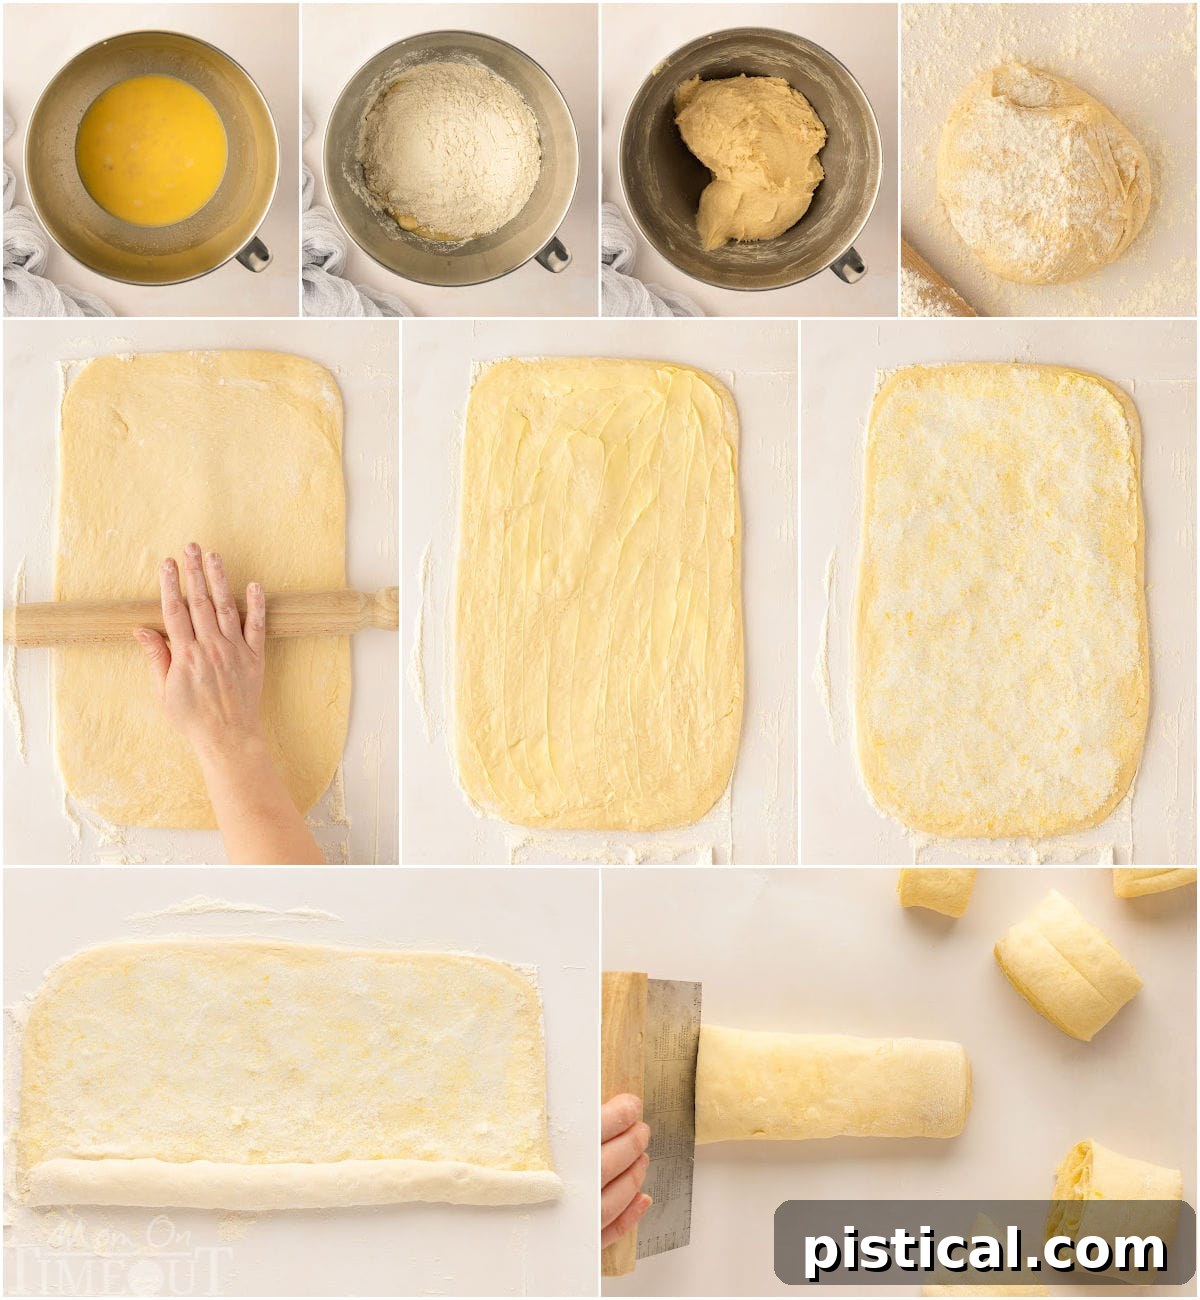
- Activate the Yeast: In a large mixing bowl, whisk together the lukewarm milk, instant yeast, egg, granulated sugar, melted butter, and a pinch of salt. Continue whisking until the mixture becomes lightly foamy, indicating the yeast is active and ready to work its magic.
- Form the Dough: Gradually add the bread flour to the wet ingredients. Using a stand mixer fitted with a dough hook, knead the dough for approximately 3 minutes until it forms a soft, elastic ball. If you’re kneading by hand, mix with a spatula until a cohesive dough forms, then turn it out onto a lightly floured surface and knead for about 5 minutes. The dough should feel slightly tacky but not sticky. Add small amounts of flour if necessary, but avoid over-flouring to maintain a tender crumb.
- First Rise: Lightly oil a clean bowl and place the dough in it, turning once to coat. Cover the bowl tightly with plastic wrap and place it in a warm, draft-free spot. Allow the dough to rise until it has doubled in size, which typically takes about 60-90 minutes, depending on your kitchen’s temperature. This stage is crucial for developing the dough’s airy texture and flavor.
- Roll the Dough: Once risen, gently punch down the dough to release the air. Transfer it to a lightly floured surface and, using a floured rolling pin, roll it into a large rectangle, aiming for dimensions of roughly 12 inches by 16 inches. Maintain an even thickness for uniform rolls.
- Apply the Butter Base: Spread the softened unsalted butter evenly across the entire surface of the rolled-out dough, leaving a small border (about half an inch) along one of the long edges. This border will help seal the roll later.
- Prepare the Lemon Filling: In a separate small bowl, combine the granulated sugar and finely grated lemon zest. Mix them thoroughly until the sugar is infused with the bright citrus aroma. This lemon sugar mixture will be the heart of your rolls.
- Sprinkle the Filling: Generously scatter the lemon-sugar mixture evenly over the buttered surface of the dough, making sure to spread it right up to the edges (except for the small border you left).
- Roll and Seal: Starting from the long side opposite the small border, tightly roll the dough into a long log shape. Gently pinch the seam closed with your fingers to ensure the filling stays securely inside during baking.
- Slice the Rolls: For easier and more even cutting, slice the log of dough in half first. Then, cut each half into 6 equal pieces, resulting in 12 perfectly portioned rolls. A sharp knife or unflavored dental floss can help achieve clean cuts.
- Arrange for Second Rise: Grease a 9×13-inch baking dish with a tablespoon of melted butter. Arrange the cut rolls in the dish, leaving a small amount of space between each one to allow for expansion during the second rise.
- Second Rise: Cover the baking dish loosely with plastic wrap and return it to a warm spot. Allow the rolls to rise again for about 45-60 minutes, or until they have puffed up significantly and are nestled closely together. This second proofing ensures a light and airy final texture.
- Preheat and Bake: While the rolls are completing their second rise, preheat your oven to 350°F (175°C). Once risen, remove the plastic wrap. Lightly brush the tops of the rolls with an additional tablespoon of melted butter for a golden finish. Bake for 28-30 minutes, or until the tops are beautifully golden brown and the rolls are cooked through. If they brown too quickly, you can loosely tent them with aluminum foil.
- Cool Slightly: Once baked, remove the rolls from the oven. While they’re cooling slightly in the pan, prepare your luscious lemon glaze.

The Creamy Lemon Glaze
- Combine Wet Ingredients: In a medium mixing bowl, combine the softened cream cheese and softened unsalted butter. Beat them together with an electric mixer until the mixture is smooth and well-combined, with no lumps.
- Add Dry and Liquid: Gradually add the powdered sugar, a pinch of salt, and fresh lemon juice to the cream cheese mixture. Continue beating until you achieve a smooth, pourable consistency. For a thicker glaze, add a little more powdered sugar; for a thinner, runnier glaze, add a touch more lemon juice or a splash of milk.
- Glaze and Garnish: While the lemon rolls are still warm (this allows the glaze to melt slightly and seep into the cracks, creating maximum flavor), generously drizzle the prepared lemon cream cheese glaze over the entire pan of rolls. For an elegant presentation and an extra burst of fresh lemon aroma, scatter thin lemon slices and additional lemon zest over the glazed rolls.
- Serve Immediately: For the ultimate experience, serve these lemon sweet rolls right away while they are still warm and the glaze is perfectly melted and gooey. Enjoy!
Pro Tip: Don’t be shy with the lemon sugar filling! Spread it generously over the dough for maximum flavor, but remember to leave a small, unbuttered border at one edge. This ensures a proper and secure seal when you roll the dough, preventing the filling from oozing out.
Storage and Make-Ahead Brilliance
While these lemon sweet rolls are undoubtedly best enjoyed fresh from the oven, we understand that sometimes planning ahead or managing leftovers is essential. Here’s how to store them effectively or prepare them in advance:
- Refrigerator Storage: If you have any delightful leftovers, transfer them to an airtight container. They can be safely stored in the refrigerator for 2-3 days. To revive their freshness, a quick reheat is recommended.
- Freezing Baked Rolls: To freeze baked rolls, ensure they are completely cooled first. Wrap each roll individually in plastic wrap, then place them in a freezer-safe bag or container. They can be frozen for up to one month. When ready to enjoy, reheat them directly from frozen in a preheated oven at 300°F (150°C) for about 15 minutes, or until warmed through and soft.
- Reheating Leftovers: The best way to enjoy leftover rolls is to warm them gently. Pop a single roll into the microwave for 20-30 seconds. This will soften the dough and gently melt the glaze, bringing it back to a delightful consistency. For larger batches, the oven is ideal (as described for frozen rolls).
- Making Ahead (Overnight Option): You can prepare these Lemon Sweet Rolls up to 48 hours in advance of baking. After the second rise (step 10 in the recipe), instead of baking, cover the baking dish tightly with plastic wrap and place it in the refrigerator. The cold temperature will effectively “put the yeast to sleep,” preventing further rising. When you’re ready to bake, remove the dish from the fridge and let it sit at room temperature for at least an hour (or up to two hours) to allow the dough to warm up and gently proof again before proceeding with step 11 and baking.
- Freezing Unbaked Rolls: For maximum freshness upon baking, you can freeze the rolls before their final rise. Follow the recipe instructions up to step 10 (placing the cut rolls in the greased baking dish). Instead of the second rise, cover the dish exceptionally well with multiple layers of plastic wrap and then aluminum foil to prevent freezer burn. Freeze for up to one month. To bake, thaw the rolls completely in the refrigerator for 24 hours. Then, bring them to room temperature for at least an hour before proceeding from step 11 and baking as directed.

Frequently Asked Questions About Lemon Sweet Rolls
Which type of flour is best for these rolls?
Bread flour is an excellent choice for these lemon sweet rolls. It contains a higher protein content compared to all-purpose flour, which leads to stronger gluten development. This results in a dream dough that is incredibly soft, wonderfully fluffy, and boasts a desirable chewiness. However, if bread flour isn’t readily available, don’t worry! This recipe has been thoroughly tested with standard all-purpose flour, and it yields delicious results as well, though the texture might be slightly less chewy.
How long does the dough typically take to rise?
Patience is truly a virtue when it comes to yeast doughs, especially during the first rise. This initial proofing typically takes approximately an hour, but it’s crucial to remember that environmental factors, particularly the temperature of your kitchen, play a significant role. Rather than strictly adhering to a time, watch for the dough to visibly double in size. A helpful trick is to take a quick photo of the dough when you begin; this visual reference will serve as your best guide. A properly proofed dough will appear beautifully dome-shaped and, when gently poked with a clean finger, it should slowly spring back, leaving a slight indentation.
Can I substitute active dry yeast for instant yeast in this recipe?
Absolutely! While the recipe specifies instant yeast for its convenience (it can be added directly to dry ingredients), you can certainly use active dry yeast with a slight adjustment. To do so, combine the warm milk, all of the yeast, and one tablespoon of the granulated sugar from the dough ingredients in your mixing bowl. Whisk gently to combine these ingredients. Allow this mixture to sit undisturbed for 5 to 10 minutes until it becomes foamy and bubbly, indicating that the yeast is active. Once foamy, proceed with adding the remaining dough ingredients as written in the recipe, remembering to include the remaining 2 tablespoons of sugar at this stage.

Creative Variations to Explore
These lemon sweet rolls are wonderfully adaptable, offering a canvas for your culinary creativity. Here are some delightful variations to try:
- Citrus Medley: Introduce another layer of bright citrus flavor by swapping some of the lemon juice and zest for fresh orange or even lime. This creates a beautifully balanced and aromatic roll.
- Berry Bliss: For a burst of fruity freshness, gently fold in fresh blueberries or finely chopped strawberries into the lemon filling before rolling the dough. The berries will soften and release their juices, adding a lovely tart-sweet counterpoint.
- Nutty Crunch: To add extra texture and a hint of nutty flavor, consider sprinkling chopped nuts such as toasted almonds, pecans, or pistachios over the lemon filling. You can also sprinkle them on top of the glaze after baking for a beautiful garnish.
- Lighter Glaze Option: If you prefer a less indulgent topping, prepare a simpler, lighter lemon glaze using only powdered sugar and fresh lemon juice. This will still provide a tangy sweetness without the richness of cream cheese.
- Naked Rolls (No Glaze): For those who prefer a less sweet treat, or if you simply want to highlight the natural flavors of the dough and tangy lemon filling, feel free to skip the glaze altogether. These rolls are delicious even without the extra topping.
Trish’s Expert Tips for Perfect Lemon Sweet Rolls
Achieving bakery-quality lemon sweet rolls at home is entirely possible with a few key techniques and considerations:
- Mind the Milk Temperature: The temperature of your milk is paramount for yeast activation. It’s crucial that the milk is warmed to approximately 110°F (43°C). Milk that is too hot (scalding) will kill the delicate yeast, preventing your dough from rising. A microwave can quickly bring milk to the perfect temperature in about 30-45 seconds, but remember that microwave wattages vary. If you don’t have a kitchen thermometer, perform a simple finger test: dip a clean finger into the milk. It should feel comfortably warm, like a baby’s bath water, not hot. When in doubt, it’s always better to err on the side of slightly cooler milk than too hot.
- Achieving the Ideal Glaze Consistency: The beauty of a homemade glaze is its customizability. We aimed for a light and pourable consistency in our recipe, but you can easily adjust it to your preference. If you desire a thicker, more opaque glaze, simply incorporate more powdered sugar, adding a tablespoon at a time until you reach your desired thickness. Conversely, if you find your glaze too thick and want it thinner or more runny, add a touch more fresh lemon juice or even a splash of milk, a teaspoon at a time, until it reaches the perfect pourable consistency.
- The Power of Bread Flour: As mentioned in our FAQ, bread flour is a superior choice for these rolls. Its higher protein content facilitates excellent gluten development, which is what gives the dough its desirable elasticity and strength. This translates to an incredibly soft, wonderfully fluffy, and slightly chewy roll – the hallmark of a truly great sweet roll. If bread flour is not available, all-purpose flour will still yield delicious results, though the texture might be slightly different.
- Patience is Key for Rising: The rising process (or proofing) is a critical step that cannot be rushed. For the first rise, anticipate roughly an hour, but always prioritize the visual cue over strict timing. The ambient temperature of your kitchen significantly influences how quickly the dough rises. Your goal is for the dough to visibly double in size. Taking a quick photo of the dough at the start can provide a helpful visual comparison later. A properly proofed dough will appear plump and dome-shaped, and when gently pressed with a clean finger, it should slowly spring back, leaving a slight, lingering indentation. This indicates perfect readiness for the next stage.

More Zesty Lemon Treats to Brighten Your Day
If you’ve fallen in love with the vibrant flavor of these Lemon Sweet Rolls, you’re in for a treat! Explore these other fantastic lemon-infused recipes:
- Effortless No-Bake Lemon Pie
- Fluffy Lemon Ricotta Pancakes with Blueberry Sauce
- Refreshing Strawberry Lemonade
- Decadent Lemon Blueberry Cheesecake
- Fun Lemon Rice Krispie Treats

Print Recipe
Pin Recipe
Lemon Sweet Rolls
Ingredients
Dough
- 1 ½ cups whole milk warmed to 110°F or see notes
- 2 ¼ teaspoons instant yeast 1 packet (See notes for using active dry yeast)
- 1 large egg room temperature
- 3 tablespoons granulated sugar
- 2 teaspoons lemon zest
- ½ teaspoon salt
- 3 tablespoons unsalted butter melted
- 3½ to 4¼ cups bread flour or all purpose flour, spooned and leveled
- olive oil or butter for greasing the bowl
Filling
- ¾ cup granulated sugar
- 1½ tablespoons lemon zest packed, about 2 large lemons
- 5 tablespoons unsalted butter softened
- 1 tablespoon unsalted butter for greasing
Glaze
- 4 ounces full fat cream cheese brick style
- 2 tablespoons unsalted butter softened
- 1 ¼ cups powdered sugar
- pinch of salt
- 2 tablespoons lemon juice about 1 large lemon
Garnish
- lemon slices
- lemon zest
Instructions
Lemon Rolls
-
In the large bowl of a stand mixer, combine the lukewarm milk, yeast, egg, sugar, lemon zest, melted butter, and salt. Whisk it together by hand until it gets foamy.1 ½ cups whole milk, 2 ¼ teaspoons instant yeast, 1 large egg, 3 tablespoons granulated sugar, 2 teaspoons lemon zest, ½ teaspoon salt, 3 tablespoons unsalted butter
-
Add the flour then use the stand mixer with a dough hook attachment to knead the dough for 3 minutes. (If you don’t have a stand mixer, use a spatula to mix until a dough forms. Then, turn the dough out onto a surface dusted with flour and knead by hand for 5 minutes.) To test the dough, gently touch it with a clean, dry finger. It should feel a little tacky but shouldn’t stick to your finger. If it does stick, add flour a tablespoon at a time until it no longer sticks to your finger. Take care not to add too much flour.3½ to 4¼ cups bread flour
-
Lightly oil a bowl, place the dough in it and coat it lightly with the oil. Cover the bowl with plastic wrap and leave it in a warm spot to rise until it doubles in size. This will take about an hour, depending on the temperature.olive oil
-
Once the dough has risen, turn it out on to a lightly floured surface. With a floured rolling pin, roll the dough into a large rectangle, roughly 16 inches by 12 inches.
-
Combine the sugar and lemon zest in a bowl and mix well.¾ cup granulated sugar, 1½ tablespoons lemon zest
-
Dot the soft butter all over the dough then use the back of a spoon or an offset spatula to spread it into an even layer across the entire surface of the dough.5 tablespoons unsalted butter
-
Evenly sprinkle the lemon-sugar mixture on top of the butter.
-
Starting with the long side facing you, tightly roll the dough rectangle into a long log shape. Pinch the seam closed with your fingers. To make cutting easier, cut the log of dough in half.
-
Use a sharp knife or dough cutter to cut each half of the dough into 6 equal pieces. You will have 12 pieces total.
-
Grease a 9”x13” baking dish with 1 tablespoon of melted butter. Place the rolls in the dish, leaving a little space between each one.1 tablespoon unsalted butter
-
Cover the dish with plastic wrap and put it somewhere warm to rise again. The rolls will puff up and become close together during this time. The second rise will take 45-60 minutes depending on the temperature. (See notes for making overnight.)
-
Preheat your oven to 350°F.
-
Once the lemon rolls have puffed up, take off the plastic wrap and brush them with one tablespoon of melted butter. Bake for 28 to 30 minutes. Check on the rolls after 25 minutes. If they’re not golden brown yet, bake for an additional 5-10 minutes, or until golden brown. If they are brown but not yet cooked, tent with foil and continue baking.
-
Take the rolls out of the oven and set them aside.
Lemon Cream Cheese Glaze
-
In a large mixing bowl, add the cream cheese and soft butter and beat to combine.4 ounces full fat cream cheese, 2 tablespoons unsalted butter
-
Add the powdered sugar, salt and lemon juice, and beat until you have a smooth pourable consistency. You can adjust the consistency of the glaze by adding more lemon juice for a thinner glaze or more powdered sugar for a thicker glaze.1 ¼ cups powdered sugar, pinch of salt, 2 tablespoons lemon juice
-
While the Lemon Rolls are still warm in the dish, drizzle the glaze over them. Scatter over the lemon slices and lemon zest for garnish.lemon slices, lemon zest
-
Serve the rolls right away while they’re still warm.
Notes
Fresh is always best but here is the information you need to store these rolls:
- Refrigerator: Store leftovers in an airtight container in the fridge for 2-3 days.
- Freezing: Let baked rolls cool completely then wrap them tightly as above and freeze for up to one month. Reheat from frozen in the oven for 15 minutes or until warmed through.
- Reheating: Fresh is always best! But leftover rolls can be reheated in the microwave for 30 seconds to soften the dough and glaze.
- Making Ahead: You can make these Lemon Rolls up to 48 hours in advance. After the second rise, put them in the fridge. The cold puts the yeast to sleep, preventing further rising. When you’re ready to bake, bring them back to room temperature for at least an hour before baking. These Lemon Rolls can also be frozen prior to baking. Follow the recipe up to step 10. Cover the dish well with plastic wrap and foil before placing in the freezer. Thaw for 24 hours in the fridge before baking and continue from step 11.
Notes
- It’s important the milk is only warmed to 110°F. Scalding hot milk can kill the yeast. The microwave can bring it to the perfect temperature in 30-45 seconds, but wattage varies. If you don’t have a thermometer you can perform a finger test: dip your finger in – if it feels comfortable, the milk is ideal. If you’re not sure, err on the side of cool rather than hot.
- Bread flour is a great choice here. Packed with protein, it creates a dream dough that is soft and fluffy. If you can’t find it, this recipe has been tested with all-purpose flour which works too.
- Patience is key for the first rise – roughly an hour, but temperature plays a role. Watch for the dough to double in size. Take a picture when you start – it’ll be your guide. A properly proofed dough will be dome-shaped and slowly spring back when poked gently.
- We made a light and runny glaze, but if you prefer it thicker, simply add more powdered sugar. Want it thinner? Add a touch more lemon juice or milk.
- The recipe calls for instant yeast but if you only have active dry yeast you can use that in this recipe as well. Simply combine warm milk, yeast and one tablespoon of sugar in the mixing bowl and whisk to combine. Let sit until foamy, 5 to 10 minutes, and then add the other ingredients and continue on with the recipe as written. (You will need to add the additional 2 tablespoons of sugar.)