
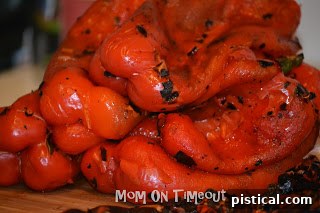
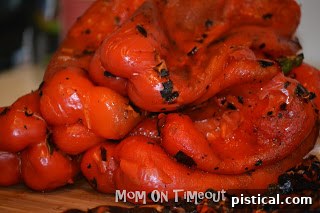
There’s a special kind of satisfaction that comes with enjoying fresh, seasonal produce, especially when you know you’re getting the best quality at the best price. Summer brings an abundance of vibrant fruits and vegetables, and among them, bell peppers shine brightly. Their sweet, crisp flavor is undeniable, and during peak season, they become incredibly affordable. This makes it the perfect time to not only savor them fresh but also to stock up, preserve their delightful taste, and enjoy them throughout the colder months.
Why Roast and Freeze Your Own Bell Peppers?
While jarred roasted red bell peppers are readily available in stores, nothing compares to the superior taste, texture, and peace of mind that comes from homemade. When you roast and freeze your own bell peppers, you gain complete control over the ingredients, ensuring they are free from unnecessary additives, preservatives, or excessive sodium. The flavor profile of freshly roasted peppers is intensely smoky and sweet, far surpassing the often watery or acidic taste of their store-bought counterparts. Furthermore, preserving seasonal produce at home is a fantastic way to save money and reduce food waste, making your kitchen more sustainable.
Imagine having a stash of beautifully roasted red bell peppers in your freezer, ready to transform everyday meals into culinary masterpieces. They’re incredibly versatile, adding a gourmet touch to countless dishes. From hearty winter soups and stews to elegant bruschetta, flavorful cornbreads, comforting casseroles, and, of course, the most irresistible roasted red pepper dip, the possibilities are endless. This guide will walk you through the simple, rewarding process of roasting and flash-freezing bell peppers, ensuring you capture that peak summer flavor for year-round enjoyment.
Choosing the Perfect Bell Peppers
The journey to perfectly roasted bell peppers begins with selecting the right produce. Look for bell peppers that are firm to the touch, with taut, glossy skins. Avoid any peppers that show signs of wrinkling, soft spots, or blemishes, as these indicate they are past their prime. While red bell peppers are most commonly used for roasting due to their intense sweetness and vibrant color when cooked, you can certainly use orange or yellow peppers for a milder, sweeter flavor. Green bell peppers, being less ripe, have a more bitter taste and firm texture, making them less ideal for this specific roasting and freezing method, though they can be delicious in other applications.
Since the goal is to stock up, consider buying bell peppers in larger quantities directly from farmers’ markets, local farms, or grocery stores when they are on sale. This not only supports local agriculture but also ensures you’re getting the freshest possible peppers at the most economical price.
Equipment You’ll Need
The beauty of roasting bell peppers at home is that it requires minimal specialized equipment. Here’s a quick checklist:
- Fresh Bell Peppers: Your star ingredient!
- Tongs: Essential for safely rotating peppers over a flame or on a grill.
- Glass Bowl: For steaming the roasted peppers.
- Plastic Wrap or Tight-Fitting Lid: To cover the bowl and trap steam.
- Sharp Knife and Cutting Board: For prepping the peppers after roasting.
- Baking Sheet: For flash freezing.
- Parchment Paper or Waxed Paper: To line the baking sheet and prevent sticking during flash freezing.
- Freezer-Safe Bags or Containers: For long-term storage.
- Permanent Marker: For labeling your freezer bags.
Step-by-Step Guide to Roasting Bell Peppers
While the original recipe focuses on flame roasting, it’s worth noting that bell peppers can be roasted using several methods, all yielding delicious results. Each method achieves the same goal: charring the skin to make it easy to peel and softening the flesh to release its natural sweetness.
Method 1: Roasting Over an Open Flame (Gas Stove or Grill)
This is often considered the most traditional and effective method for developing that signature smoky flavor. It’s also incredibly satisfying to watch the peppers transform!
- Prepare Your Workspace: Ensure your stovetop is clean, and you have enough ventilation. If using a grill, ensure it’s clean and ready.
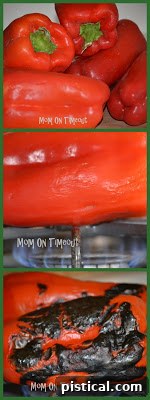
- Set the Heat: If using a gas stove, turn a burner to a low to medium flame. The key here is patience; a lower flame ensures the pepper cooks through evenly without burning the skin too quickly. A medium flame offers a good balance, but always start lower if you’re unsure.
- Position the Peppers: Carefully place a bell pepper directly onto the burner grate, lying on its side. If your grate allows, you can also balance it on its ends for even charring.
- Roast and Rotate: Allow the flame to slowly char the skin. You’ll see the skin begin to blister, blacken, and crinkle. This process takes time, typically 5-8 minutes per side, depending on the flame intensity and pepper size. Use tongs to rotate the pepper every few minutes, ensuring all sides are evenly charred. The goal is to blacken the skin completely, but not burn the flesh underneath.
- Monitor Closely: While you don’t need to “babysit” the peppers, do stay in the room. Bell peppers contain natural sugars and can occasionally flare up, especially if juices escape. A watchful eye ensures safety and prevents over-charring.
- Continue for All Peppers: Repeat the process with remaining peppers until all are deeply charred on all surfaces. Don’t worry if some parts look fully black; this is exactly what you want for easy peeling.
Method 2: Oven Roasting (Alternative for No Open Flame)
If you don’t have a gas stove or grill, the oven is an excellent alternative, producing similarly delicious results.
- Preheat Oven: Preheat your oven to a high temperature, around 400-450°F (200-230°C). Some recipes even suggest using the broiler for a faster char.
- Prepare Peppers: Wash and dry your bell peppers. You can roast them whole, or cut them in half and remove the stem and seeds first. Roasting them whole helps retain more moisture.
- Arrange on Baking Sheet: Place the peppers directly on a baking sheet. You can lightly toss them with a tiny amount of olive oil if desired, but it’s not strictly necessary.
- Roast: Place the baking sheet in the preheated oven. If using whole peppers, roast for 20-30 minutes, turning every 10 minutes, until the skin is blistered and charred. If using halves, roast skin-side up until the skin is blackened and bubbly, usually 15-20 minutes.
- Broil Option: For a quicker char, you can also finish them under the broiler for 5-10 minutes, keeping a very close watch as they can burn quickly.
Method 3: Grill Roasting (Outdoor Flavor)
For an authentic smoky flavor, roasting peppers on an outdoor grill is a fantastic option.
- Preheat Grill: Preheat your grill to medium-high heat.
- Prepare Peppers: Wash and dry the bell peppers. You can lightly brush them with olive oil to prevent sticking and enhance charring.
- Grill and Rotate: Place the peppers directly on the grill grates. Close the lid if desired to speed up cooking. Grill for 15-20 minutes, turning every 5 minutes, until the skin is completely blackened and blistered on all sides.
The Steaming Secret for Easy Peeling
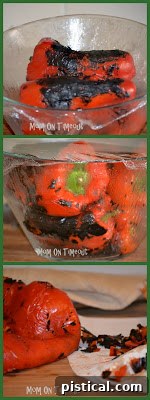
Once your peppers are beautifully charred, the next crucial step is steaming. This process is absolutely vital for making the skin easy to remove. As soon as a pepper comes off the flame or out of the oven, immediately transfer it to a glass bowl. Continue adding peppers to the same bowl as they finish roasting. Once all peppers are in the bowl, cover it tightly with plastic wrap or a snug-fitting lid. This traps the residual heat and creates steam.
You’ll observe condensation building up on the inside of the bowl as the hot peppers release steam. This trapped steam works wonders by loosening the charred skin from the tender flesh. Let the peppers steam for at least 15-20 minutes, or even longer until they are cool enough to handle comfortably. Resist the urge to peek or remove the cover too soon, as this will release the precious steam that does all the hard work for you. The longer they steam, the easier the peeling process will be.
Prepping Your Roasted Peppers: Peeling, Stemming & Seeding

Now comes the satisfying part: transforming those charred beauties into ready-to-use ingredients. Once the peppers have steamed sufficiently and are cool enough to touch, it’s time to peel, destem, and deseed them.
- Peeling the Skin: Gently grasp a pepper. You’ll find that the charred skin peels off remarkably easily with your fingers. If you encounter any stubborn bits, a paper towel can provide a bit more grip and help rub away the skin. Don’t worry if a tiny bit of char remains; it adds to the smoky flavor. However, aim to remove as much of the black, tough skin as possible.
- Removing Stems and Seeds: With the skin removed, hold the pepper upside down and firmly pull the stem. It should come out relatively easily, often bringing a good portion of the seeds along with it. Give the pepper a gentle shake to dislodge any remaining loose seeds.
- Cleaning the Interior: For a more thorough cleaning, carefully tear or cut the pepper open. Use your fingers or a small spoon to scrape away any lingering seeds and the white membranes from the interior. Some people are meticulous about removing every single seed, while others are content with getting the majority. It’s truly a matter of personal preference; a few stray seeds won’t harm the flavor or texture of your finished dishes.
As you process each pepper, you’ll be left with beautiful, tender, and intensely flavorful roasted red bell pepper flesh, ready for its next stage of preservation.
Cutting and Flash Freezing for Convenience
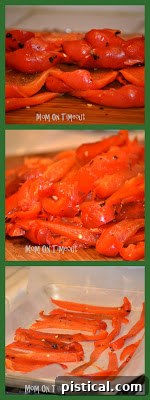
With all your peppers peeled, stemmed, and seeded, you’re almost at the finish line! The next step involves preparing them for efficient freezer storage, and this is where flash freezing truly shines. First, decide on the shape you want your peppers to be. For maximum versatility and ease of use, cutting them into strips is often ideal. These strips can be easily integrated into soups, salads, casseroles, or pureed into sauces. If you prefer diced peppers for specific recipes, or even larger chunks, feel free to cut them to your desired size. The flexibility is yours!
To flash freeze, line a large baking sheet with parchment paper or waxed paper. Parchment paper is generally preferred as it prevents sticking better, but waxed paper works well too. Arrange the cut pepper strips (or pieces) in a single layer on the prepared baking sheet. It’s crucial that the pieces do not touch each other. This separation is the key to successful flash freezing.
Place the baking sheet, with the individually spaced pepper pieces, into your freezer. Allow them to freeze solid, which typically takes about 2-4 hours, depending on your freezer’s temperature and the size of your pepper pieces. This process, known as flash freezing, offers numerous benefits:
- Preserves Freshness and Flavor: Rapid freezing helps to lock in the peak flavor and nutrients, minimizing ice crystal formation that can degrade texture.
- Prevents Clumping: By freezing each piece individually, you prevent the peppers from sticking together in one large, unmanageable block.
- Convenient Portioning: This means when you need some roasted red bell peppers for a recipe, you can easily grab just a handful or even a single strip without having to thaw the entire batch. Think of how you use frozen peas – you pour out what you need, and the rest stays frozen. The same principle applies here!
- Extends Shelf Life: Properly flash-frozen and stored, your roasted peppers will maintain their quality for months.
Long-Term Storage and Enjoyment
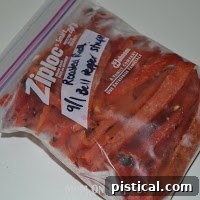
Once your pepper strips are completely frozen solid on the baking sheet, it’s time for the final storage step. Carefully transfer the frozen peppers into freezer-safe bags or airtight containers. If using bags, try to remove as much air as possible before sealing to prevent freezer burn. A straw can be used to suck out excess air, or you can simply press the air out as you seal.
Don’t forget to “bag ’em and tag ’em!” Label each bag or container with the contents (e.g., “Roasted Red Bell Peppers”) and the date it was frozen. This simple practice will help you keep track of your freezer inventory and ensure you use the oldest items first. Properly stored, homemade roasted red bell peppers can maintain their quality in the freezer for up to 6-8 months, sometimes even longer.
When you’re ready to use them, there’s no need to thaw the entire batch. Simply take out the amount you need and add them directly to your cooking, or let them thaw for a few minutes at room temperature for recipes where you want them softer or pureed. The convenience of having these flavorful peppers on hand throughout the year is truly a game-changer for home cooks.
Creative Ways to Use Your Homemade Roasted Red Peppers
Now that you have a freezer full of delicious homemade roasted red bell peppers, let your culinary imagination run wild! Here are just a few ideas to get you started:
- Dips and Spreads: The classic roasted red pepper dip (like the super creamy and flavorful recipe I’ll be sharing next week!) is a must-try. Blend them with chickpeas for a vibrant hummus, or with cream cheese and herbs for a savory spread.
- Soups and Sauces: Puree roasted peppers into creamy tomato soup, or use them as a base for pasta sauces, adding depth and sweetness. They’re fantastic in a hearty goulash or a rich vegetable broth.
- Sandwiches and Wraps: Layer strips of roasted pepper into sandwiches, paninis, or wraps for a burst of flavor and color. They pair wonderfully with feta cheese, chicken, or grilled vegetables.
- Salads: Toss thawed and chopped roasted peppers into green salads, pasta salads, or grain bowls for an instant upgrade.
- Eggs and Breakfast: Dice them and add to omelets, frittatas, or scrambled eggs. They also make a delicious addition to breakfast burritos.
- Pizza and Flatbreads: Scatter them over homemade pizzas or flatbreads before baking for a smoky, sweet topping.
- Casseroles and Bakes: Incorporate them into vegetable gratins, lasagna, or chicken and rice bakes to enhance the flavor profile.
- Bruschetta and Appetizers: Chop them finely and mix with garlic, olive oil, and basil for a simple yet elegant bruschetta topping.
- Cornbreads and Muffins: Fold chopped roasted peppers into savory cornbread batter or muffins for a unique twist.
Embracing the bounty of summer and taking the time to roast and freeze your own red bell peppers is a rewarding endeavor. It’s a simple act of food preservation that pays dividends in flavor, convenience, and cost savings throughout the year. Enjoy the vibrant taste of summer, no matter the season!
Linking up here.