

The holiday season twinkles with joy, laughter, and an abundance of delightful treats. Among the most charming and effortlessly festive desserts are these adorable Melting Snowman Oreo Balls. Imagine tiny snowmen, caught in a whimsical state of melting, gracing your dessert table – each one a bite-sized piece of magic! This no-bake recipe transforms simple Oreo cookies, rich cream cheese, and smooth white chocolate into an irresistible confection that’s perfect for any festive gathering, cookie exchange, or simply to bring a smile to faces young and old.
Crafted with ease and designed for maximum impact, these Oreo Balls are not just a treat for the taste buds; they’re a miniature work of art. Their cuteness factor is off the charts, making them an instant favorite at holiday parties and a wonderful addition to any festive dessert display. Get ready to impress your guests and spread some serious holiday cheer with these deliciously decadent and oh-so-charming snowmen!
Seeking more quick and easy holiday treats to round out your festive spread? Be sure to explore some of our other crowd-pleasing favorites that promise to add extra sparkle to your celebrations. Consider whipping up a batch of classic Christmas Crack for a salty-sweet crunch, the timeless elegance of Martha Washington Candy, or the rich, buttery texture of Buttermilk Pecan Pralines!

Crafting the Perfect Oreo Snowman Balls
The universal love for creamy, rich, and decadent Oreo Balls is undeniable, and these particular Melting Snowman Oreo Balls elevate that affection to a whole new level. They are not merely delicious; they are incredibly adorable, making them the ultimate centerpiece for any holiday party or festive celebration. Imagine the delight on everyone’s faces as they spot these charming, whimsical treats!
This recipe ingeniously combines crushed Oreo cookies with softened cream cheese to form a rich, pliable base. Each perfectly portioned ball is then generously coated in smooth white chocolate, setting the stage for transformation. The magic truly happens during decoration, where simple candies and sprinkles bring these delightful snowmen to life, appearing as if they’re gracefully melting into a sweet puddle of white. This creative presentation adds an element of playful charm that is simply unmatched.
This festive recipe quickly becomes a holiday favorite for several compelling reasons: it’s incredibly easy to make, eliminating the need for any complicated baking steps; the resulting treats are irresistibly cute, adding a touch of whimsy to any occasion; they are absolutely delicious, with a perfect balance of cookie and cream flavors; and they require just a handful of readily available ingredients. Guaranteed to be a smash hit at any holiday event, these delightful Snowman Oreo Balls are the perfect festive addition to your dessert repertoire, sure to be talked about long after the last bite.
Elevate your Oreo Balls with a gourmet touch! For an extra layer of flavor, consider adding a hint of peppermint or mint extract to the Oreo and cream cheese filling, or infuse the white chocolate coating with a similar essence for a cool, refreshing twist that perfectly complements the rich sweetness.

Why These Melting Snowman Oreo Balls Are Your Next Holiday Must-Make
This delightful recipe isn’t just a treat; it’s an experience, offering the perfect blend of holiday fun and incredible flavor. Here’s why these Oreo Snowman Balls will quickly become a cherished part of your festive traditions:
- Unmatched Fun and Festive Appeal: These treats are absolute showstoppers! Their charming melting snowman design brings an instant smile to everyone’s face, making them undeniably perfect for holiday parties, beautifully arranged cookie trays, or as the whimsical highlight of any dessert table. They embody the spirit of the season in the most delicious way.
- Irresistibly Delicious Flavor Profile: Prepare for a symphony of textures and tastes. Each bite delivers the satisfying crunch of crushed Oreo cookies blended with the silky smoothness of cream cheese, all enveloped in a rich, sweet, and decadent white chocolate coating. This harmonious combination creates a flavor that is both comforting and exquisitely indulgent, making them truly unforgettable.
- Effortlessly Easy to Make: One of the greatest advantages of this recipe is its simplicity. With straightforward instructions and a minimal list of ingredients, these no-bake Oreo balls are a joy to create. They’re an ideal project for bakers of all skill levels, from seasoned dessert makers to beginners, and even a fantastic, safe activity for children to help with during the bustling holiday season.
- No-Bake Convenience: During the busy holidays, oven space is often a premium. This recipe eliminates the need for baking, freeing up your oven for other festive dishes and simplifying your kitchen routine. It’s a stress-free way to create impressive desserts.
- Perfect for Gifting: Beyond being a delightful treat for your own home, these Melting Snowman Oreo Balls make wonderful homemade gifts. Pack them in decorative boxes or clear cellophane bags tied with festive ribbons for a personal touch that friends, family, and neighbors will adore.
- Versatile Customization: While adorable as is, this recipe offers endless possibilities for customization. Experiment with different Oreo flavors, various chocolate coatings, or unique decorations to tailor them to your taste and creative vision.
Step-by-Step Guide: How To Make Melting Snowman Oreo Balls
Creating these enchanting Snowman Oreo Balls is surprisingly quick and straightforward, making them a fantastic addition to your holiday repertoire. These cream cheese-infused Oreo balls are not only a breeze to assemble but are even more delightful to eat, guaranteed to enhance your festive celebrations. The recipe is also incredibly scalable, easily doubled or tripled to accommodate larger gatherings without extra fuss. Here’s an in-depth look at how to bring these charming snowmen to life. Remember, you can always find the full, printable recipe card with precise measurements and details at the conclusion of this post.
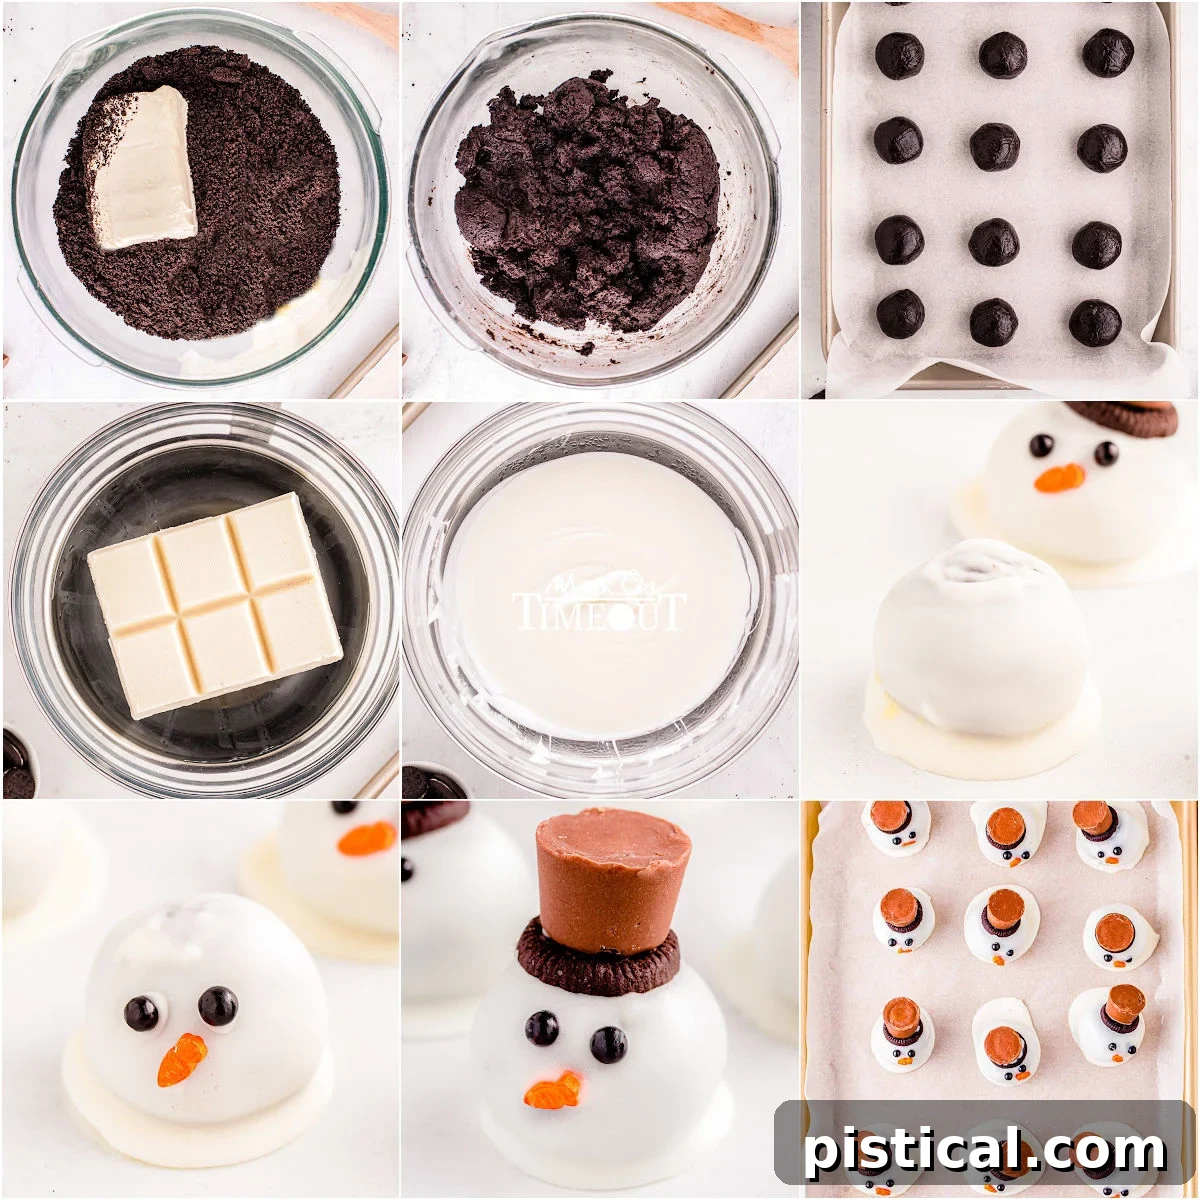
- Prepare Your Workspace: Begin by lining two large baking sheets with parchment paper. This crucial step prevents sticking and makes for easy cleanup after the Oreo balls have chilled and set. Set them aside, ready for action.
- Crush the Oreos: Take your entire package of regular Oreo cookies – yes, including the creamy filling! Place them into a food processor or a high-powered blender. Pulse until the cookies are finely crushed, resembling moist crumbs. Consistency is key here for a smooth, cohesive dough.
- Combine with Cream Cheese: Add the softened cream cheese and any optional extracts (like vanilla or peppermint for an extra kick) directly into the food processor with the Oreo crumbs. Pulse again until the mixture is thoroughly combined and forms a thick, uniform dough. Alternatively, if you don’t have a food processor, transfer the crushed Oreos to a large mixing bowl and use a sturdy spatula or your hands to thoroughly incorporate the cream cheese until no streaks remain.
- Scoop and Roll: Using a cookie scoop (approximately 1½ tablespoons in size is ideal for 1-inch balls), portion out the Oreo mixture. Roll each portion gently between your palms to form smooth, round balls. Arrange these balls in a single layer on the prepared parchment-lined baking sheets. A cookie scoop ensures uniform sizing, which is great for even chilling and dipping.
- Chill the Balls: Cover the baking sheets loosely with plastic wrap and transfer them to the refrigerator. Allow the Oreo balls to chill for at least 1 hour, or for a quicker set, place them in the freezer for 30 minutes. It’s essential that the balls are firm before you proceed to the dipping stage; this helps them hold their shape and prevents the chocolate from becoming too thick or messy.
- Melt the White Chocolate: In a double boiler or a microwave-safe bowl, combine the good quality white chocolate (or melting wafers/almond bark) and coconut oil (if using chocolate chips/bars; omit oil if using wafers/bark, following package directions). If using a double boiler, stir constantly over simmering water until smooth and creamy. If microwaving, heat at 50% power in 30-second intervals, stirring vigorously after each interval, until the chocolate is completely smooth and free of lumps. Be vigilant to avoid overheating or burning the chocolate, as it can seize.
- Dip and Coat: Once the chocolate is perfectly melted and the Oreo balls are firm, it’s time to dip! Using a specialized dipping tool or a fork, carefully submerge one Oreo ball into the melted white chocolate, ensuring it’s fully coated. Gently lift the ball out, allowing any significant excess chocolate to drip off, but do not tap it excessively. The slight excess chocolate around the base helps create that charming “melting” effect. Return the dipped ball to the parchment-lined baking sheet.
- Decorate Quickly: This step requires speed, as white chocolate sets rapidly. Immediately after dipping each ball, begin decorating to create your melting snowmen. Use assorted sprinkles for the eyes and nose. Small black pearl sprinkles or edible sugar eyes work wonderfully for the eyes, and tiny orange sprinkles or even carefully cut slivers of orange candy can form the carrot nose.
- Add the Hat: For the snowman’s hat, carefully place half of a mini Oreo on top of the dipped ball, pressing gently to secure it while the chocolate is still wet. Then, take a Rolo candy, dip one end lightly into the melted white chocolate, and place it on top of the mini Oreo, creating a cute top hat.
- Final Chill and Store: Once all the Oreo balls are dipped and decorated, return the baking sheets to the refrigerator for another hour. This final chill allows the white chocolate coating to set completely, ensuring your snowmen are firm and ready to be enjoyed. Once fully set, transfer the Oreo balls to an airtight container. For optimal storage and to prevent any decorations from smudging, arrange them in a single layer or separate layers with sheets of parchment paper. Keep refrigerated until serving.
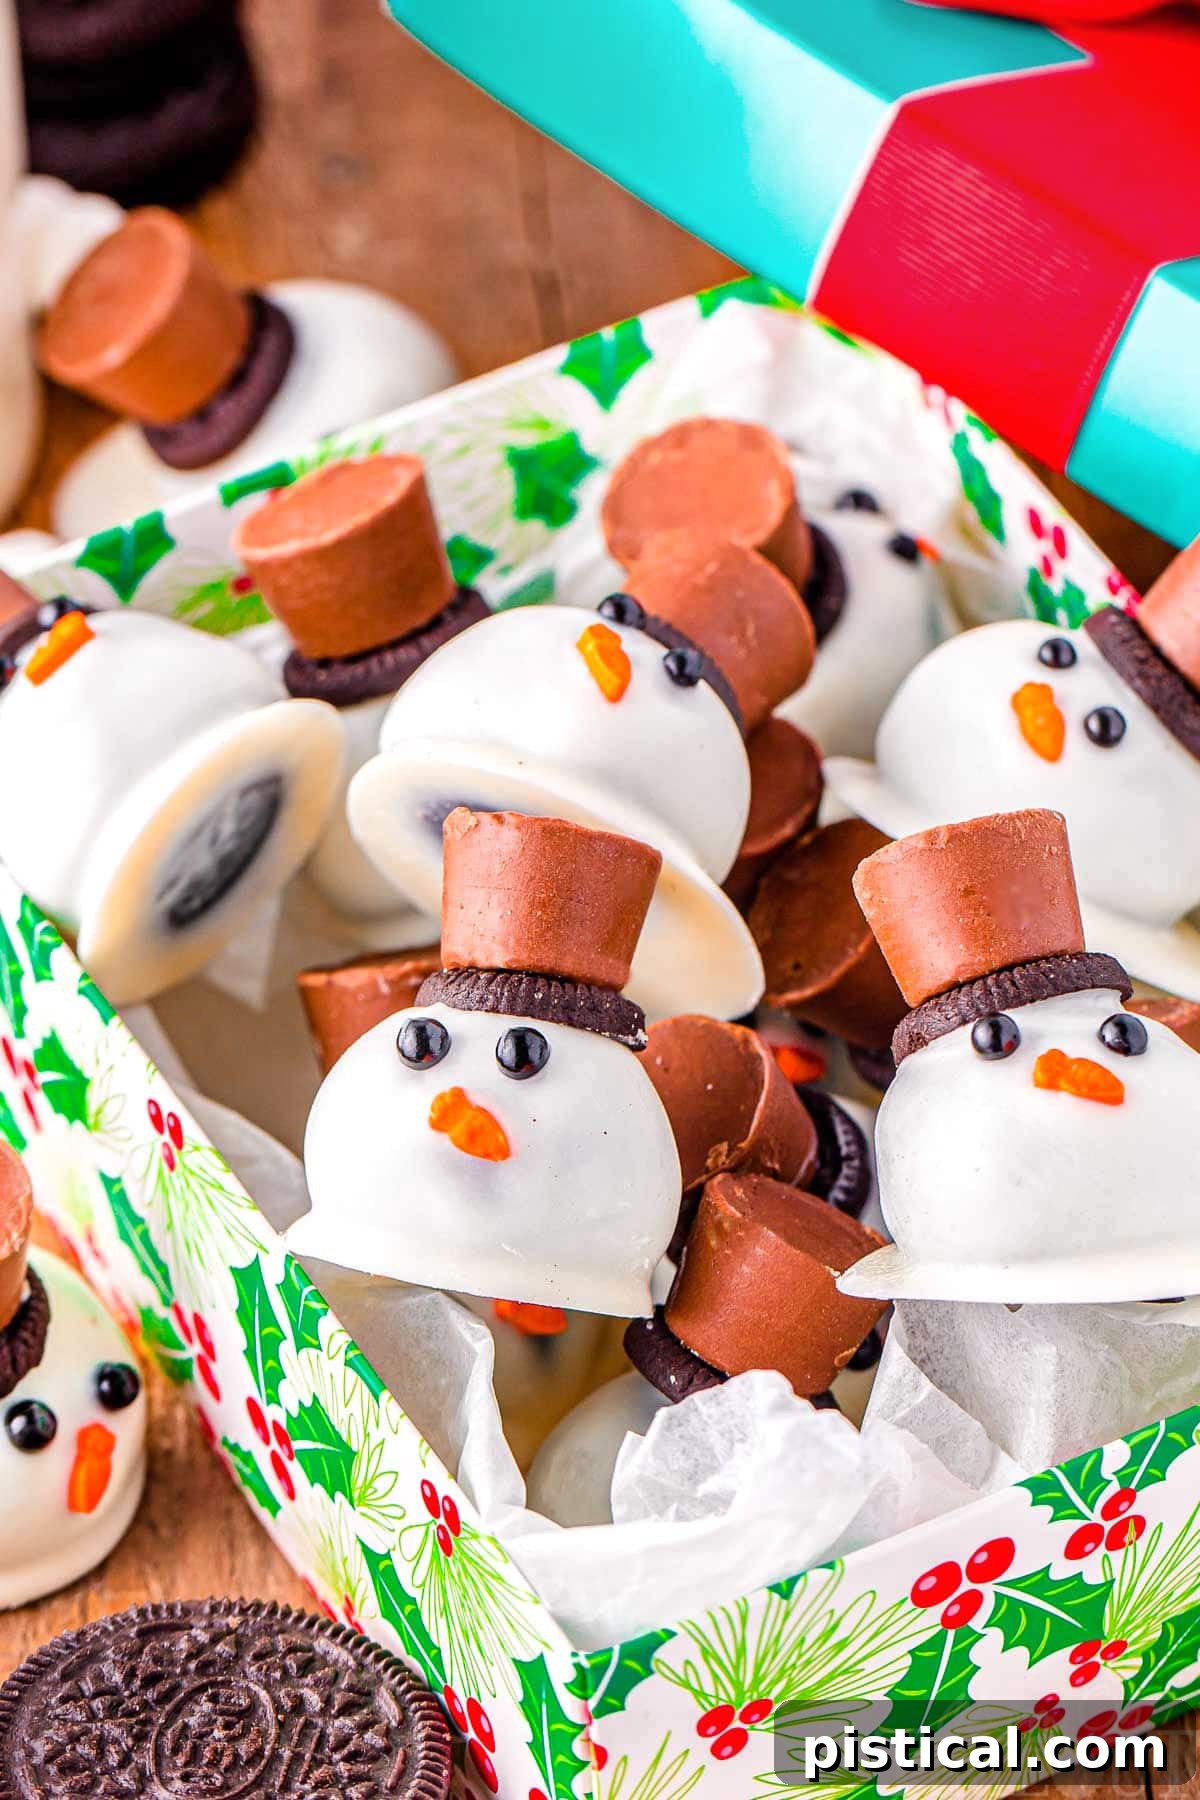
Thoughtful Gifting: Planning to share these adorable treats? Package your Melting Snowman Oreo Balls in festive boxes, tins, or clear cellophane bags tied with a charming holiday ribbon. They make delightful homemade gifts that are sure to spread cheer!
Storage and Make-Ahead Tips
Proper storage is key to keeping your Melting Snowman Oreo Balls fresh, delicious, and looking their best, especially if you plan to make them in advance for holiday parties.
Refrigeration: Always store your finished Oreo Balls in an airtight container in the refrigerator. To prevent them from sticking together or any decorations from smudging, arrange them in a single layer. If you need to stack them, place a piece of parchment paper or wax paper between each layer. When stored correctly, these delightful Oreo cookie balls can be refrigerated for up to 2 weeks, making them an excellent make-ahead dessert for the busy holiday season.
Freezing: While the Oreo balls themselves can be frozen (before dipping in chocolate and decorating) for longer storage, I do not recommend freezing the decorated Melting Snowman Oreo Balls. The delicate colors from the sprinkles and other decorations tend to bleed or run when frozen and then thawed, diminishing their charming appearance. If you wish to freeze them, freeze the plain Oreo balls after the initial chill, then thaw them in the refrigerator before dipping and decorating. This way, you can enjoy perfectly fresh-looking snowmen whenever you’re ready.
Creative Variations to Enhance Your Snowman Oreo Balls
While the classic Melting Snowman Oreo Balls are undeniably charming, this recipe offers a fantastic canvas for creative experimentation. Feel free to personalize them to your taste or event theme with these delightful variations:
- Explore Diverse Oreo Flavors: The world of Oreos has expanded far beyond the classic! Today, you can find a plethora of yummy flavors, from Golden Oreos to Mint, Peanut Butter, Red Velvet, and even seasonal varieties. Each different Oreo flavor will instantly change the profile of your Oreo Balls, offering a new taste experience with minimal effort. For the best results in terms of texture and consistency, stick to Oreo varieties that have the standard or classic amount of stuffing, as Double Stuf or Thins might alter the cream cheese ratio slightly.
- Experiment with Chocolate Coatings: Don’t limit yourself to white chocolate! These balls are equally delicious when coated with rich dark chocolate or creamy milk chocolate. You could even do a mix, creating a “chocolate snowman” or a “tan snowman” effect, or drizzle different chocolates over the white base for added visual appeal and flavor complexity.
- Infuse with Extracts: Beyond vanilla, a dash of extract can significantly elevate the flavor. Peppermint or mint extract offers a refreshing cool sensation, perfect for winter holidays. Almond extract adds a sophisticated, nutty note, while orange extract can bring a bright, citrusy zing. A little goes a long way, so start with a small amount (¼ to ½ teaspoon) and adjust to your preference.
- Get Creative with Decorations: This is where the true fun begins! The snowman’s “hat” is incredibly versatile. Instead of mini Oreos and Rolos, consider mini Reese’s peanut butter cups, chocolate kisses, gummy rings, or even small chocolate chips for buttons. Use edible food markers to draw scarves or cheerful smiles. Edible glitter or sanding sugar can add a sparkly, snowy effect. Tiny pretzel sticks can become arms, while mini chocolate chips can serve as buttons down the snowman’s “belly.” Let your imagination run wild and turn each snowman into a unique character!
- Add Food Coloring: For a vibrant display, divide your melted white chocolate and tint portions with food-safe gel coloring. Create blue snowmen, pink snowmen, or even green ones to match a specific holiday theme.

Expert Tips for Perfect Melting Snowman Oreo Balls
Achieving perfectly adorable and delicious Melting Snowman Oreo Balls is easy with a few expert tips. Follow these suggestions from Trish, the recipe’s creator, to ensure your treats turn out beautifully every time:
- Ensure Thorough Chilling: This is arguably the most crucial step! Always allow your Oreo balls to firm up completely in the refrigerator (for at least an hour) or freezer (for 30 minutes) before you attempt to dip them in chocolate. If the balls are too soft, they can fall apart in the warm chocolate or make the coating uneven and difficult to manage. A firm ball ensures a smooth dipping process and helps maintain its shape.
- Embrace the “Melting” Effect: When dipping, resist the urge to vigorously tap off every last drop of excess chocolate. The slight pooling of chocolate around the base of the dipped ball is precisely what gives these snowmen their characteristic and charming “melting” appearance. This intentional drip creates the whimsical, imperfect look that makes them so unique and fun.
- Prepare Decorations in Advance: White chocolate sets quickly, so speed is essential during the decorating phase. Have all your assorted sprinkles, mini Oreos (halved), and Rolo candies laid out and ready to go on your workspace *before* you start dipping. This way, you can decorate each ball immediately after dipping, ensuring the candies adhere properly before the chocolate hardens.
- Precision with Tweezers: For the smallest details, such as placing tiny sprinkles for eyes or a delicate carrot nose, kitchen tweezers can be an incredibly useful tool. They allow for precise placement, ensuring your snowman’s face is perfectly symmetrical and expressive.
- Achieve Uniformity with a Cookie Scoop: To ensure that all of your Oreo balls are the same size, invest in a small cookie scoop (a 1 to 1.5 tablespoon size is ideal). This not only saves time but also guarantees that your snowmen are consistently proportioned, which looks lovely on a dessert platter.
- Melt Chocolate Carefully: When melting your white chocolate, whether using a double boiler or a microwave, always do so slowly and over low heat (or at 50% power in the microwave). White chocolate is particularly prone to seizing or burning if overheated, which will make it lumpy and unusable for dipping. Stir frequently and patiently for a smooth, pourable consistency.
Frequently Asked Questions About Melting Snowman Oreo Balls
Here are answers to some common questions you might have when making these festive treats:
Do I need to use a food processor for this recipe?
While a food processor or blender is certainly the most efficient and best tool for crushing the Oreo cookies into consistently fine crumbs, it’s not absolutely essential. If you don’t have one, you can easily achieve the same result the old-fashioned way: place the entire package of Oreo cookies into a large, sturdy resealable plastic bag. Then, use a rolling pin or the bottom of a heavy glass to crush them until they are uniformly fine crumbs. Just be sure to get them as fine as possible for the best texture in your Oreo balls.
Can these Oreo balls be made ahead of time?
Absolutely! These Melting Snowman Oreo Balls are an ideal make-ahead holiday treat, perfect for easing your festive prep. For the best results in terms of freshness and appearance, you can prepare the Oreo balls (before dipping and decorating) up to 1 week in advance. Store the plain, un-dipped balls in an airtight container in the refrigerator. When you’re ready to serve, simply take them out, dip them in melted chocolate, decorate, and allow them to set. This flexibility makes them perfect for busy hosts.
What should I use for the snowman’s nose and eyes?
The beauty of these snowmen lies in their customizable decorations! For the eyes, any small, round black candy or black sprinkles will work perfectly. Think tiny chocolate chips (mini or even micro chips), black nonpareils, or round black sugar pearls. For the nose, you’ll want something orange to mimic a carrot. Small orange sprinkles are excellent, or you could even use finely chopped orange-colored candy or a tiny sliver of dried apricot. If you’re looking for a coordinated set, you can sometimes find specialized snowman cookie ball decoration kits that include pre-shaped eyes and noses, making the process even simpler!
More Easy Holiday Treats You’ll Love
If you’ve enjoyed making these delightful Melting Snowman Oreo Balls, you’re in for a treat! The holiday season is all about sharing joy, and what better way to do that than with an array of easy-to-make, festive desserts. Explore some of our other cherished holiday recipes that are sure to bring smiles and sweetness to your table:
- Homemade Gumdrops: A classic candy that’s surprisingly simple to make and endlessly fun to customize with different flavors and colors.
- Cream Cheese Mints: Elegant, refreshing, and melt-in-your-mouth delicious, these mints are a perfect light treat.
- Buckeyes: The iconic peanut butter and chocolate candy that’s a staple on any holiday dessert platter.
- Pretzel Reindeer: A cute and creative snack that combines salty pretzels with sweet chocolate, perfect for kids.
- Martha Washington Candy: A rich, coconut, and pecan candy dipped in chocolate – a timeless favorite.
- Peppermint Mocha Fudge: Indulgent, rich, and bursting with holiday flavors, this fudge is a must-try.

Print
Pin
Melting Snowman Oreo Balls
Ingredients
- 36 Oreo cookies regular, crushed into fine crumbs
- 8 ounces cream cheese softened
- ½ teaspoon vanilla extract or peppermint extract, optional
- 12 ounces white chocolate (good quality) or melting wafers or almond bark
- ½ teaspoon coconut oil or canola oil
- 24 Rolo candies
- 12 mini Oreos
- assorted sprinkles
Instructions
-
Line two large sheet pans with parchment paper. Set aside.
-
Place the Oreos in a food processor or blender and pulse into fine crumbs. (Use the entire cookie.)
-
Add the softened cream cheese and extract (if using) and pulse until combined OR transfer Oreo crumbs to a large bowl and mix with the cream cheese until fully combined.
-
Scoop out about 1½ tablespoons of the mixture and roll into 1-inch balls. Place on the prepared sheet pan. Repeat with the rest of the mixture.
-
Cover and refrigerate the Oreo balls for at least 1 hour or freeze for 30 minutes. The balls should be firm before dipping.
-
Use a double boiler or microwave to melt the white chocolate and oil together until smooth and creamy. If microwaving, heat at 50% power in 30 second increments, stirring in between until smooth. Be careful not to burn the chocolate. (If using melting wafers or vanilla almond bark, refer to the package for melting instructions. You won’t need the oil.)
-
Dip an Oreo ball into the melted chocolate using a dipping tool or fork, and return to the sheet pan.
-
Working quickly, use assorted sprinkles to create the eyes and nose for the snowman. Use orange sprinkles or small carrots for the nose and any black sprinkles for the eyes.
-
Place half of a mini Oreo on top of the ball. Dip the Rolo in the melted chocolate and place on top of the mini Oreo.
-
Place Oreo balls in the refrigerator to chill for another hour to set up completely. Once fully set up, store Oreo balls in an airtight container in the refrigerator in a single layer or. layered with parchment paper.
Notes
Keep the Oreo Balls in an airtight container in the refrigerator in a single layer. If you need to layer, place a piece of parchment or was paper in between the layers. The Oreo cookie Balls can be refrigerated for up to 2 weeks which makes them great for making in advance.
I don’t recommend freezing the decorated Oreo Balls because the color from the sprinkles can bleed if frozen and then thawed.