
Master the Art of Pom Pom Making: Your Ultimate Finger Method Guide
Ever wondered how to create those charming, fluffy pom poms that add a touch of whimsy to any craft project?
Forget complicated gadgets or tedious cardboard cutouts. I’ve perfected a simple, intuitive technique known as the “finger method” that makes pom pom crafting accessible to everyone. Years ago, I stumbled upon a much more intricate way involving cutting out two circles and making fiddly slits – it was unnecessarily cumbersome and time-consuming. This guide will introduce you to a revolutionary approach that requires just three basic items: your own fingers, a skein of yarn, and a pair of scissors. It’s truly as easy as pie!
Pom poms are incredibly versatile, capable of being made in a wide array of sizes to suit any project. In this comprehensive tutorial, we’ll explore how to create three popular sizes using one, two, or three fingers. And just to pique your interest, I even have an exciting upcoming craft project later this week that calls for an impressive four-finger pom pom – imagine the possibilities!
Let’s embark on this creative journey together, step by step. Take your time, enjoy the process, and remember that mastery doesn’t happen overnight. You’ll likely need to practice this technique two or three times before you truly become a POM POM MASTER! So, embrace patience, my aspiring crafter. The reward of a perfectly formed pom pom is well worth the effort.
The Basic Finger Method: Crafting Your First Pom Pom
Crafting a beautiful pom pom begins with a few simple, yet crucial, steps. Pay close attention to these foundational techniques, as they are key to creating a durable and attractive finished product.
-
Prepare Your Yarn and Begin Wrapping:
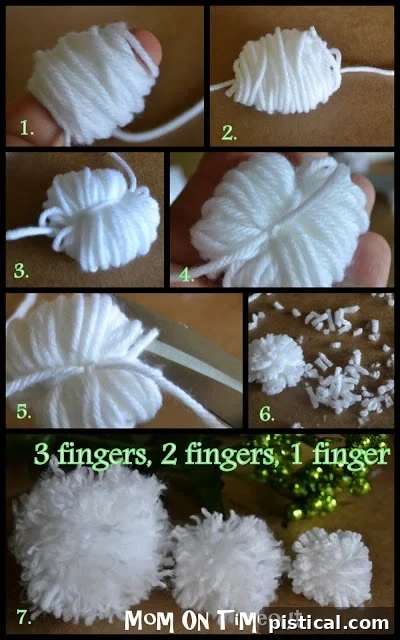
Start by cutting a separate length of yarn, approximately 12 inches long. This piece will be used to tie your pom pom together, so set it aside on a flat surface where it’s easily accessible. Now, select the number of fingers you wish to use – one, two, or three – to determine your pom pom’s size. Begin wrapping your main yarn around your chosen finger(s). It is absolutely essential to wrap loosely enough so that you can easily slide the yarn bundle off your fingers once you’re done, without restricting circulation.
The number of wraps determines the fullness of your pom pom:- For a one-finger pom pom, aim for approximately 75-100 wraps.
- For a two-finger pom pom, target 100-125 wraps.
- For a three-finger pom pom, consider 125-150 wraps.
These counts are approximate, as finger sizes and yarn thicknesses vary. If your first attempt isn’t as full as you’d like (and don’t forget to count your wraps!), simply add an extra 10-20 wraps next time. Experimentation is part of the fun!
-
Carefully Position the Yarn Bundle:
Once you’ve completed your wrapping, gently slide the entire bundle of yarn off your finger(s). Handle it with care to keep its shape. Lay this neatly wrapped bundle directly on top of the 12-inch piece of yarn you set aside earlier, ensuring it’s perfectly centered both horizontally and vertically. This precise positioning will help ensure your pom pom is balanced and sturdy. -
Secure the Bundle with a Tight Knot:
Now, take the two ends of the pre-cut yarn piece and tie it around the center of your wrapped bundle. THIS IS THE MOST IMPORTANT STEP! The success of your pom pom hinges on the tightness of this knot. If the knot isn’t incredibly secure, your pom pom WILL unravel and fall apart. A loose knot is the most common reason for a failed pom pom, so pull it as tight as you possibly can. -
Reinforce with a Second Knot:
To ensure maximum security and durability, carefully turn your yarn bundle over. Bring the two ends of the tying yarn (which should now be on the opposite side) up and tie another knot, once again pulling it as TIGHTLY as possible. This double-knotting technique provides exceptional stability. If you’re feeling extra cautious, or working with particularly slippery yarn, you can even repeat this step for a triple knot. -
Cut All the Loops:
With your bundle securely tied, it’s time to release the loops. Using your sharp scissors, carefully slide one blade up and under the loops on one side of the bundle and cut through them all. Work your way around the entire pom pom, ensuring that every single loop is cut. Don’t leave any loops uncut, as this will result in an uneven and sparse pom pom. -
Shape Your Perfect Sphere:
After all the loops are cut, your pom pom will look a bit unruly and shaggy. This is normal! Now comes the fun part: shaping. Gently rotate your pom pom in your hands and, using your scissors, begin to trim away any pieces of yarn that extend beyond your desired spherical shape. Work slowly, turning the pom pom constantly, much like you would trim a hedge, until you achieve a beautifully round and dense ball. Don’t be afraid to trim generously – you can always make it smaller, but never bigger. -
Unleash Your Pom Pom Creativity!:
Congratulations! You’ve successfully crafted your first pom pom. Now, the possibilities are endless! Can’t quite think of what to do with your adorable new creation? Stay tuned – I’ve got at least three exciting pom pom craft projects coming up that are guaranteed to be tons of fun and inspire your next DIY adventure.
Elevate Your Pom Poms: The Secret to Achieving Irresistible Fluffiness!
You’ve mastered the basic pom pom, but what if you desire that extra cloud-like, supremely fluffy texture? Take a look at the image above (referencing the original image 7 if present, or the general idea of fluffiness). Notice the striking difference between a standard pom pom and a truly plush one, particularly the three-finger pom pom. That enviable fluffiness isn’t just luck – it’s a technique! Here’s how you can achieve it.
-
Initial Preparation:
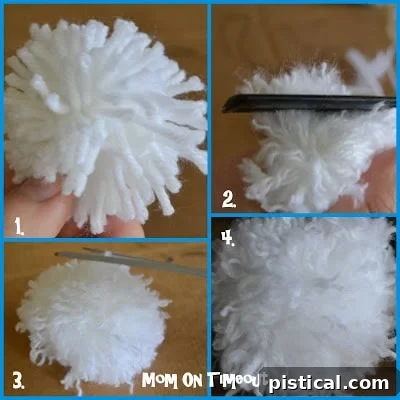
Complete steps 1 through 5 of the basic pom pom making guide. At this stage, do not bother trimming your pom pom into a perfect sphere. Your goal is simply to have all the loops cut. We’ll refine the shape later, as you’ll be messing it up during the fluffing process anyway! -
The Art of Combing:
Now for the secret ingredient to fluffiness! Take a comb, a pet brush, or any tool with fine teeth or bristles. The finer the teeth, the more effectively you can separate the yarn fibers. IMPORTANT: Hold the pom pom super tightly by its core (where you tied the knots) while combing. This firm grip is crucial to prevent individual strands of yarn from pulling out. Despite careful handling, it’s normal to lose a few pieces of yarn during this process – usually two or more. Don’t worry, it’s no biggie and won’t significantly impact the final look of your full pom pom. -
Comb Until Desired Fluffiness:
Continue combing through the yarn, working your way around the entire pom pom. The more you comb and gently separate the individual fibers of the yarn, the fluffier and “poofier” (yes, it might not be a dictionary word, but it perfectly describes the effect!) your pom pom will become. This action breaks up the natural twist of the yarn, allowing it to bloom and expand, creating that wonderful, soft texture. Keep going until you achieve your desired level of cloud-like softness and volume. -
Final Trim and Shaping:
Once you are satisfied with the fluffiness, it’s time for the final trim. Just like in the basic method, gently work your way around the pom pom with your scissors, carefully snipping away any uneven strands or stray fibers. Continue trimming and rotating until your fluffy pom pom looks perfectly neat and spherical.
Now that you’re well on your way to becoming a pom pom master, here are some additional insights, creative twists, and practical advice to enhance your crafting experience and expand your pom pom repertoire.
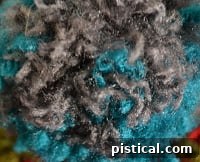
- Size Adjustment: Remember this golden rule: you can always make your pom pom smaller by trimming it down, but you can never make it bigger once the yarn is cut and tied. So, if in doubt, start with more wraps or use more fingers to create a larger initial size, giving yourself ample room for shaping.
-
Experiment with Multiple Colors: Unleash your inner artist by incorporating multiple yarn colors! Try wrapping half with one vibrant color and the other half with a contrasting shade for a striking two-toned effect. Or, if you’re feeling adventurous, go wild and experiment with three or even more colors for a truly unique, multi-hued pom pom.

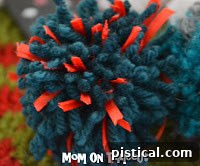
- Add Texture and Shine with Ribbon: Elevate your pom poms by introducing different textures. Halfway through your yarn wrapping process, incorporate some decorative ribbon. Wrap the ribbon around your fingers as many times as you desire, then continue wrapping with yarn. When you cut the loops, you’ll discover a surprisingly cool and elegant pom pom with contrasting textures and a lovely sheen.
- A Fun Feline Friend Toy: I have a strong feeling that a small, fluffy pom pom would make an absolutely fantastic cat toy! The soft texture and playful movement are sure to capt captivate your feline companions for hours of entertainment. Just ensure it’s made safely without small, detachable parts.
- Combing Yarn Effectively: When combing the yarn to achieve maximum fluffiness, think of it like combing tangled hair. Hold the yarn firmly at the base of the strand (close to the tied center) as you comb outwards. This technique minimizes shedding and prevents individual strands from pulling out, ensuring your pom pom remains dense and full.
- Versatile Craft Additions: Pom poms are not just for hats and scarves! They are a wonderfully versatile addition to a myriad of craft projects. Think decorative garlands, playful keychains, unique gift toppers, festive ornaments, adorable nursery decor, embellishments for bags or clothing, and even creative jewelry components.
- Unlock Your Unique Style: Once you’ve truly mastered the basic finger method technique, you’ll gain the confidence and understanding to intuitively see how you can modify and adapt it. This mastery will empower you to create even more unique, personalized, and imaginative pom poms that perfectly reflect your individual style and creative vision. The journey from novice to pom pom artisan is an exciting one!
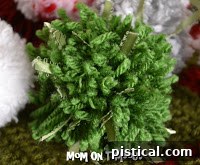
We hope this comprehensive guide has demystified the art of pom pom making for you. With just your fingers, some yarn, and a pair of scissors, you can create an endless array of these delightful fluffy spheres. Remember, practice makes perfect, and the joy of creating something beautiful with your own hands is truly priceless. Happy crafting!