
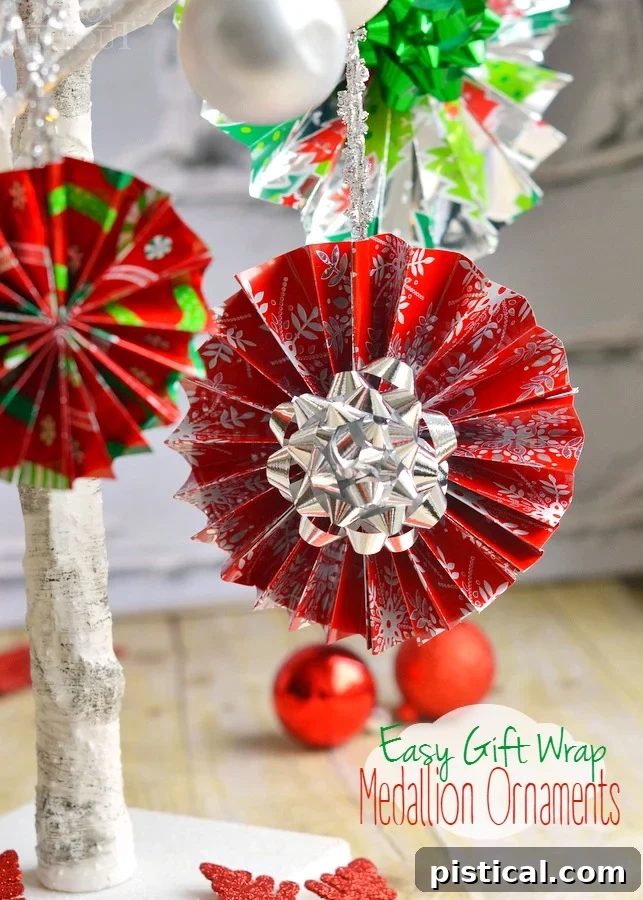
Decorate your tree with style this year! These easy Gift Wrap Medallion Ornaments are so easy to make and add a festive flair to your tree and Christmas gifts! A fun craft for kids of all ages!
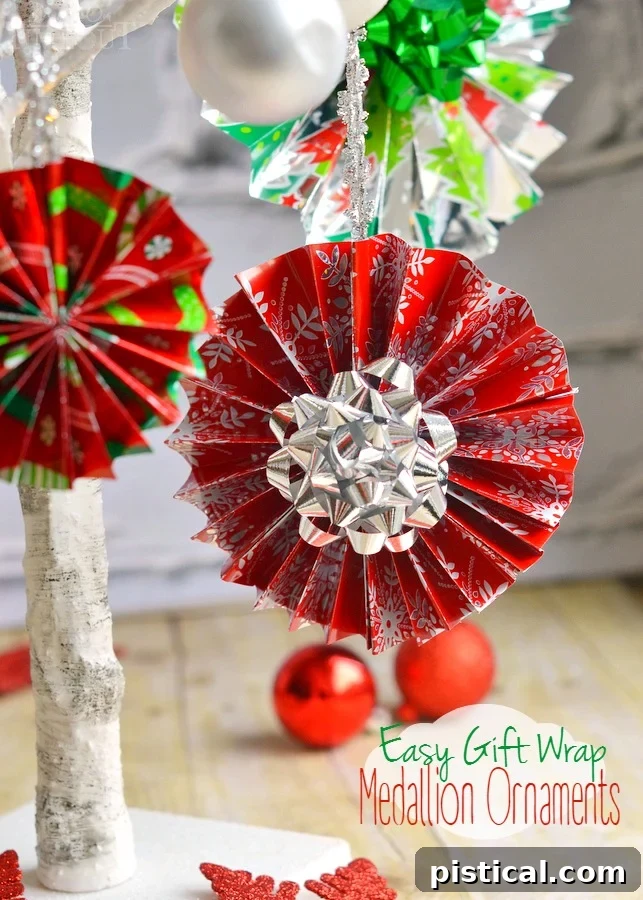
Craft Charming Gift Wrap Medallion Ornaments: Your Ultimate DIY Holiday Guide
The crisp autumn air is gradually giving way to the undeniable magic of the holiday season. If you’re anything like me, Christmas music might already be your soundtrack, setting a joyous tone that makes you want to deck the halls! While my household, like many, has a strict “no decorating before Thanksgiving” rule, that certainly doesn’t mean we can’t get a head start on the festive preparations. This year, let’s channel that eager holiday spirit into creating something truly special: **Easy Gift Wrap Medallion Ornaments!**
These delightful DIY decorations are an absolute joy to make and are perfect for infusing your home with personalized, handmade charm. Imagine transforming humble wrapping paper scraps into elegant medallions that adorn your Christmas tree, or add a thoughtful, festive touch as unique gift toppers. This craft is incredibly simple, making it accessible and fun for crafters of all ages – even the youngest members of the family can join in! So, gather your supplies, put on your favorite holiday tunes, and let’s embark on a creative journey to make some amazing holiday memories together.
Why These DIY Christmas Ornaments Are a Holiday Must-Make
Crafting during the holidays is more than just making decorations; it’s about creating traditions, sharing moments, and infusing your home with love. These Gift Wrap Medallion Ornaments offer a multitude of benefits that make them an ideal holiday project:
- Eco-Friendly & Budget-Conscious: This project is a brilliant way to give new life to leftover wrapping paper. Instead of tossing those beautiful scraps, transform them into stunning ornaments. It’s a wonderful way to recycle, reduce waste, and save money on store-bought decorations.
- Unbelievably Simple & Quick: Don’t let their intricate appearance fool you! These medallions come together in a remarkably short amount of time. They’re perfect for a spontaneous afternoon craft session or for batch-making a whole collection for a themed tree.
- Highly Customizable Design: The creative possibilities are endless! Choose from a vast array of wrapping paper designs – from whimsical characters and playful patterns to sophisticated metallics and elegant traditional motifs. You can tailor your medallions to perfectly match any existing holiday decor theme or create an entirely new look.
- A Fantastic Family Activity: The straightforward folding technique makes this an excellent craft for involving children of all ages. It’s a wonderful opportunity for family bonding, developing fine motor skills, and sparking creativity. Imagine the pride in seeing their handmade creations hanging on the tree!
- Versatile Holiday Decor: While they shine as beautiful Christmas tree ornaments, their utility extends far beyond the tree. These medallions also make stunning gift toppers, adding an extra layer of thoughtfulness and handmade charm to your holiday presents. They can even be incorporated into garlands or used as festive wall decor.
Gather Your Supplies: Materials for Your Festive Medallion Ornaments
One of the many joys of this craft is how few materials you need, and chances are, you already have most of these items around your home or can easily find them.
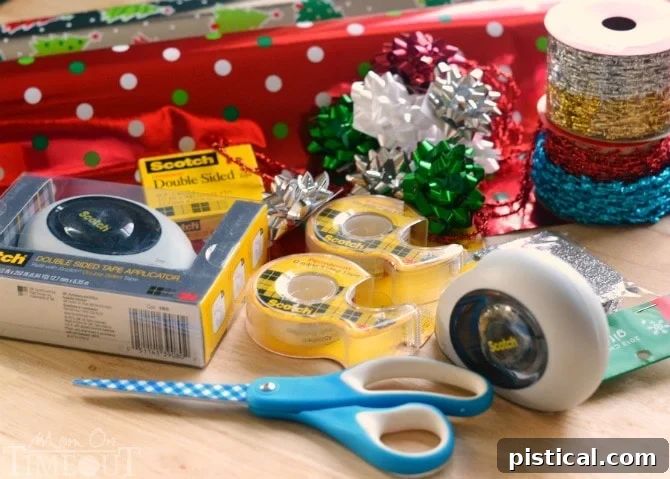
- Holiday-Patterned Gift Wrap: This is your star material! Look for paper that has grid lines on the back, as these will be incredibly helpful for achieving neat and consistent folds. The pattern is entirely up to you – choose festive, whimsical, elegant, or anything that inspires your holiday spirit!
- Sharp Scissors: Essential for clean, precise cuts that will make your medallions look professionally made.
- Ribbon or Twine: You’ll need this to create the hanging loops for your finished ornaments. Choose a color or material that complements your chosen wrapping paper.
- Mini Bows or Other Embellishments: These small additions will be the focal point of your medallion’s center. Think beyond mini bows – consider small glitter stickers, tiny buttons, self-adhesive rhinestones, or even a personalized initial cut from contrasting paper!
- Scotch® Double-Sided Tape: Key for a clean, seamless finish. It allows you to join paper sections without visible glue, giving your ornaments a polished look.
- Scotch® Double-Sided Tape Applicator with Refills: This handy tool makes applying double-sided tape incredibly fast, precise, and mess-free. It’s a game-changer for this type of paper craft, ensuring strong adhesion with minimal effort.
Step-by-Step Instructions: Crafting Your Own Gift Wrap Medallions
Now for the exciting part – bringing your materials to life! Follow these detailed, easy-to-understand instructions to craft your stunning gift wrap medallions. Remember to take your time and enjoy the creative process!
Step 1: Prepare Your Wrapping Paper Rectangles
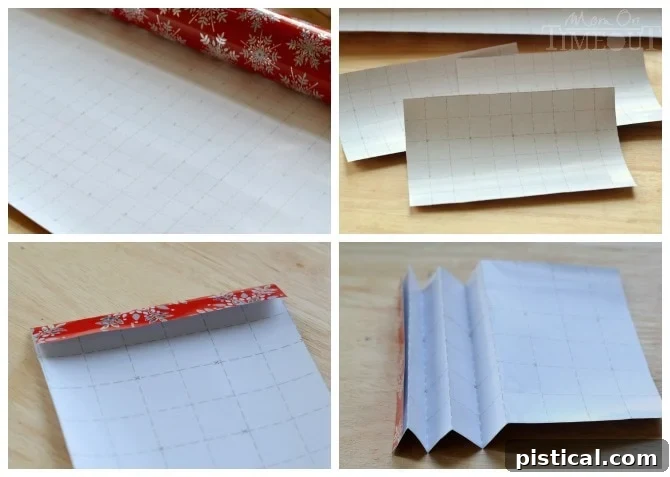
Start by unrolling your festive gift wrap. For each complete medallion, you will need to cut out three identical rectangles of wrapping paper. The size of these rectangles will directly influence the final diameter of your ornament:
- Width Considerations: For consistent, beautiful folds, aim for an even number of grid squares across the width of your rectangle. Eight or ten squares work best, as ten squares will allow you to create five crisp accordion folds.
- Height & Medallion Diameter: The height of your rectangle will determine the overall diameter of your finished medallion. If you desire larger, more prominent ornaments for a grand tree, cut taller rectangles. For smaller, more delicate medallions perfect for a tabletop tree or as embellishments, opt for shorter rectangles.
Pro Tip: If this is your first time, begin with a medium-sized rectangle to familiarize yourself with the folding and assembly process. Once you’ve completed one, you’ll easily be able to adjust dimensions for future medallions to achieve your desired effect.
Step 2: Master the Accordion Fold
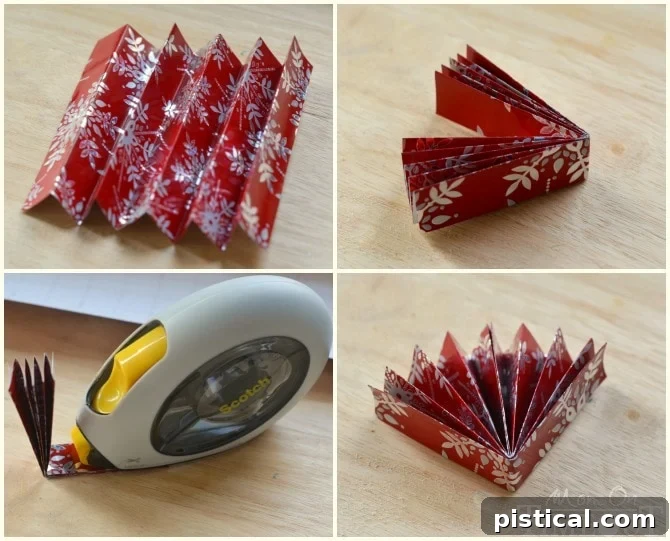
This step is where the magic of the medallion’s texture begins. Flip your cut rectangle over so the helpful grid lines are facing upwards. These lines are invaluable for creating neat, uniform folds that are essential for a beautiful final product!
- Initiate the First Fold: Starting from one of the short sides of your rectangle, carefully fold the paper over to the very first grid line. Press down firmly along the crease to ensure it’s sharp and defined.
- Flip and Reverse Fold: Now, flip the entire paper strip over. Using the next grid line as your guide, fold the paper back in the opposite direction. This creates the signature “accordion” effect, where the folds alternate back and forth.
- Consistent Folding: Continue this flip-and-fold process across the entire length of your paper rectangle. Always use the grid lines to ensure each section is of equal width. The more consistent your folds, the more symmetrical and pleasing your finished medallion will be.
- Form the Fan: Once the entire rectangle is neatly folded into a compact accordion, gently fold this accordion strip in half. This action will cause the folds to splay out, forming a charming fan-like shape.
Crafting Tip: Precision in folding is key. Take your time with each crease to ensure a beautiful, symmetrical outcome. If your folds are a little off, don’t worry! Handmade items have character.
Step 3: Secure Your Fan Sections
To transform your soft paper fan into a sturdy semi-circular section for the medallion, you’ll need to secure its inner flaps. This is where your Scotch® Double-Sided Tape Applicator truly simplifies the process!
- Apply Tape to Flap: Lay one of your folded paper fans flat. Position the double-sided tape applicator flat on the inside flap of the fan. Smoothly move the applicator across the flap to apply a continuous strip of tape along its inner edge.
- Cut and Seal: Once you reach the end of the paper flap, stop moving the applicator and pull the yellow button up and back. This will cleanly cut the tape.
- Adhere Firmly: Carefully bring the taped flap over and press it firmly against the opposite side of the fan, ensuring strong adhesion. This action will secure the inner folds, creating a robust semi-circular shape. This completed segment forms one-third of your final medallion.
You need three of these secured fan sections for each medallion. Repeat Steps 1, 2, and 3 for the remaining two rectangles of wrapping paper you cut earlier. Ensure all three sections are as identical as possible for a harmonious final product.
Step 4: Assemble Your Medallion into a Full Circle
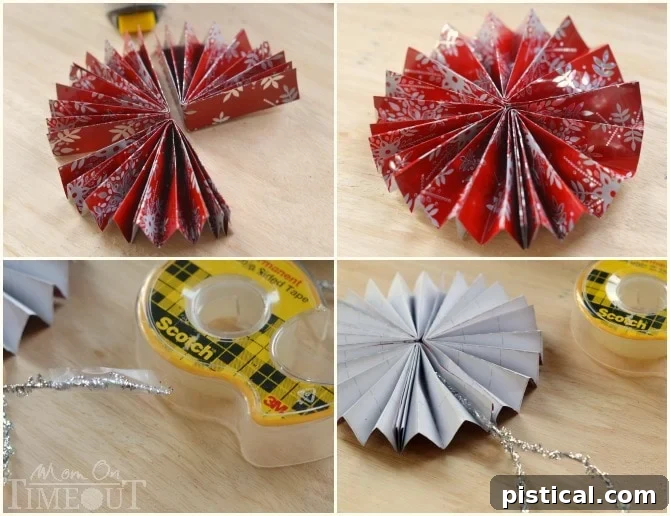
With your three sturdy paper fans now ready, it’s time to unite them into a beautiful, complete medallion!
- First Connection: Take your double-sided tape applicator and apply a fresh strip of tape along the straight outer edge of one fan. Carefully align a second fan and press its straight outer edge firmly onto the taped edge of the first fan, ensuring a clean and tight connection.
- Complete the Circle: Repeat this process with the third fan. Apply tape to its straight outer edge and connect it to the second fan. Finally, connect the remaining open edge of the third fan to the first fan, effectively closing the circle. Press all three joined fans together firmly around their entire circumference to ensure strong adhesion and to form a perfect, full-circle medallion.
Assembly Hint: Work on a flat surface and apply even pressure when joining the fans to prevent gaps and ensure a robust medallion structure.
Step 5: Add a Convenient Hanging Loop
To transform your beautiful medallion into a versatile ornament or gift topper, it needs a practical hanging loop.
- Prepare Your Ribbon: Cut a piece of ribbon or twine to your desired length for the loop. A length of about 6-8 inches usually works well, allowing for a comfortable hanging length.
- Tape the Ends: Take a small piece of double-sided tape and wrap it around each end of the ribbon. This will create sticky ends that securely adhere inside the medallion folds.
- Insert and Secure: Gently open one of the medallion’s folds, just enough to insert one of the taped ribbon ends. Press it firmly against the inside of the fold to secure. Repeat this with the other taped end of the ribbon, inserting it into a different fold, ideally on the opposite side, to create a balanced loop for hanging.
Step 6: Embellish the Center for a Finishing Touch
The final step is to adorn the center of your medallion, adding that perfect touch of sparkle and completeness.
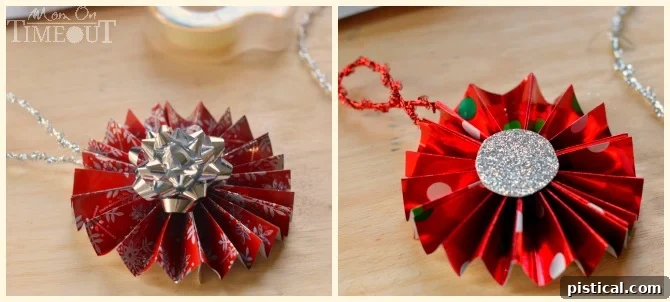
Using your double-sided tape applicator, apply a small piece of tape to the back of your chosen embellishment. Carefully press it firmly onto the very center of your medallion. While mini bows are a classic and charming choice, feel free to unleash your creativity! Consider these ideas:
- Small glitter-infused stickers or foam shapes (think stars, snowflakes, or tiny bells).
- A contrasting piece of wrapping paper cut into a neat circle, star, or festive shape.
- A decorative button, a cluster of tiny beads, or miniature faux berries for a rustic touch.
- For a truly personalized ornament, print small, cherished photos of family or pets and adhere them to the center!
Beyond the Tree: Creative Ways to Use Your Gift Wrap Medallions
Once you’ve successfully crafted your first few medallions, you’ll find yourself wanting to make a whole collection! These versatile ornaments are perfect for adding handmade elegance throughout your holiday decor:
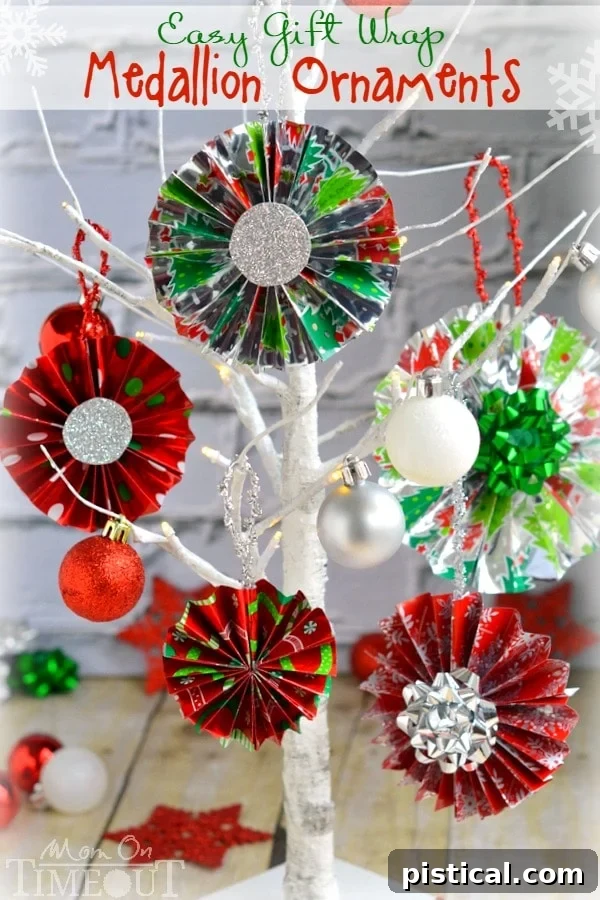
- Traditional Christmas Tree Decor: Hang them proudly on your Christmas tree, mixing various sizes, patterns, and colors for a dynamic and visually appealing display.
- Unique Gift Toppers: Ditch the conventional bows this year! Adorn your beautifully wrapped presents with these handmade medallions for a thoughtful, personalized, and memorable presentation.
- Charming Holiday Garland: String multiple medallions together using festive ribbon or twine to create a stunning, custom garland. Drape it across your mantel, along a staircase banister, or frame a doorway for an inviting touch.
- Festive Wall Art: Arrange a cluster of varying-sized medallions on a blank wall or above a console table to create a unique and artistic festive backdrop.
- Window Wonderland: Hang them in your windows to catch the natural light, adding a cheerful glow visible from both inside and outside your home.
- Party Favors or Place Settings: Craft smaller versions of the medallions and attach them to goodie bags for holiday parties, or use them as elegant embellishments on your holiday table place settings.
Repeat these simple steps to create as many beautiful and unique medallions as your heart desires! Each one will add a special touch of handmade charm and holiday spirit to your celebrations.
More Christmas Craft Inspiration!
Ready for more exciting and easy DIY projects to keep that holiday spirit thriving? Explore these other fantastic festive ideas!
Festive Stocking Silverware Holder
Holiday Gift Garland
Wood Snowman Ornaments
Candy Cane Mice
Connect With Me!
I hope this guide inspires you to create your own beautiful Gift Wrap Medallion Ornaments! There’s something truly special about decorating your home with handmade pieces that tell a story. I’d absolutely love to see your unique creations. Please share your festive ornaments on social media and tag me so I can admire your craftiness!

For more inspiring craft ideas, delicious recipes, and family-friendly fun, connect with me across my social channels:
You can also find me linking up at some of these amazing parties for even more creative inspiration and community.
Disclosure: I have been selected to be a brand ambassador for Scotch Brands. I have been compensated for my time for creating this content. All opinions expressed are 100% my own and reflect my genuine experience with the products!